Store
‘Artistic’ is a collection of cinematic and stylized post-processing effects to enhance visual storytelling in games and interactive experiences. Contains the following assets:
- One Bit, a hipster, original and versatile look using a dithering with blue noise.
- Oil Paint, transform your games into pieces of art.
- Tilt Shift, used to simulate a miniature scene.
- Photo, recreates the authentic look & feel of professional cameras.
- Shockwave, stunning shockwave effects with customizable distortion.
- Color Isolation, isolates areas by color and applies effects.
- Sharpen, enhances image details.
- Tonemapper, maps HDR into LDR using different algorithms.
- Comic, simulates the printing technique used in comics and newspapers.
- Neon, synth-wave effect.
- Spark, adds bloom and ray-of-light effects.
- Radial Blur, the need for the speed.
Requirements
All ‘Artistic’ effects are developed for ‘Universal Render Pipeline’ (or URP), which means they will not work with Built-In, or HDRP.
Unity 6 or Higher
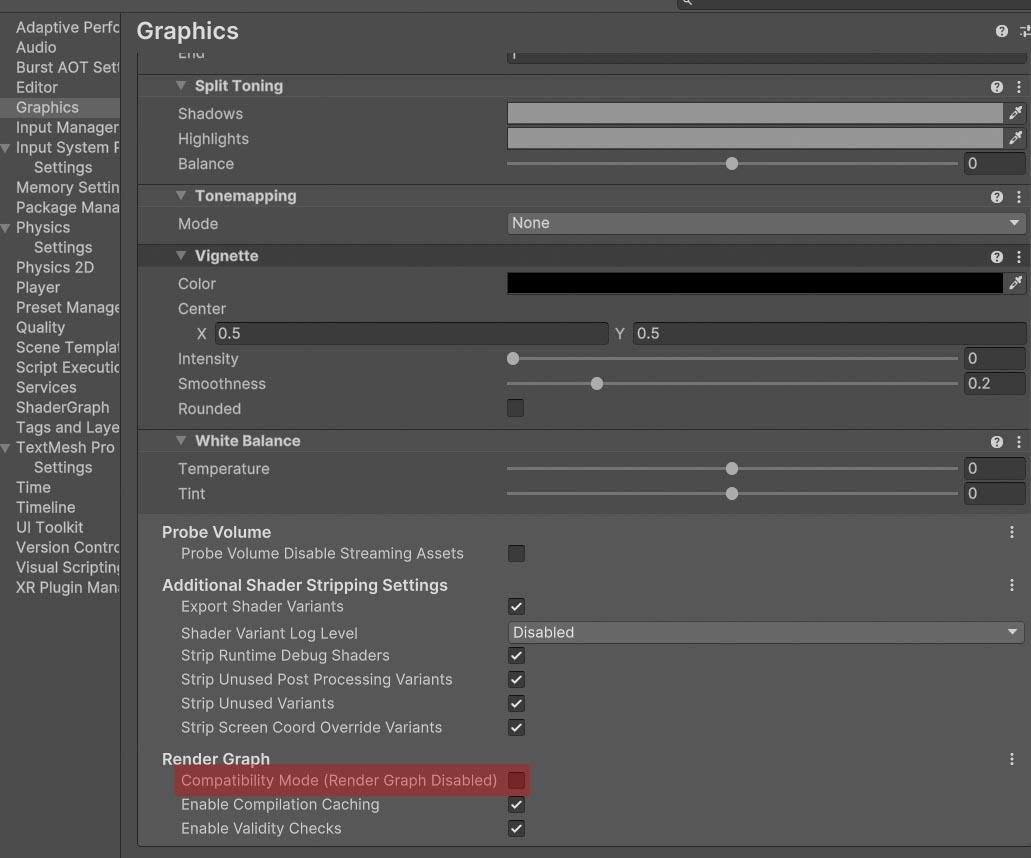
All effects are compatible with Unity 6, and use the new Render Graph. You will need to have URP version 17.0.2 or higher installed. In the official documentation you can find the steps to install it correctly.
Make sure that the ‘Compatibility Mode’ is disabled (Project Settings > Graphics > Render Graph).
Installation
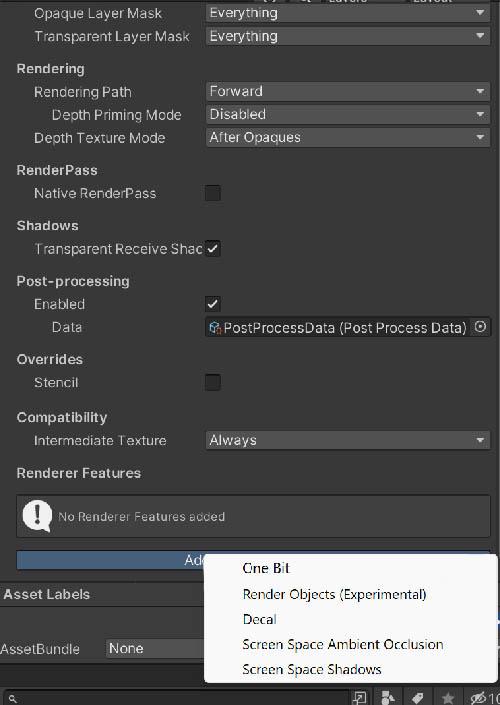
Step 1: Add Renderer Feature
The effects must be registered in your project’s URP configuration:
- Locate your Universal Renderer Data asset.
- Click Add Renderer Feature and select the desired effect from Fronkon Games > Artistic.
Once installed, you have to add the effect you want to use from ‘Artistic’ as a ‘Render Feature’. This official tutorial tells how to do it.
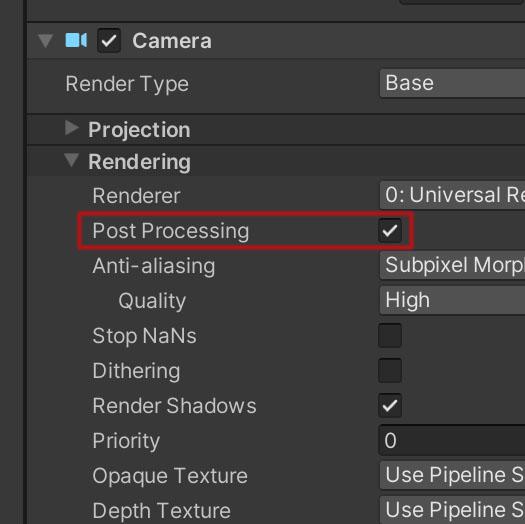
Remember that the camera you are using must have the ‘Post Processing’ option enabled.
‘Quality’ levels (Project Settings > Quality) can have their own active ‘Render Pipeline Asset’.
If so, whatever you assign in ‘Scriptable Render Pipeline Settings’ in ‘Graphics’ will be ignored.
Remember to add the effect to the quality levels you want to use.
Step 2: Configure The Volume
To apply the effects to your scene:
- Create a Volume component (Global or Local) or select one that has already been created.
- In the Volume component, create or assign a Volume Profile.
- Click Add Override and select the desired effect from Fronkon Games > Artistic.
- Enable the ‘Intensity’ parameter (and any others you wish to modify).
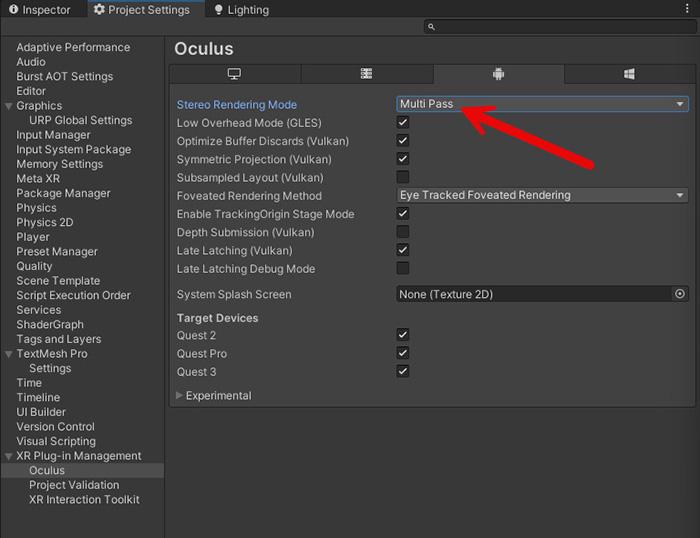
VR
To increase compatibility with VR devices, I recommend that you select ‘Stereo Rendering Mode’ in ‘Multi Pass’ mode:
🟦 One Bit
One Bit produces a distinctive monochromatic dithering effect using a blue noise algorithm, similar to that used in the award-winning ‘Return of the Obra Dinn’. The effect converts the image into a high-contrast pattern where pixel brightness is represented through noise-based dithering rather than continuous tones, creating a stylized 1-bit aesthetic with configurable color modes and edge enhancement.
Requisites
To ensure optimal performance and compatibility, your project must meet the following requirements:
- Unity: 6000.0.58f2 or higher.
- Universal RP: 17.0.3 or higher.
Installation Guide
Step 1: Add Renderer Feature
The effect must be registered in your project’s URP configuration:
- Locate your Universal Renderer Data asset.
- Click Add Renderer Feature and select Fronkon Games > Artistic > One Bit.
Step 2: Configure the Volume
To apply the effect to your scene:
- Create a Volume component (Global or Local).
- In the Volume component, create or assign a Volume Profile.
- Click Add Override and select Fronkon Games > Artistic > One Bit.
- Enable the ‘Intensity’ parameter (and any others you wish to modify).
Parameter Configuration
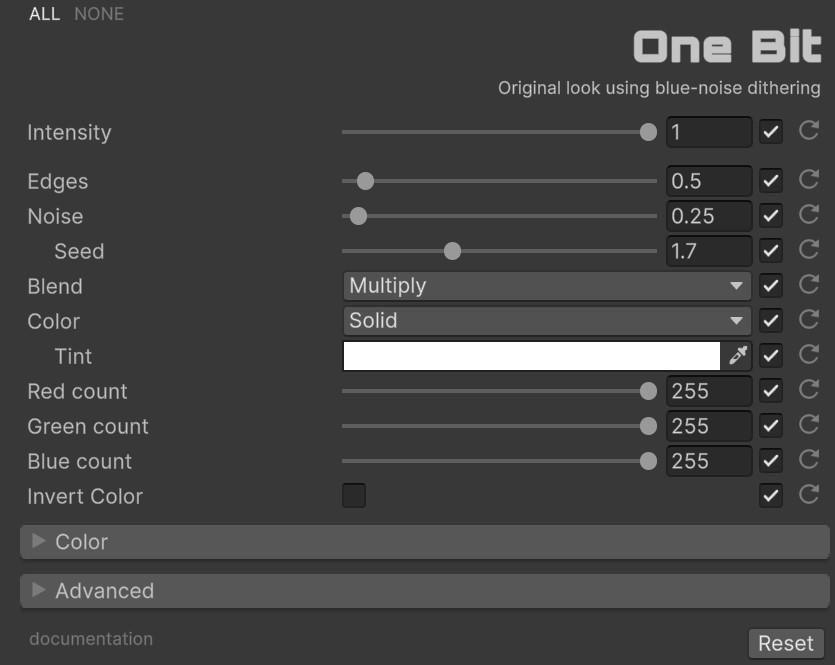
With ‘Intensity’ you can control the overall strength of the effect [0.0 - 1.0]. If it is 0, the effect will not be active.
Dithering Parameters
Dithering is a technique that simulates intermediate tones by distributing pixels in patterns, allowing the representation of gradients and shading using only a limited set of colors. In this effect, blue noise dithering is used, a high-quality noise distribution that produces visually pleasant, artifact-free patterns without the banding or repetitive structures common in other dithering methods.
| Parameter | Range | Default | Effect |
|---|---|---|---|
| Edges | 0.0 to 10.0 | 0.5 | Edge detection strength. Higher values produce more pronounced contour lines |
| Noise Strength | 0.0 to 10.0 | 0.25 | Amount of blue noise dithering applied to the image |
| Noise Seed | 0.0 to 5.0 | 1.7 | Random seed for the noise pattern. Different values produce different dithering patterns |
| Blend Mode | Enum (23 modes) | Multiply | Color blend operation used to mix the effect with the original image |
| Invert Color | Boolean | false | Inverts the final color output |
Color Modes
The Color Mode parameter selects how the dithered image is colorized. Each mode offers different creative possibilities.
| Mode | Description | Key Parameters |
|---|---|---|
| Solid | Applies a single tint color to the entire image | Color |
| Horizontal | Two-color horizontal gradient | Color 0, Color 1, Horizontal Offset |
| Vertical | Two-color vertical gradient | Color 0, Color 1, Vertical Offset |
| Circular | Two-color radial gradient from center | Color 0, Color 1, Circular Radius |
| Gradient | Maps pixel luminance to a full color gradient ramp | Gradient, Luminance Min/Max |
The Gradient mode uses the brightness of the original pixel to replace it in a color gradient. The leftmost colors of the gradient are used for darker areas and the rightmost for brighter areas.
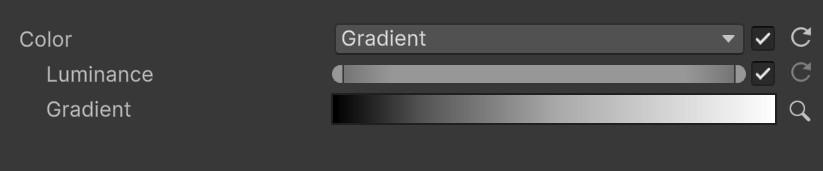
You can modify the brightness range used with Luminance. Click on ‘🔍’ icon to open the Palette Tool.
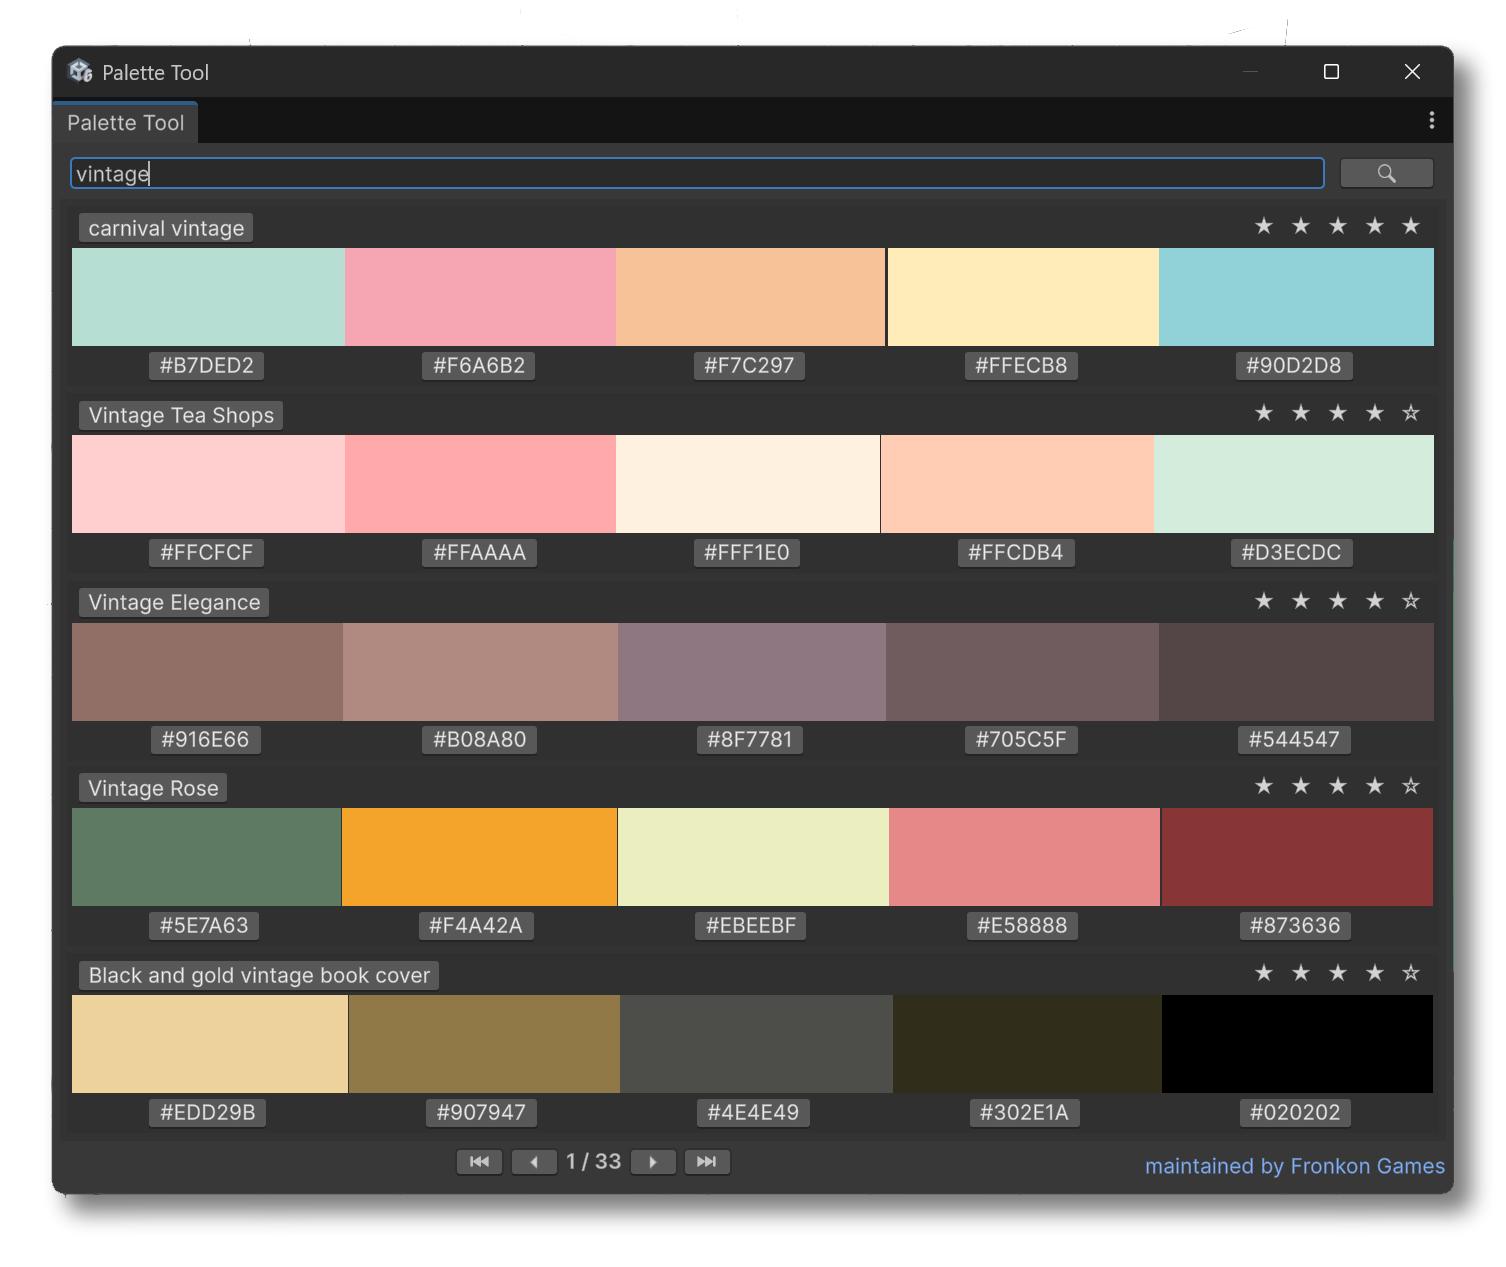
Simply enter the color you want to search for and Palette Tool will search over 6000 color palettes from color-hex. Once you find the one that best fits your needs, click on the button with the name to apply it to the gradient.
Channel Color Levels
| Parameter | Range | Default | Effect |
|---|---|---|---|
| Red Count | 0 to 255 | 255 | Number of red channel color levels. Low values create a retro posterization effect |
| Green Count | 0 to 255 | 255 | Number of green channel color levels |
| Blue Count | 0 to 255 | 255 | Number of blue channel color levels |
Color Grading
Standard color correction parameters apply to the final output.
| Parameter | Range | Effect | Default |
|---|---|---|---|
| Brightness | -1.0 to 1.0 | Additive luminance offset | 0.0 |
| Contrast | 0.0 to 10.0 | Mid-tone contrast expansion | 1.0 |
| Gamma | 0.1 to 10.0 | Nonlinear tonal mapping (inverted) | 1.0 |
| Hue | 0.0 to 1.0 | Color wheel rotation | 0.0 |
| Saturation | 0.0 to 2.0 | Color intensity relative to luminance | 1.0 |
Runtime Control
The effect integrates with Unity’s Volume system for seamless runtime parameter modification. Access the OneBitVolume component through the Volume Profile.
using UnityEngine;
using UnityEngine.Rendering;
using FronkonGames.Artistic.OneBit;

// ...

[SerializedField]
private VolumeProfile volumeProfile;

// ...

// Access the effect
if (volumeProfile.TryGet(out OneBitVolume volume))
{
    // Enable/disable effect
    volume.intensity.value = 1.0f; // 0.0 = disabled

    // Configure dithering
    volume.edges.value = 0.8f;
    volume.noiseStrength.value = 0.3f;
    volume.noiseSeed.value = 2.0f;
    volume.blendMode.value = ColorBlends.Multiply;

    // Set color mode
    volume.colorMode.value = ColorModes.Gradient;
    volume.luminanceMin.value = 0.1f;
    volume.luminanceMax.value = 0.9f;

    // Reduce channel levels for retro look
    volume.redCount.value = 8;
    volume.greenCount.value = 8;
    volume.blueCount.value = 8;

    // Apply color correction
    volume.contrast.value = 1.2f;
    volume.saturation.value = 0.8f;
}
For a more detailed example, check the code in the demo scene.
Preset Configurations
| Preset | Key Settings | Look |
|---|---|---|
| Default | Default values | Clean 1-bit dithering with subtle edges |
| Ink Sketch | Edges = 1.0, Noise = 0.0, Blend = Darken, RGB Count = 16 | Bold ink outlines with no noise dithering |
| Newspaper | Edges = 0.0, Noise = 4.0, Blend = Solid, Color = Gray (0.4), Saturation = 0.0, Brightness = -0.8, Contrast = 1.2 | Desaturated halftone newspaper print |
| Warm Gradient | Edges = 0.5, Noise = 10.0, Blend = Overlay, Color Mode = Gradient, Luminance Max = 0.4, Saturation = 0.7 | Warm-toned gradient dithering with soft edges |
| Retro Color | RGB Count = 12, Saturation = 2.0 | Posterized retro look with vivid colors |
| Charcoal | Edges = 2.5, Noise = 0.0, Blend = Darken, Gamma = 0.5, Saturation = 0.0 | Monochrome charcoal drawing with heavy edges |
| Autumn Ramp | Edges = 0.25, Noise = 10.0, Blend = Multiply, Color Mode = Gradient, Luminance Max = 0.5, Contrast = 1.2 | Autumn-toned gradient with fine noise texture |
🎨 Oil Paint
Oil Paint transforms your games into pieces of art by applying image-smoothing algorithms that preserve edges while abstracting details, producing the characteristic look of oil paintings. The effect offers six distinct algorithms, each with different quality-performance trade-offs, from the classic Kuwahara filter to advanced anisotropic variants.
Requisites
To ensure optimal performance and compatibility, your project must meet the following requirements:
- Unity: 6000.0.58f2 or higher.
- Universal RP: 17.0.3 or higher.
Instalation Guide
Step 1: Add Renderer Feature
The effect must be registered in your project’s URP configuration:
- Locate your Universal Renderer Data asset.
- Click Add Renderer Feature and select Fronkon Games > Artistic > Oil Paint (choose the desired algorithm variant).
Step 2: Configure the Volume
To apply the effect to your scene:
- Create a Volume component (Global or Local).
- In the Volume component, create or assign a Volume Profile.
- Click Add Override and select Fronkon Games > Artistic > Oil Paint (matching the algorithm you chose).
- Enable the ‘Intensity’ parameter (and any others you wish to modify).
Six Algorithm Variants
Each algorithm is registered as its own Renderer Feature and Volume, allowing you to choose the best balance of quality and performance for your project.
| Algorithm | Technique | Quality | Performance |
|---|---|---|---|
| Kuwahara Basic | Classic Kuwahara filter | Good | Fast |
| Kuwahara Generalized | Improved variant based on Acerola’s work | Better | Moderate |
| Kuwahara Directional | Sobel filter added for improved denoising | Better | Moderate |
| Kuwahara Anisotropic | Based on ‘Anisotropic Kuwahara Filtering’ | Best detail | Expensive |
| Tomita-Tsuji | Enhanced Kuwahara variant | Best visual | Most expensive |
| Symmetric Nearest Neighbour | Edge-preserving smoothing | Good | Most efficient |
Parameter Configuration
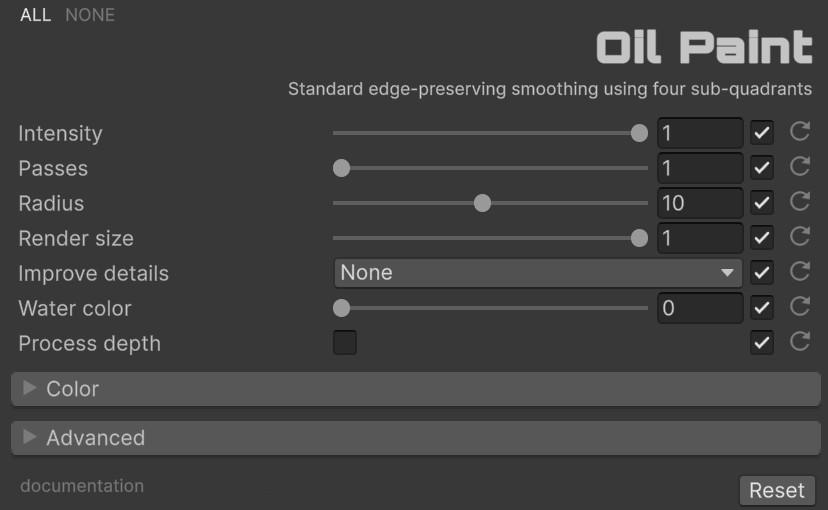
With ‘Intensity’ you can control the overall strength of the effect [0.0 - 1.0]. If it is 0, the effect will not be active.
Common Parameters
All algorithms share these core parameters:
| Parameter | Range | Default | Effect |
|---|---|---|---|
| Passes | 1 to 4 | 1 | Number of algorithm iterations. Higher values greatly enhance the effect but multiply GPU cost |
| Radius | 1 to 20 | 10 | Size of the filter kernel. Larger values produce smoother, more abstract results |
| Detail | None / Sharpen / Emboss | None | Extra algorithm to better define details. Adds an additional render pass |
| Detail Strength | 0.0 to 1.0 | 1.0 | Strength of the detail enhancement. Only active when Detail is not None |
| Emboss Strength | 0.0 to 20.0 | 5.0 | Strength of the emboss effect. Only active when Detail is Emboss |
| Emboss Angle | 0.0 to 360.0 | 0.0 | Angle of the emboss light direction. Only active when Detail is Emboss |
| Water Color | 0.0 to 1.0 | 0.0 | Adds a watercolor paint effect to the image |
| Render Size | 0.1 to 1.0 | 1.0 | Final render resolution. Values below 1 improve performance but increase blur |
Anisotropic-Specific Parameters
The Kuwahara Anisotropic variant offers additional fine-tuning controls:
| Parameter | Range | Default | Effect |
|---|---|---|---|
| Blur | 1 to 6 | 2 | Size of the gaussian blur kernel for eigenvectors |
| Sharpness | 0.0 to 18.0 | 8.0 | Adjusts sharpness of the color segments |
| Hardness | 1.0 to 100.0 | 8.0 | Adjusts hardness of the color segments |
| Alpha | 0.01 to 2.0 | 1.0 | How extreme the angle of the kernel is |
| Zero Crossing | 0.25 to 2.0 | 0.58 | How much sectors overlap with each other |
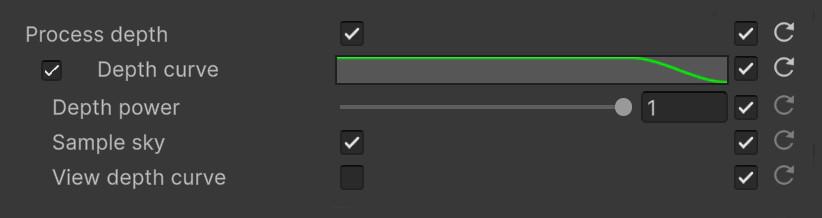
Depth Processing
For more precise control over where the effect is applied, activate ‘Process Depth’.
| Parameter | Range | Default | Effect |
|---|---|---|---|
| Depth Curve | AnimationCurve | , | Adjusts effect intensity based on scene depth. Useful for preserving background detail |
| Depth Power | 0.01 to 1.0 | 1.0 | Factor to concentrate the depth curve |
| Sample Sky | Boolean | true | Whether the effect is applied to the sky |
| View Depth Curve | Boolean | false | Debug visualization: warm areas = intense effect, cool areas = less effect |
Color Grading
Standard color correction parameters apply to the final output.
| Parameter | Range | Effect | Default |
|---|---|---|---|
| Brightness | -1.0 to 1.0 | Additive luminance offset | 0.0 |
| Contrast | 0.0 to 10.0 | Mid-tone contrast expansion | 1.0 |
| Gamma | 0.1 to 10.0 | Nonlinear tonal mapping (inverted) | 1.0 |
| Hue | 0.0 to 1.0 | Color wheel rotation | 0.0 |
| Saturation | 0.0 to 2.0 | Color intensity relative to luminance | 1.0 |
Runtime Control
The effect integrates with Unity’s Volume system for seamless runtime parameter modification. Each algorithm has its own Volume class within the FronkonGames.Artistic.OilPaint namespace.
using UnityEngine;
using UnityEngine.Rendering;
using FronkonGames.Artistic.OilPaint;

// ...

[SerializedField]
private VolumeProfile volumeProfile;

// ...

// Example with Kuwahara Basic
if (volumeProfile.TryGet(out KuwaharaBasicVolume volume))
{
    // Enable/disable effect
    volume.intensity.value = 1.0f; // 0.0 = disabled

    // Configure filter
    volume.passes.value = 1;
    volume.radius.value = 10;
    volume.detail.value = OilPaint.Detail.Sharpen;
    volume.detailStrength.value = 0.8f;
    volume.waterColor.value = 0.3f;

    // Configure depth processing
    volume.processDepth.value = true;
    volume.depthPower.value = 0.8f;
    volume.sampleSky.value = false;

    // Apply color correction
    volume.contrast.value = 1.1f;
    volume.saturation.value = 1.2f;
}
For a more detailed example, check the code in the demo scene.
Performance Characteristics
The effect’s GPU cost depends heavily on the chosen algorithm and the Passes and Radius parameters.
| Algorithm | Passes | Estimated Cost | Notes |
|---|---|---|---|
| Symmetric Nearest Neighbour | 1 | Lightest | Best for mobile and VR |
| Kuwahara Basic | 1 | Light | Good balance for most platforms |
| Kuwahara Generalized | 1 | Moderate | Improved quality over Basic |
| Kuwahara Directional | 1 | Moderate | Adds Sobel pass for edge direction |
| Kuwahara Anisotropic | 1 | Expensive | Requires eigenvector computation + blur |
| Tomita-Tsuji | 1 | Most expensive | Highest quality, desktop/console only |
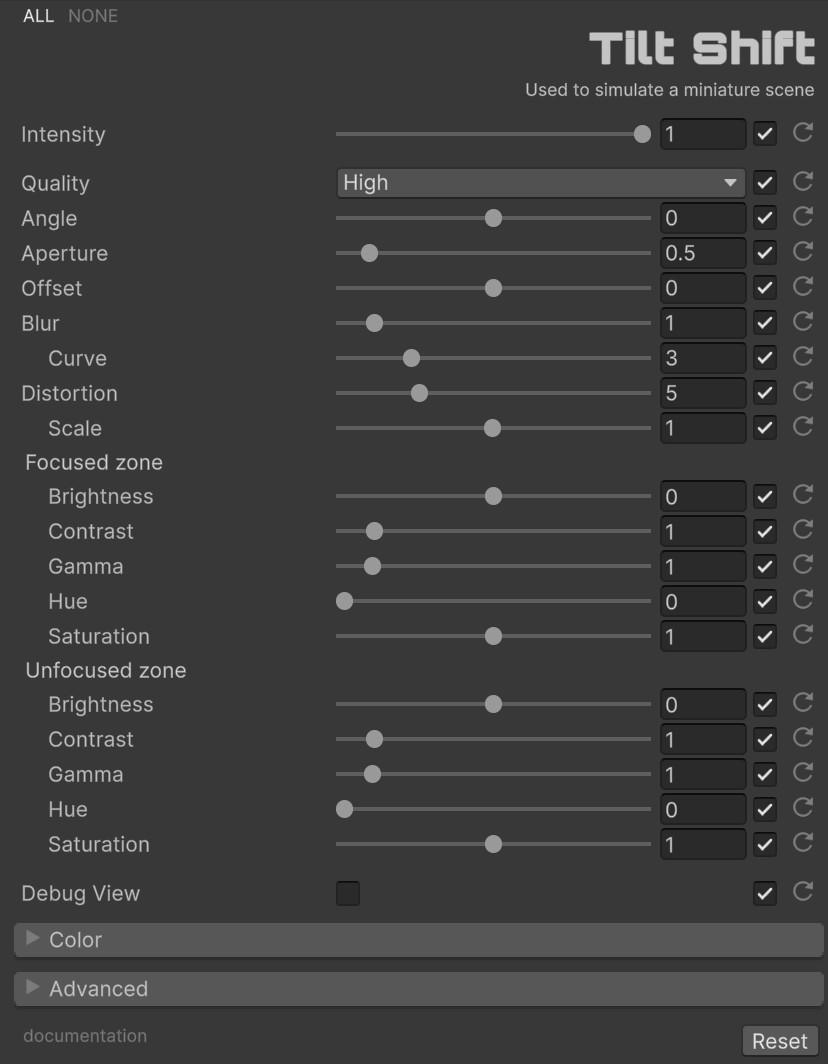
🏙️ Tilt Shift
Tilt Shift simulates the selective focus effect of a tilt-shift lens, making real scenes appear as miniature models. This technique is widely used in cinema, as in the race scene of ‘The Social Network’. The effect applies a configurable blur band across the image with independent color grading for focused and unfocused zones, combined with optional barrel distortion.
Requisites
To ensure optimal performance and compatibility, your project must meet the following requirements:
- Unity: 6000.0.58f1 or higher.
- Universal RP: 17.0.3 or higher.
Instalation Guide
Step 1: Add Renderer Feature
The effect must be registered in your project’s URP configuration:
- Locate your Universal Renderer Data asset.
- Click Add Renderer Feature and select Fronkon Games > Artistic > Tilt Shift.
Step 2: Configure the Volume
To apply the effect to your scene:
- Create a Volume component (Global or Local).
- In the Volume component, create or assign a Volume Profile.
- Click Add Override and select Fronkon Games > Artistic > Tilt Shift.
- Enable the ‘Intensity’ parameter (and any others you wish to modify).
Parameter Configuration
With ‘Intensity’ you can control the overall strength of the effect [0.0 - 1.0]. If it is 0, the effect will not be active.
Core Parameters
| Parameter | Range | Default | Effect |
|---|---|---|---|
| Quality | Fast / Normal / High | High | Number of blur samples per pass: Fast (6), Normal (12), High (22) |
| Angle | -90.0 to 90.0 | 0.0 | Rotation angle of the focus band in degrees |
| Aperture | 0.1 to 5.0 | 0.5 | Width of the focused area. Smaller values create a narrower focus band |
| Offset | -1.5 to 1.5 | 0.0 | Vertical offset of the focus band center |
| Blur | 0.0 to 10.0 | 1.0 | Blur intensity multiplier for the unfocused areas |
| Blur Curve | 1.0 to 10.0 | 3.0 | Power curve controlling the blur falloff from focused to unfocused |
| Distortion | 0.0 to 20.0 | 5.0 | Barrel distortion force applied to the unfocused areas |
| Distortion Scale | 0.01 to 2.0 | 1.0 | Scale of the barrel distortion pattern |
Zone Color Grading
Independent color correction can be applied to the focused (sharp) and unfocused (blurred) zones.
| Zone | Parameter | Range | Default |
|---|---|---|---|
| Focused | Brightness | -1.0 to 1.0 | 0.0 |
| Contrast | 0.0 to 10.0 | 1.0 | |
| Gamma | 0.1 to 10.0 | 1.0 | |
| Hue | 0.0 to 1.0 | 0.0 | |
| Saturation | 0.0 to 2.0 | 1.0 | |
| Unfocused | Brightness | -1.0 to 1.0 | 0.0 |
| Contrast | 0.0 to 10.0 | 1.0 | |
| Gamma | 0.1 to 10.0 | 1.0 | |
| Hue | 0.0 to 1.0 | 0.0 | |
| Saturation | 0.0 to 2.0 | 1.0 |
Debug View
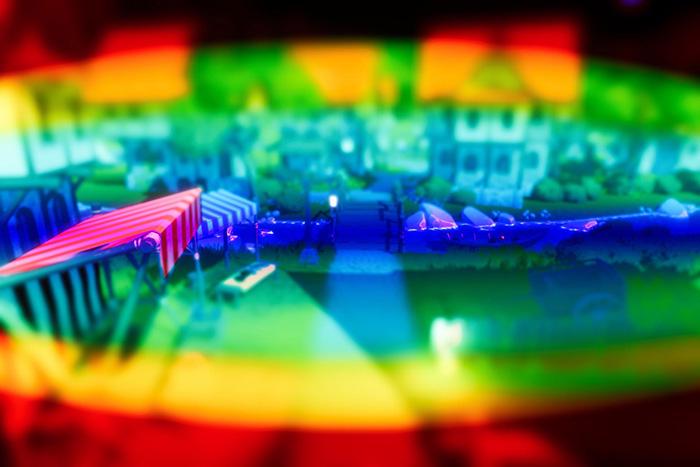
Activate ‘Debug’ to visualize how the effect is applied. Areas with more blur intensity are tinted red, and areas with less intensity are tinted blue.
Color Grading
Standard color correction parameters apply to the final output.
| Parameter | Range | Effect | Default |
|---|---|---|---|
| Brightness | -1.0 to 1.0 | Additive luminance offset | 0.0 |
| Contrast | 0.0 to 10.0 | Mid-tone contrast expansion | 1.0 |
| Gamma | 0.1 to 10.0 | Nonlinear tonal mapping (inverted) | 1.0 |
| Hue | 0.0 to 1.0 | Color wheel rotation | 0.0 |
| Saturation | 0.0 to 2.0 | Color intensity relative to luminance | 1.0 |
Runtime Control
The effect integrates with Unity’s Volume system for seamless runtime parameter modification. Access the TiltShiftVolume component through the Volume Profile.
using UnityEngine;
using UnityEngine.Rendering;
using FronkonGames.Artistic.TiltShift;

// ...

[SerializedField]
private VolumeProfile volumeProfile;

// ...

// Access the effect
if (volumeProfile.TryGet(out TiltShiftVolume volume))
{
    // Enable/disable effect
    volume.intensity.value = 1.0f; // 0.0 = disabled

    // Configure focus band
    volume.quality.value = Quality.High;
    volume.angle.value = 0.0f;
    volume.aperture.value = 0.5f;
    volume.offset.value = 0.0f;

    // Configure blur
    volume.blur.value = 1.5f;
    volume.blurCurve.value = 3.0f;
    volume.distortion.value = 5.0f;

    // Boost saturation in focused area
    volume.focusedSaturation.value = 1.3f;
    volume.unfocusedBrightness.value = 0.1f;

    // Apply color correction
    volume.contrast.value = 1.1f;
    volume.saturation.value = 1.2f;
}
For a more detailed example, check the code in the demo scene.
Preset Configurations
| Preset | Key Settings | Look |
|---|---|---|
| Subtle Miniature | Aperture = 0.98, Blur = 1.6, Blur Curve = 1.0, Distortion = 2.0 | Gentle miniature effect with light blur and subtle distortion |
| Angled Focus | Angle = -30, Aperture = 0.65, Blur = 3.8, Blur Curve = 1.0, Distortion = 2.0, Unfocused Saturation = 0.5, Focused Saturation = 1.5 | Tilted focus band with desaturated background |
| Strong Diorama | Aperture = 0.5, Blur = 6.5, Blur Curve = 1.5, Distortion = 20.0, Focused Gamma = 1.2, Unfocused Gamma = 0.95, Unfocused Saturation = 0.6 | Heavy miniature effect with strong distortion and darkened edges |
Performance Characteristics
Per-pixel cost depends on the Quality setting, which controls the number of blur samples per pixel.
| Quality | Samples | Estimated Cost |
|---|---|---|
| Fast | 6 | Lightest, suitable for mobile |
| Normal | 12 | Balanced |
| High | 22 | Best quality, recommended for desktop |
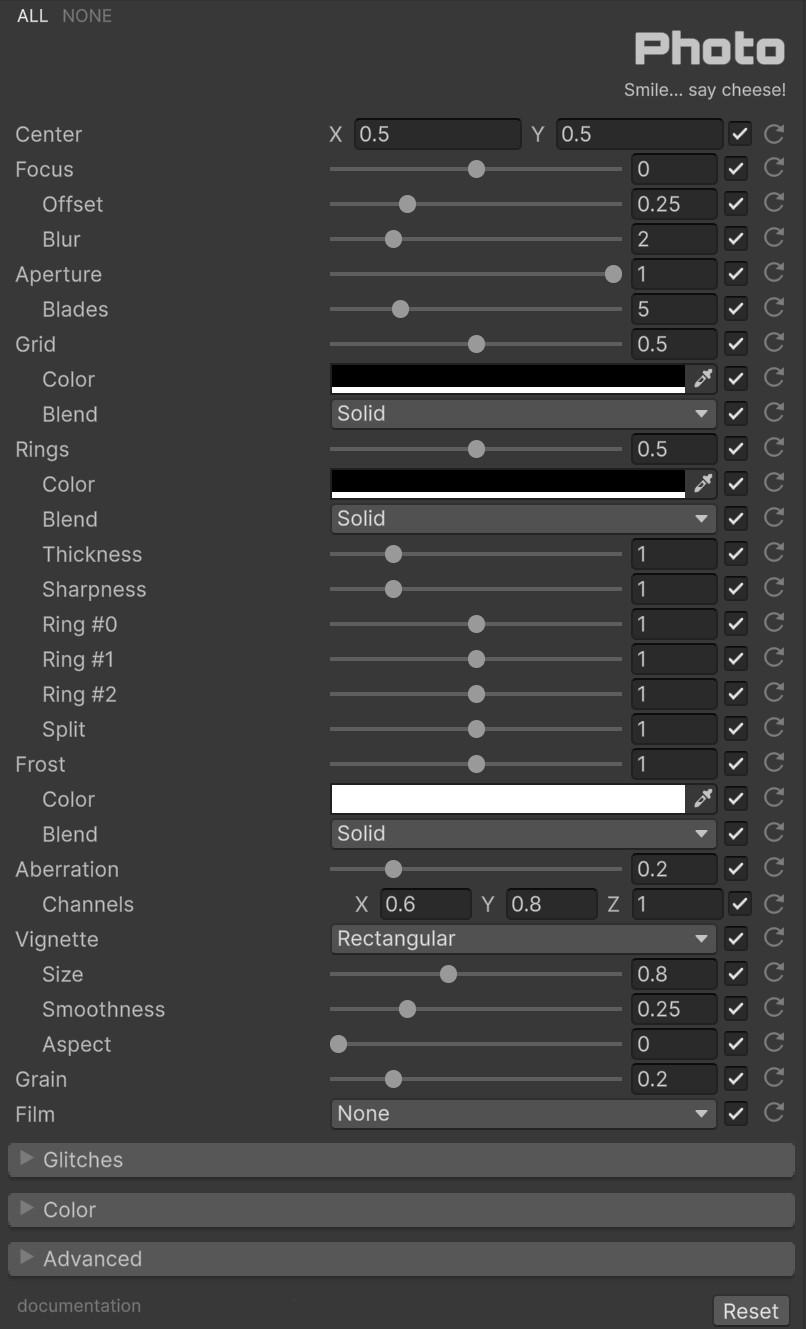
📷 Photo
Photo is a versatile film camera simulator offering a comprehensive suite of effects that mimic the charm and character of analog photography. It combines optical lens simulation (focus, rings, frost, chromatic aberration, vignetting, aperture) with 12 authentic film stock emulations and analog imperfections (grain, dust, light leaks, color bleeding, halation), all in a single post-processing pass.
Requisites
To ensure optimal performance and compatibility, your project must meet the following requirements:
- Unity: 6000.0.58f2 or higher.
- Universal RP: 17.0.3 or higher.
Instalation Guide
Step 1: Add Renderer Feature
The effect must be registered in your project’s URP configuration:
- Locate your Universal Renderer Data asset.
- Click Add Renderer Feature and select Fronkon Games > Artistic > Photo.
Step 2: Configure the Volume
To apply the effect to your scene:
- Create a Volume component (Global or Local).
- In the Volume component, create or assign a Volume Profile.
- Click Add Override and select Fronkon Games > Artistic > Photo.
- Enable the ‘Intensity’ parameter (and any others you wish to modify).
Parameter Configuration
With ‘Intensity’ you can control the overall strength of the effect [0.0 - 1.0]. If it is 0, the effect will not be active.
Focus & Blur
These parameters simulate the optical behavior of a real camera lens. Focus controls the sharpness of the image, mimicking the effect of turning a camera’s focus ring, at 0 the image is perfectly sharp, while moving toward the extremes progressively blurs the scene as if the lens were out of focus. Blur amplifies the overall softness, and Focus Offset shifts the image slightly when defocused, reproducing the subtle displacement that occurs in real lenses during focus pulls.
| Parameter | Range | Default | Effect |
|---|---|---|---|
| Center | Vector2 | (0.5, 0.5) | Center point of the lens effects in normalized screen coordinates |
| Focus | -1.0 to 1.0 | 0.0 | Image focus. 0 = perfect focus, extremes = out of focus |
| Focus Offset | 0.0 to 1.0 | 0.25 | Image shift amount when out of focus |
| Blur | 0 to 10 | 2 | Blur strength applied to the image |
Rings
Concentric circles simulating the optical elements inside a camera lens.
| Parameter | Range | Default | Effect |
|---|---|---|---|
| Rings | 0.0 to 1.0 | 0.5 | Intensity of the ring overlay |
| Rings Color | Color | Black | Color tint of the rings |
| Rings Color Blend | Enum (23 modes) | Solid | Blend mode for ring color |
| Rings Thickness | 0.0 to 5.0 | 1.0 | Thickness of each ring line |
| Rings Sharpness | 0.0 to 5.0 | 1.0 | Edge sharpness of the rings |
| Ring 1/2/3 Scale | 0.0 to 2.0 | 1.0 | Individual scale for each concentric ring |
| Ring Split Scale | 0.0 to 2.0 | 1.0 | Spacing between rings |
Grid
Overlays a pattern of small dots across the image, replicating the focusing screen grid found in SLR camera viewfinders. This subtle detail adds authenticity to the analog camera simulation.
| Parameter | Range | Default | Effect |
|---|---|---|---|
| Grid | 0.0 to 1.0 | 0.5 | Intensity of the viewfinder points grid overlay |
| Grid Color | Color | Black | Color of the grid points |
| Grid Color Blend | Enum (23 modes) | Solid | Blend mode for grid color |
Frost
Central part that emulates the behavior of some old analog cameras when focusing the image.
| Parameter | Range | Default | Effect |
|---|---|---|---|
| Frost | 0.0 to 2.0 | 1.0 | Intensity of the soft diffused glow around frame edges |
| Frost Color | Color | White | Color of the frost effect |
| Frost Color Blend | Enum (23 modes) | Solid | Blend mode for frost color |
Chromatic Aberration
Simulates the color fringing that occurs in real lenses when different wavelengths of light fail to converge at the same point. Each RGB channel is offset independently, producing the characteristic rainbow-edge artifacts visible in vintage and low-quality optics.
| Parameter | Range | Default | Effect |
|---|---|---|---|
| Aberration | 0.0 to 1.0 | 0.2 | Overall intensity of the chromatic aberration |
| Aberration Channels | Vector3 | (0.6, 0.8, 1.0) | Per-channel aberration factor (R, G, B) |
Vignette
Simulates the darkening of the image edges, often seen in old photographs and film scans, which can be used to create a sense of depth and mood.
| Parameter | Range | Default | Effect |
|---|---|---|---|
| Vignette | None / Rectangular / Circular | Rectangular | Type of vignette shape |
| Vignette Size | 0.0 to 2.0 | 0.8 | Size of the vignette opening |
| Vignette Smoothness | 0.0 to 1.0 | 0.25 | Smoothness of the vignette falloff |
| Vignette Aspect | 0.0 to 1.0 | 0.0 | Aspect ratio of the vignette. 1 = square |
Aperture
It emulates the lens shutter in old SLR cameras, allowing you to adjust the number of blades that block the light.
| Parameter | Range | Default | Effect |
|---|---|---|---|
| Aperture Size | 0.0 to 1.0 | 1.0 | Size of the aperture opening |
| Aperture Blades | 3 to 12 | 5 | Number of aperture blades |
Film Stock Emulation
Select from 12 authentic film stock simulations, each with unique color science and characteristics.
| Film | Characteristic |
|---|---|
| Agfa Vista 400 | Cool color balance, strong blue/green response, budget film look |
| Cinestill 800T | Cinematic quality with distinctive red halation, ideal for night scenes |
| Fuji C200 | Cool tones with blue emphasis |
| Fuji Velvia 50 | High saturation slide film, punchy contrast, enhanced red/blue |
| Fuji Pro 400H | Soft, natural skin tones, neutral gray balance |
| Kodak Gold 200 | Golden hues, green boost, warm nostalgic scenes |
| Kodak Portra 400 | Soft highlight rolloff, enhanced greens for skin tones |
| Kodak Ektar 100 | Ultra-vivid colors, high contrast |
| Polaroid 600 | Warm tones, strong vignette |
| Lomography Color 800 | Heavy grain, cyan shift, crushed shadows |
| ORWO UT18 | Cinema film stock, green/magenta bias, soft highlight shoulder |
| Ilford HP5 | Classic black and white |
Analog Imperfections
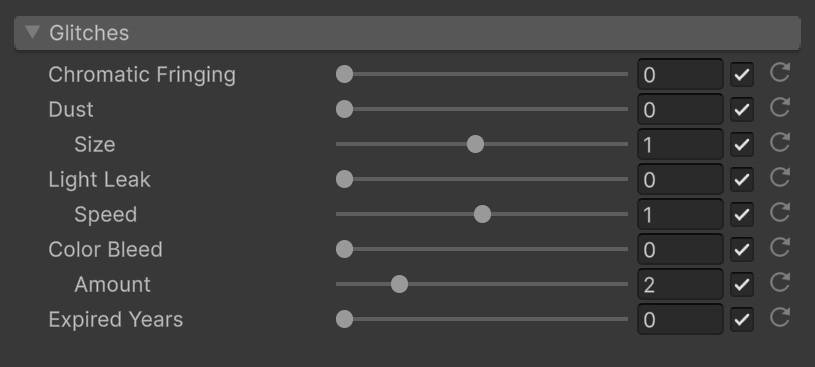
Simulates the imperfections of analog film, including grain, halation, chromatic fringing, dust, and light leaks, adding a sense of authenticity to the image.
| Parameter | Range | Default | Effect |
|---|---|---|---|
| Chromatic Fringing | 0.0 to 5.0 | 0.0 | Color separation in high-contrast areas |
| Dust | 0.0 to 1.0 | 0.0 | Amount of dust particles on the lens |
| Dust Size | 0.1 to 2.0 | 1.0 | Size of dust particles |
| Light Leak | 0.0 to 1.0 | 0.0 | Intensity of light leak streaks |
| Light Leak Speed | 0.0 to 2.0 | 1.0 | Animation speed of light leaks |
| Color Bleed | 0.0 to 1.0 | 0.0 | Amount of color bleeding between adjacent areas |
| Color Bleed Amount | 0.0 to 10.0 | 2.0 | Spread of the color bleeding effect |
| Grain | 0.0 to 1.0 | 0.2 | Film grain intensity |
| Halation | 0.0 to 1.0 | 0.25 | Red glow around bright sources (Cinestill 800T) |
| Expired Years | 0.0 to 30.0 | 0.0 | Simulates aged film with color balance and contrast shifts |
Color Grading
Standard color correction parameters apply to the final output.
| Parameter | Range | Effect | Default |
|---|---|---|---|
| Brightness | -1.0 to 1.0 | Additive luminance offset | 0.0 |
| Contrast | 0.0 to 10.0 | Mid-tone contrast expansion | 1.0 |
| Gamma | 0.1 to 10.0 | Nonlinear tonal mapping (inverted) | 1.0 |
| Hue | 0.0 to 1.0 | Color wheel rotation | 0.0 |
| Saturation | 0.0 to 2.0 | Color intensity relative to luminance | 1.0 |
Runtime Control
The effect integrates with Unity’s Volume system for seamless runtime parameter modification. Access the PhotoVolume component through the Volume Profile.
using UnityEngine;
using UnityEngine.Rendering;
using FronkonGames.Artistic.Photo;

// ...

[SerializedField]
private VolumeProfile volumeProfile;

// ...

// Access the effect
if (volumeProfile.TryGet(out PhotoVolume volume))
{
    // Enable/disable effect
    volume.intensity.value = 1.0f; // 0.0 = disabled

    // Configure focus
    volume.focus.value = 0.0f;
    volume.focusOffset.value = 0.25f;
    volume.blur.value = 2;

    // Select film stock
    volume.film.value = Films.Kodak_Portra_400;
    volume.expiredYears.value = 5.0f;

    // Configure lens effects
    volume.aberration.value = 0.3f;
    volume.vignette.value = Vignettes.Circular;
    volume.vignetteSize.value = 0.7f;

    // Add imperfections
    volume.grain.value = 0.3f;
    volume.dust.value = 0.1f;
    volume.lightLeak.value = 0.2f;

    // Apply color correction
    volume.contrast.value = 1.1f;
    volume.saturation.value = 1.1f;
}
For a more detailed example, check the code in the demo scene.
Preset Configurations
| Preset | Film | Key Settings | Look |
|---|---|---|---|
| Standard | None | Default values, Blur = 3, Frost = 1.5 | Clean camera look with soft frost and blur |
| Classic | Kodak Portra 400 | Vignette Size = 0.85, Grain = 0.2, Rings = 0.3, Ring Thickness = 3.0, Dust = 0.05 | Warm Kodak tones with gentle vignette and grain |
| Vintage | Agfa Vista 400 | Blur = 1, Ring Thickness = 5, Vignette Size = 0.8, Grain = 0.4, Dust = 0.25, Color Bleed = 0.2, Light Leak = 0.15 | Heavily aged film with dust and light leaks |
| Polaroid | Kodak Gold 200 | Brightness = 0.1, Contrast = 1.2, Saturation = 1.2, Vignette = Rectangular, Grain = 0.3, Dust = 0.2, Color Bleed = 0.3, Light Leak = 0.25 | Warm Polaroid instant photo with color bleed |
| Retro | Fuji C200 | Grid = 2.0, Ring Thickness = 5.0, Grain = 1.0, Color Bleed = 0.5, Dust = 0.3, Halation = 0.3, Chromatic Fringing = 0.4, Light Leak = 0.3 | Heavy retro degradation with strong grain |
| Nature | Fuji Velvia 50 | Vignette = Rectangular, Vignette Size = 0.8, Chromatic Fringing = 2.0, Rings = 0.5, Grain = 0.15, Color Bleed = 0.1 | Vivid nature photography with subtle imperfections |
| Noir | Ilford HP5 BW | Contrast = 1.02, Vignette = Circular, Vignette Size = 0.7, Grain = 0.6, Rings = 0.4, Dust = 0.15, Halation = 0.2 | Black and white film noir with heavy grain |
| Cinematic | Cinestill 800T | Halation = 0.5, Focus Offset = 0.5, Vignette = Circular, Light Leak = 0.2, Chromatic Fringing = 0.3 | Cinematic tungsten film with halation glow |
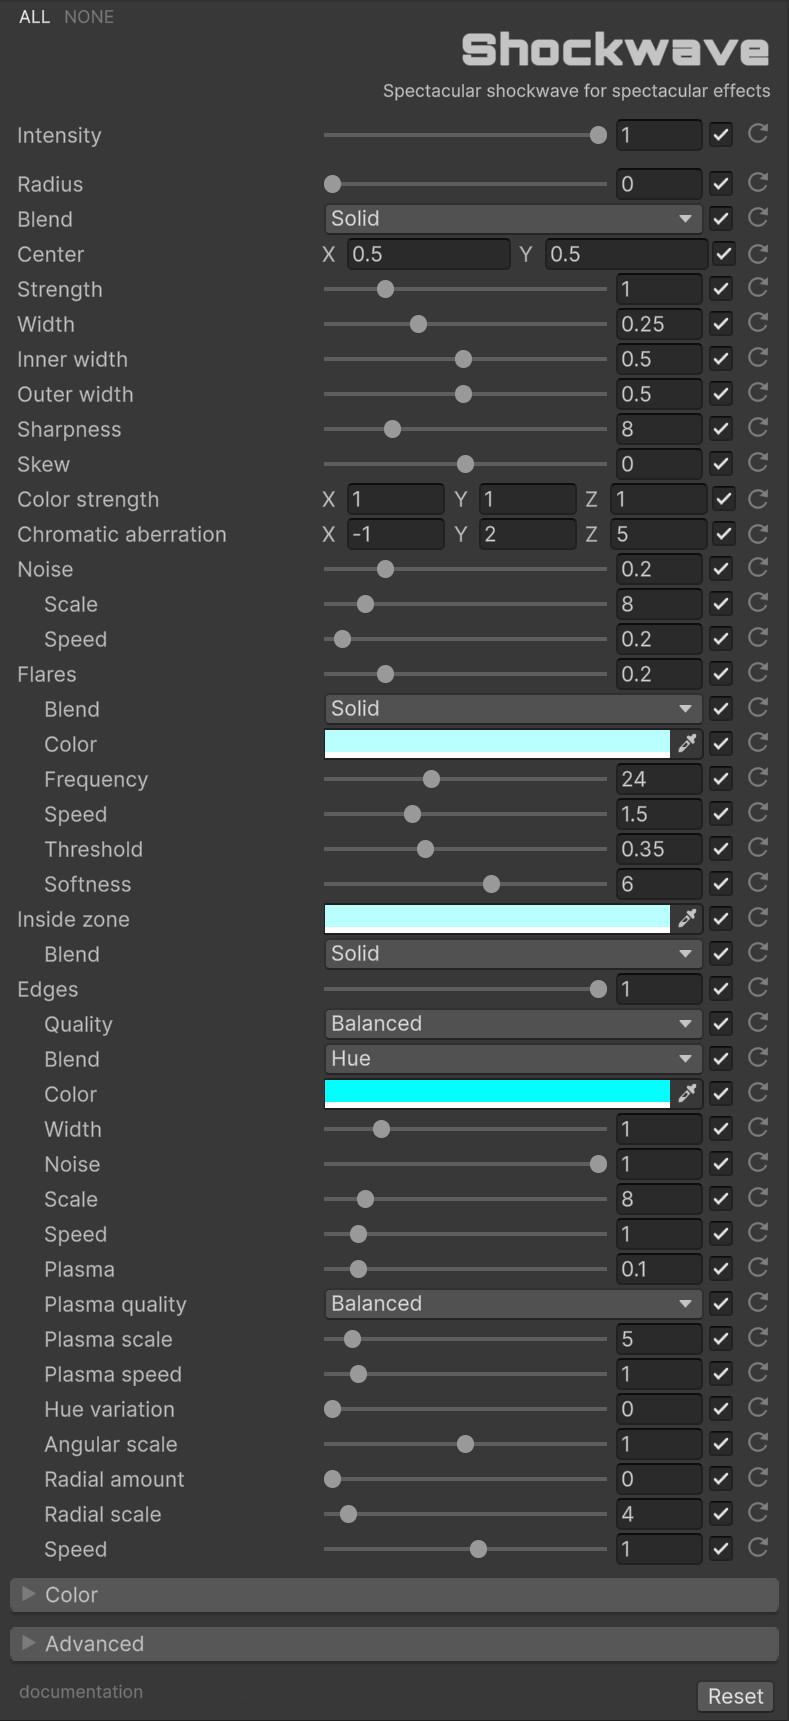
💥 Shockwave
Shockwave creates stunning expanding wave distortion effects with customizable chromatic aberration, animated flares, edge detection with plasma, noise texturing, and hue variation. Perfect for explosions, time jumps, portals, and other dramatic visual effects. The effect renders a configurable ring that expands from a center point, distorting the image within its area while applying layered visual effects.
Requisites
To ensure optimal performance and compatibility, your project must meet the following requirements:
- Unity: 6000.0.58f2 or higher.
- Universal RP: 17.0.3 or higher.
Instalation Guide
Step 1: Add Renderer Feature
The effect must be registered in your project’s URP configuration:
- Locate your Universal Renderer Data asset.
- Click Add Renderer Feature and select Fronkon Games > Artistic > Shockwave.
Step 2: Configure the Volume
To apply the effect to your scene:
- Create a Volume component (Global or Local).
- In the Volume component, create or assign a Volume Profile.
- Click Add Override and select Fronkon Games > Artistic > Shockwave.
- Enable the ‘Intensity’ parameter (and any others you wish to modify).
Parameter Configuration
With ‘Intensity’ you can control the overall strength of the effect [0.0 - 1.0]. If it is 0, the effect will not be active.
Core Shockwave Parameters
These parameters define the fundamental shape and behavior of the expanding wave. Radius is the primary animation driver, smoothly interpolating it from 0 to 1 over time creates the expanding ring effect. Strength and Width control how aggressively the wave distorts the image, while Chromatic Aberration splits the RGB channels along the wave for dramatic color fringing.
| Parameter | Range | Default | Effect |
|---|---|---|---|
| Radius | 0.0 to 1.0 | 0.0 | Radius of the shockwave. 0 = no wave, 1 = extends beyond screen. Animate this to create the expanding wave |
| Center | Vector2 | (0.5, 0.5) | Origin point in normalized screen coordinates |
| Strength | 0.0 to 5.0 | 1.0 | Intensity of the distortion displacement |
| Width | 0.01 to 0.75 | 0.25 | Thickness of the shockwave ring band |
| Color Strength | Vector3 | (1, 1, 1) | Per-channel (R, G, B) color intensity of the shockwave |
| Shockwave Color Blend | Enum (23 modes) | Solid | Blend mode for the shockwave color |
| Chromatic Aberration | Vector3 | (-1, 2, 5) | Per-channel displacement for color separation effects |
Ring Configuration
Controls the shape of the visible shockwave ring. The inner and outer widths define the ring’s thickness, while sharpness determines how hard or soft the ring edges appear. Skew introduces asymmetry, making the wave push more strongly inward or outward for varied visual styles.
| Parameter | Range | Default | Effect |
|---|---|---|---|
| Ring Width Inner | 0.01 to 1.0 | 0.5 | Inner boundary of the shockwave ring |
| Ring Width Outer | 0.01 to 1.0 | 0.5 | Outer boundary of the shockwave ring |
| Ring Sharpness | 1.0 to 32.0 | 8.0 | Falloff rate from ring center. Higher = sharper edges |
| Ring Skew | -1.0 to 1.0 | 0.0 | Asymmetric distortion. Negative = inward, positive = outward |
Inside Zone
Controls the color and appearance of the area inside the shockwave ring. The tint parameter allows you to adjust the color, while the blend mode determines how the tint interacts with the underlying image.
| Parameter | Range | Default | Effect |
|---|---|---|---|
| Inside Tint | Color | (0.725, 1, 1) | Color tint applied to the area inside the shockwave ring |
| Color Blend | Enum (23 modes) | Solid | Blend mode for the inside zone tint |
Flare Effects
Flares are lens flare effects that are generated within the shockwave area. They are animated and can be customized with different colors, frequencies, and speeds.
| Parameter | Range | Default | Effect |
|---|---|---|---|
| Flares | 0.0 to 1.0 | 0.2 | Intensity of lens flare effects within the shockwave area |
| Flares Color Blend | Enum (23 modes) | Solid | Blend mode for flare colors |
| Flares Color | Color | (0.725, 1, 1) | Base color of the flare effects |
| Flares Frequency | 0.0 to 64.0 | 24.0 | Density of flare elements. Higher = more numerous, smaller flares |
| Flares Speed | 0.0 to 5.0 | 1.5 | Animation speed of the flare movement |
| Flares Threshold | 0.0 to 1.0 | 0.35 | Brightness threshold for flare visibility |
| Flares Softness | 0.0 to 10.0 | 6.0 | Blur amount applied to flares. Higher = softer |
Noise
Noise adds procedural patterns to the shockwave, creating a more dynamic and organic look. The noise scale controls the frequency of the pattern, while the noise speed animates the pattern over time.
| Parameter | Range | Default | Effect |
|---|---|---|---|
| Noise | 0.0 to 1.0 | 0.2 | Intensity of procedural noise on the shockwave |
| Noise Scale | 0.1 to 64.0 | 8.0 | Frequency of the noise pattern |
| Noise Speed | 0.0 to 5.0 | 0.2 | Animation speed of the noise pattern |
Edge Effects
Edge effects add a subtle border to the shockwave, creating a more dynamic and organic look. The edge quality parameter controls the quality of the edge detection, while the edge color blend parameter determines how the edge color interacts with the underlying image.
| Parameter | Range | Default | Effect |
|---|---|---|---|
| Edge | 0.0 to 1.0 | 1.0 | Intensity of edge highlighting within the shockwave area |
| Edge Quality | Performance / Balanced / High | Balanced | Edge detection quality: 4-sample (Performance), 5-sample cross (Balanced), 9-sample Sobel (High) |
| Edge Color Blend | Enum (23 modes) | Hue | Blend mode for edge colors |
| Edge Color | Color | Cyan | Base color for edge highlighting |
| Edge Width | 0.1 to 5.0 | 1.0 | Thickness of edge highlighting in texels |
Edge Noise & Plasma
Edge noise and plasma add animated patterns to the shockwave, creating a more dynamic and organic look. The edge noise quality parameter controls the quality of the noise, while the edge noise scale parameter determines the frequency of the noise pattern.
| Parameter | Range | Default | Effect |
|---|---|---|---|
| Edge Noise | 0.0 to 1.0 | 1.0 | Noise intensity applied to edge effects |
| Edge Noise Scale | 0.1 to 64.0 | 8.0 | Frequency of edge noise patterns |
| Edge Noise Speed | 0.0 to 10.0 | 1.0 | Animation speed of edge noise |
| Edge Plasma | 0.0 to 1.0 | 0.1 | Intensity of animated plasma energy patterns on edges |
| Edge Plasma Quality | Performance / Balanced / High | Balanced | Plasma quality: 3 octaves (Performance), 6 octaves (Balanced), 9 octaves (High) |
| Edge Plasma Scale | 0.01 to 64.0 | 5.0 | Frequency of plasma patterns |
| Edge Plasma Speed | 0.0 to 10.0 | 1.0 | Animation speed of plasma effects |
Hue Variation
Hue variation adds animated color bands to the shockwave, creating a more dynamic and organic look. The hue variation quality parameter controls the quality of the color bands, while the hue variation scale parameter determines the frequency of the color bands.
| Parameter | Range | Default | Effect |
|---|---|---|---|
| Hue Variation | 0.0 to 1.0 | 0.0 | Intensity of angular hue variation across the shockwave |
| Hue Variation Scale | 0.0 to 2.0 | 1.0 | Angular frequency, how many color bands appear around the center |
| Hue Variation Speed | -10.0 to 10.0 | 1.0 | Animation speed. Positive = clockwise, negative = counterclockwise |
| Hue Variation Radial | 0.0 to 1.0 | 0.0 | Intensity of radial hue variation (color rings from center outward) |
| Hue Variation Radial Scale | 0.0 to 64.0 | 4.0 | Radial frequency, how many color rings appear |
Color Grading
Standard color correction parameters apply to the final output.
| Parameter | Range | Effect | Default |
|---|---|---|---|
| Brightness | -1.0 to 1.0 | Additive luminance offset | 0.0 |
| Contrast | 0.0 to 2.0 | Mid-tone contrast expansion | 1.0 |
| Gamma | 0.01 to 10.0 | Nonlinear tonal mapping (inverted) | 1.0 |
| Hue | 0.0 to 1.0 | Color wheel rotation | 0.0 |
| Saturation | 0.0 to 2.0 | Color intensity relative to luminance | 1.0 |
Runtime Control
The effect integrates with Unity’s Volume system for seamless runtime parameter modification. Access the ShockwaveVolume component through the Volume Profile. The key to creating a shockwave animation is to animate the Radius parameter from 0 to 1 over time.
using UnityEngine;
using UnityEngine.Rendering;
using FronkonGames.Artistic.Shockwave;

// ...

[SerializedField]
private VolumeProfile volumeProfile;

// ...

// Access the effect
if (volumeProfile.TryGet(out ShockwaveVolume volume))
{
    // Enable/disable effect
    volume.intensity.value = 1.0f; // 0.0 = disabled

    // Set shockwave origin
    volume.center.value = new Vector2(0.5f, 0.5f);

    // Animate radius from 0 to 1 to create the expanding wave
    volume.radius.value = Mathf.Clamp01(elapsedTime / duration);

    // Configure ring
    volume.strength.value = 2.0f;
    volume.width.value = 0.2f;
    volume.ringSharpness.value = 12.0f;

    // Add flares
    volume.flares.value = 0.3f;
    volume.flaresFrequency.value = 24.0f;

    // Configure edge effects
    volume.edge.value = 1.0f;
    volume.edgeColor.value = Color.cyan;
    volume.edgePlasma.value = 0.2f;

    // Add hue variation
    volume.hueVariation.value = 0.3f;
    volume.hueVariationSpeed.value = 2.0f;
}
Here is an example of a coroutine for opening and closing.
private IEnumerator ShockwaveCoroutine()
{
    volume.radius.value = isOpen == true ? 1.0f : 0.0f;

    // Toggle the shockwave.
    float time = 0.0f;
    while (time < (isOpen == true ? openTime : closeTime))
    {
        volume.radius.value = isOpen == true ? 1.0f - (time / openTime) : time / closeTime;
        time += Time.deltaTime;
        yield return null;
    }

    isOpen = !isOpen;
    volume.radius.value = isOpen == true ? 1.0f : 0.0f;
    currentCoroutine = null;
}
For a more detailed example, check the code in the demo scene.
Preset Configurations
| Preset | Key Settings | Look |
|---|---|---|
| Standard | Default values | Clean expanding distortion wave |
| Explosion | Strength = 3.0, Width = 0.15, Ring Inner = 0.3, Ring Outer = 0.8, Sharpness = 12, Color Strength = (1.5, 0.8, 0.3), Flares = 0.6, Noise = 0.4, Edge = 0.8, Edge Color = Red | Fiery explosive shockwave with warm tones |
| Portal | Strength = 2.5, Width = 0.25, Ring Inner/Outer = 0.5, Sharpness = 8, Color Strength = (0.3, 0.8, 1.5), Flares = 0.8, Saturation = 0.0, Noise = 0.6, Edge = 1.0, Edge Color = Cyan | Cool blue portal opening with desaturation |
| Time Distortion | Strength = 4.0, Width = 0.35, Ring Inner = 0.2, Ring Outer = 1.0, Sharpness = 6, Skew = 0.3, Noise = 0.8, Edge Color = Yellow, Hue = 0.9 | Heavy warping with yellow-green time-travel feel |
| Energy Blast | Strength = 2.0, Width = 0.2, Ring Inner = 0.4, Ring Outer = 0.6, Sharpness = 16, Flares = 1.0, Edge = 1.0, Edge Color = Magenta | Sharp magenta energy pulse with strong flares |
| Impact Wave | Strength = 3.5, Width = 0.4, Ring Inner = 0.6, Ring Outer = 0.4, Sharpness = 4, Skew = -0.2, Noise = 0.5, Edge = 0.9, Edge Color = Green | Wide green impact with soft sharpness |
| Mystic Ripple | Strength = 1.8, Width = 0.3, Ring Inner = 0.7, Ring Outer = 0.3, Sharpness = 10, Flares Frequency = 16, Noise = 0.7, Noise Speed = 0.5, Edge = 0.7 | Ethereal blue ripple with slow noise |
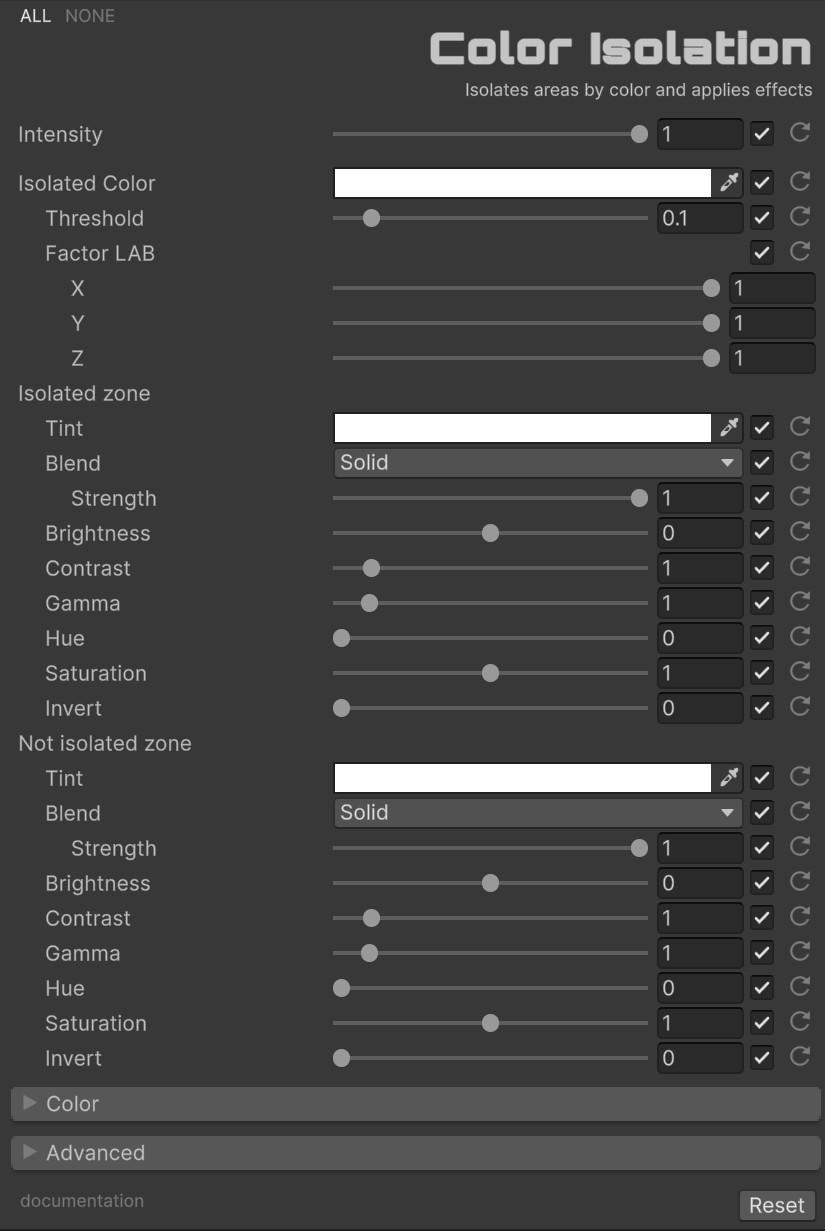
🎯 Color Isolation
Color Isolation selectively isolates areas of the image by color and applies independent visual effects to the isolated and non-isolated zones. The effect converts the image to the CIELAB color space for perceptually accurate color differentiation, then applies configurable blend modes, tinting, and color grading to each zone independently.
The core technique computes the perceptual distance between each pixel’s color and the target isolation color in CIELAB space, using three weighted axes: L* (luminosity), a* (green-magenta), and b* (blue-yellow). Pixels within the threshold distance are classified as “isolated” and receive one set of effects, while the remaining pixels receive another.
Requisites
To ensure optimal performance and compatibility, your project must meet the following requirements:
- Unity: 6000.0.58f2 or higher.
- Universal RP: 17.0.3 or higher.
Instalation Guide
Step 1: Add Renderer Feature
The effect must be registered in your project’s URP configuration:
- Locate your Universal Renderer Data asset.
- Click Add Renderer Feature and select Fronkon Games > Artistic > Color Isolation.
Step 2: Configure the Volume
To apply the effect to your scene:
- Create a Volume component (Global or Local).
- In the Volume component, create or assign a Volume Profile.
- Click Add Override and select Fronkon Games > Artistic > Color Isolation.
- Enable the ‘Intensity’ parameter (and any others you wish to modify).
Parameter Configuration
With ‘Intensity’ you can control the overall strength of the effect [0.0 - 1.0]. If it is 0, the effect will not be active.
Color Selection
Pick the target color to isolate and fine-tune how strictly the effect matches it. The comparison is performed in CIELAB color space, which measures color differences the way the human eye perceives them. The LAB factor weights let you control whether the match considers luminosity, hue, or both.
| Parameter | Range | Default | Effect |
|---|---|---|---|
| Isolated Color | Color | White | Target color to isolate from the image |
| Threshold | 0.0 to 1.0 | 0.1 | Color matching sensitivity. Lower values isolate more precisely; higher values include a wider color range |
| Factor LAB | Vector3 [0-1] | (1, 1, 1) | Weights for each CIELAB channel: X = L* (luminosity), Y = a* (green-magenta), Z = b* (blue-yellow) |
Isolated Zone
Effects applied to pixels that match the target color.
| Parameter | Range | Default | Effect |
|---|---|---|---|
| Blend | Enum (23 modes) | Solid | Color blend operation for the isolated zone |
| Blend Strength | 0.0 to 1.0 | 1.0 | Strength of the blend operation |
| Tint | Color | White | Color tint applied to isolated pixels |
| Saturation | 0.0 to 2.0 | 1.0 | Color saturation of isolated pixels |
| Brightness | -1.0 to 1.0 | 0.0 | Brightness adjustment for isolated pixels |
| Contrast | 0.0 to 10.0 | 1.0 | Contrast adjustment for isolated pixels |
| Gamma | 0.1 to 10.0 | 1.0 | Gamma correction for isolated pixels |
| Hue | 0.0 to 1.0 | 0.0 | Hue rotation for isolated pixels |
| Invert | 0.0 to 1.0 | 0.0 | Color inversion amount for isolated pixels |
Not Isolated Zone
Effects applied to pixels that do not match the target color.
| Parameter | Range | Default | Effect |
|---|---|---|---|
| Blend | Enum (23 modes) | Solid | Color blend operation for the non-isolated zone |
| Blend Strength | 0.0 to 1.0 | 1.0 | Strength of the blend operation |
| Tint | Color | White | Color tint applied to non-isolated pixels |
| Saturation | 0.0 to 2.0 | 1.0 | Color saturation of non-isolated pixels |
| Brightness | -1.0 to 1.0 | 0.0 | Brightness adjustment for non-isolated pixels |
| Contrast | 0.0 to 10.0 | 1.0 | Contrast adjustment for non-isolated pixels |
| Gamma | 0.1 to 10.0 | 1.0 | Gamma correction for non-isolated pixels |
| Hue | 0.0 to 1.0 | 0.0 | Hue rotation for non-isolated pixels |
| Invert | 0.0 to 1.0 | 0.0 | Color inversion amount for non-isolated pixels |
Color Grading
Standard color correction parameters apply to the final output.
| Parameter | Range | Effect | Default |
|---|---|---|---|
| Brightness | -1.0 to 1.0 | Additive luminance offset | 0.0 |
| Contrast | 0.0 to 10.0 | Mid-tone contrast expansion | 1.0 |
| Gamma | 0.1 to 10.0 | Nonlinear tonal mapping (inverted) | 1.0 |
| Hue | 0.0 to 1.0 | Color wheel rotation | 0.0 |
| Saturation | 0.0 to 2.0 | Color intensity relative to luminance | 1.0 |
Runtime Control
The effect integrates with Unity’s Volume system for seamless runtime parameter modification. Access the ColorIsolationVolume component through the Volume Profile.
using UnityEngine;
using UnityEngine.Rendering;
using FronkonGames.Artistic.ColorIsolation;

// ...

[SerializedField]
private VolumeProfile volumeProfile;

// ...

// Access the effect
if (volumeProfile.TryGet(out ColorIsolationVolume volume))
{
    // Enable/disable effect
    volume.intensity.value = 1.0f; // 0.0 = disabled

    // Select color to isolate (e.g., red)
    volume.isolatedColor.value = Color.red;
    volume.isolatedThreshold.value = 0.15f;

    // Desaturate non-isolated zone for dramatic effect
    volume.notIsolatedSaturation.value = 0.0f;
    volume.notIsolatedBrightness.value = -0.1f;

    // Boost isolated zone
    volume.isolatedSaturation.value = 1.5f;
    volume.isolatedContrast.value = 1.2f;
}
For a more detailed example, check the code in the demo scene.
✨ Sharpen
Sharpen enhances image details using 13 distinct sharpening algorithms, each with unique characteristics for different use cases. From simple luma-based unsharp masking to advanced multi-scale Laplacian pyramid sharpening, the effect provides precise control over image clarity with minimal artifact generation.
Requisites
To ensure optimal performance and compatibility, your project must meet the following requirements:
- Unity: 6000.0.58f2 or higher.
- Universal RP: 17.0.3 or higher.
Instalation Guide
Step 1: Add Renderer Feature
The effect must be registered in your project’s URP configuration:
- Locate your Universal Renderer Data asset.
- Click Add Renderer Feature and select Fronkon Games > Artistic > Sharpen.
Step 2: Configure the Volume
To apply the effect to your scene:
- Create a Volume component (Global or Local).
- In the Volume component, create or assign a Volume Profile.
- Click Add Override and select Fronkon Games > Artistic > Sharpen.
- Enable the ‘Intensity’ parameter (and any others you wish to modify).
Thirteen Algorithm Variants
The effect provides 13 distinct sharpening algorithms organized into categories based on their approach:
| Category | Algorithm | Technique | Best For |
|---|---|---|---|
| Classical | Luma | Unsharp mask in luma channel | General-purpose with minimal color artifacts |
| Classical | Unsharp Mask | Classic Photoshop-style sharpening | Professional workflows with threshold control |
| Classical | High-Pass | Frequency-domain filtering | Texture enhancement |
| Industry Standard | Contrast Adaptive | Per-pixel adaptive intensity (AMD CAS) | Uniform sharpness with reduced halos |
| Industry Standard | FSR RCAS | AMD FidelityFX robust sharpening | High-quality game post-processing |
| Industry Standard | NIS Sharpening | NVIDIA Image Scaling approach | Directional edge detection |
| Edge Detection | Laplacian | Laplacian operator edge enhancement | Precise edge control with kernel sizes |
| Edge Detection | Edge-Aware | Edge detection-gated sharpening | Avoids over-sharpening smooth areas |
| Edge-Preserving | Bilateral | Spatial and range filtering | Noisy images, texture preservation |
| Edge-Preserving | Guided Filter | O(N) edge-preserving filter | Strong edges with noise smoothing |
| Edge-Preserving | Domain Transform | Real-time edge-aware filtering | High-quality with minimal halos |
| Multi-Scale | Detail Enhancement | Base/detail layer separation | Fine detail control |
| Multi-Scale | Laplacian Pyramid | Multi-frequency decomposition | Natural-looking results |
Parameter Configuration
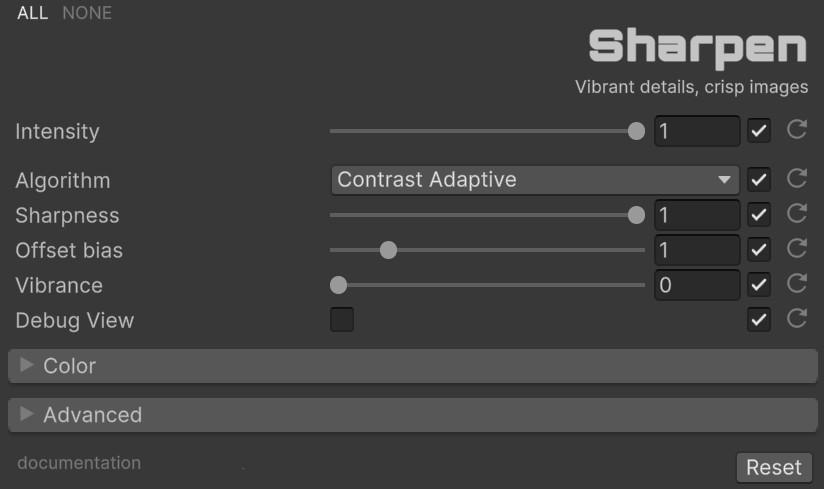
With ‘Intensity’ you can control the overall strength of the effect [0.0 - 1.0]. If it is 0, the effect will not be active.
Core Parameters
| Parameter | Range | Default | Effect |
|---|---|---|---|
| Algorithm | Enum (13 types) | Contrast Adaptive | Selects the sharpening algorithm |
| Sharpness | 0.0 to 1.0 | 1.0 | Strength of the sharpening effect |
| Offset Bias | 0.0 to 6.0 | 1.0 | Adjusts the radius of the sampling pattern |
| Sharp Clamp | 0.0 to 1.0 | 0.035 | Limits maximum sharpening per pixel, reducing halo artifacts |
| Vibrance | 0.0 to 2.0 | 0.0 | Increases the contrast and saturation of colors |
| Debug View | Boolean | false | Visualizes which areas of the image are being sharpened |
Luma Pattern Options
When using the Luma algorithm, you can choose between different sampling patterns:
| Pattern | Texture Fetches | Characteristic |
|---|---|---|
| Fast | 2 | Fastest but slightly lower quality |
| Normal | 4 | Balanced quality and performance |
| Wider | 4 | Less sensitive to noise but also to fine details |
| Pyramid | 4 | Diamond-shaped, slightly more aggressive look |
Algorithm-Specific Parameters
| Algorithm | Parameter | Range | Default | Effect |
|---|---|---|---|---|
| Laplacian | Kernel | 3x3 / 5x5 / 7x7 | 5x5 | Kernel size. Larger kernels are more precise but more expensive |
| Edge-Aware | Edge Threshold | 0.0 to 1.0 | 0.1 | Sensitivity of edge detection |
| Edge Width | 0.0 to 5.0 | 1.0 | Width of detected edges | |
| Edge Method | Sobel / Canny / Laplacian | Sobel | Edge detection algorithm | |
| Bilateral | Spatial Sigma | 0.0 to 10.0 | 2.0 | Spatial filtering radius |
| Range Sigma | 0.0 to 1.0 | 0.1 | Intensity difference tolerance | |
| Unsharp Mask | Amount | 0.0 to 5.0 | 1.0 | Sharpening intensity |
| Radius | 0.1 to 10.0 | 1.0 | Blur radius for unsharp mask | |
| Threshold | 0.0 to 1.0 | 0.0 | Skip low-contrast areas | |
| High-Pass | Radius | 0.1 to 10.0 | 1.0 | Filter radius |
| Strength | 0.0 to 2.0 | 1.0 | Sharpening strength | |
| FSR RCAS | Sharpness | 0.0 to 1.0 | 0.2 | AMD FidelityFX sharpness |
| Guided Filter | Radius | 1.0 to 20.0 | 8.0 | Filter radius |
| Epsilon | 0.001 to 1.0 | 0.01 | Edge sensitivity | |
| Strength | 0.0 to 2.0 | 1.0 | Sharpening strength | |
| Detail Enhancement | Detail Strength | 0.0 to 3.0 | 1.0 | Detail layer boost |
| Detail Range | 0.0 to 1.0 | 0.5 | Detail extraction range | |
| Smoothing | 0.0 to 10.0 | 2.0 | Base layer smoothing | |
| NIS Sharpening | Sharpness | 0.0 to 1.0 | 0.3 | NVIDIA sharpness |
| Laplacian Pyramid | Levels | 1 to 5 | 3 | Number of pyramid levels |
| Strength | 0.0 to 2.0 | 1.0 | Sharpening strength | |
| Base Contribution | 0.0 to 1.0 | 0.5 | Base layer blend | |
| Domain Transform | Radius | 1.0 to 20.0 | 5.0 | Filter radius |
| Epsilon | 0.01 to 1.0 | 0.1 | Edge preservation | |
| Strength | 0.0 to 2.0 | 1.0 | Sharpening strength |
Color Grading
Standard color correction parameters apply to the final output.
| Parameter | Range | Effect | Default |
|---|---|---|---|
| Brightness | -1.0 to 1.0 | Additive luminance offset | 0.0 |
| Contrast | 0.0 to 10.0 | Mid-tone contrast expansion | 1.0 |
| Gamma | 0.1 to 10.0 | Nonlinear tonal mapping (inverted) | 1.0 |
| Hue | 0.0 to 1.0 | Color wheel rotation | 0.0 |
| Saturation | 0.0 to 2.0 | Color intensity relative to luminance | 1.0 |
Runtime Control
The effect integrates with Unity’s Volume system for seamless runtime parameter modification. Access the SharpenVolume component through the Volume Profile.
using UnityEngine;
using UnityEngine.Rendering;
using FronkonGames.Artistic.Sharpen;

// ...

[SerializedField]
private VolumeProfile volumeProfile;

// ...

// Access the effect
if (volumeProfile.TryGet(out SharpenVolume volume))
{
    // Enable/disable effect
    volume.intensity.value = 1.0f; // 0.0 = disabled

    // Select algorithm
    volume.algorithm.value = Sharpen.Algorithm.FSRRcas;

    // Configure FSR RCAS sharpening
    volume.fsrSharpness.value = 0.3f;

    // Or use classic unsharp mask
    volume.algorithm.value = Sharpen.Algorithm.UnsharpMask;
    volume.unsharpAmount.value = 1.5f;
    volume.radius.value = 2.0f;
    volume.threshold.value = 0.05f;

    // Apply color correction
    volume.contrast.value = 1.1f;
    volume.saturation.value = 1.0f;
}
For a more detailed example, check the code in the demo scene.
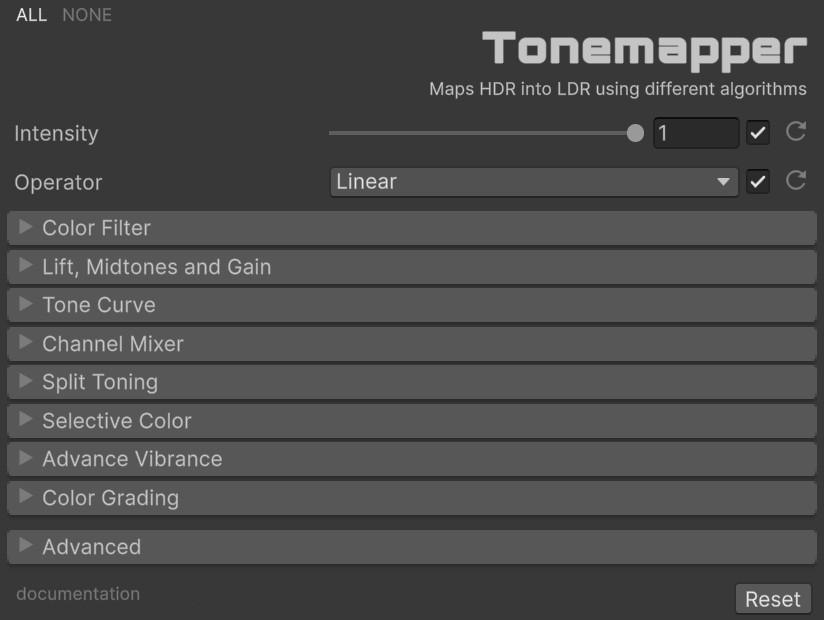
🌈 Tonemapper
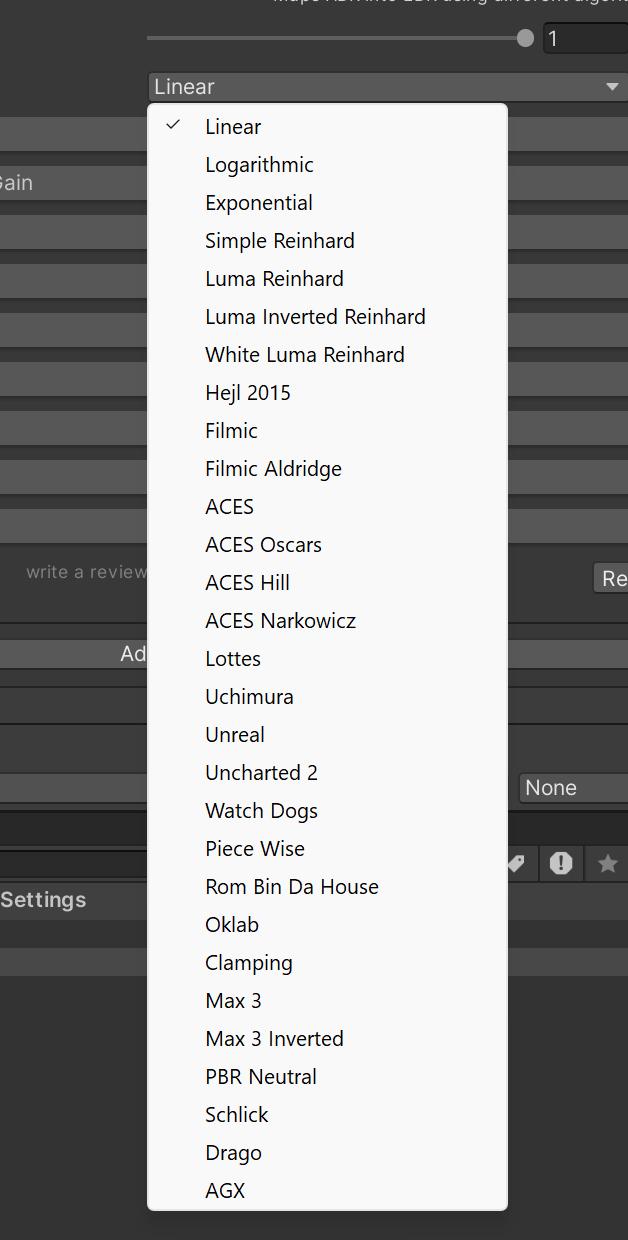
Tonemapping is a critical component in modern rendering pipelines, bridging the gap between high-dynamic-range (HDR) content and low-dynamic-range (LDR) displays. The package provides 52 distinct tonemapping operators, each offering unique characteristics for different artistic and technical requirements.
These operators range from simple mathematical functions to sophisticated film emulation curves, giving developers unprecedented control over their final image quality.
Requisites
To ensure optimal performance and compatibility, your project must meet the following requirements:
- Unity: 6000.0.58f1 or higher.
- Universal RP: 17.0.3 or higher.
Instalation Guide
Step 1: Add Renderer Feature
The effect must be registered in your project’s URP configuration:
- Locate your Universal Renderer Data asset.
- Click Add Renderer Feature and select Fronkon Games > Artistic > Tonemapper.
Step 2: Configure the Volume
To apply the effect to your scene:
- Create a Volume component (Global or Local).
- In the Volume component, create or assign a Volume Profile.
- Click Add Override and select Fronkon Games > Artistic > Tonemapper.
- Enable the ‘Intensity’ parameter (and any others you wish to modify).
Operator Categories
The 52 operators can be organized into distinct families based on their mathematical foundations and intended use cases:
Classical Mathematical Operators
Linear, good old linear mapping without compression. Useful for debugging or when HDR-to-LDR conversion is handled elsewhere.
Logarithmic, uses logarithmic compression of dynamic range based on white level reference. Good for preserving shadow detail while handling extreme highlights.
Exponential, applies exponential decay function: exp(-1.0 / (2.72 * pixel + 0.15)). Provides smooth falloff but can compress highlights aggressively.
Clamping, simple hard clamp at luminance threshold by Schlick. Fast but produces clipped highlights without smooth transitions.
Reinhard Family
Simple Reinhard, the classic Reinhard tone curve: pixel / (1.0 + pixel). Simple, fast, and widely used, but can desaturate bright areas.
Luma Reinhard, from “Photographic Tone Reproduction for Digital Images” (Reinhard 2002). Bases compression on luminance rather than per-channel values, maintaining color balance.
Luma Inverted Reinhard, Reinhard variation by Brian Karis using inverted luminance. Provides different highlight rolloff characteristics.
White Luma Reinhard, preserves white point while maintaining Reinhard’s luminance-based approach, useful for maintaining pure whites.
Reinhard Extended, extended Reinhard with shoulder/toe controls for more artistic flexibility over the tone curve shape.
Filmic and Cinematic Operators
Hejl 2015, ACES-liked operator by Jim Hejl. Provides excellent highlight handling with good contrast in midtones. Formula: (1.425x + 0.05) based compression.
Filmic, classic filmic tonemapping curve with shoulder and toe regions. Handles HDR to LDR conversion with film-like highlight rolloff.
Filmic Aldridge, variation of Hejl and Burgess-Dawson curve by Graham Aldridge. Provides adjustable cutoff parameter for controlling highlight compression onset.
ACES Family
ACES, the standard “ACES Filmic Tone Mapping Curve” (Narkowicz 2015). Industry-standard approximation with constants: a=2.51, b=0.03, c=2.43, d=0.59, e=0.14.
ACES Oscars, official ACES Oscars implementation with full color space transforms (AP0 to AP1). Includes pastel hue function designed for pleasing albedo representation.
ACESHill, ACES curve fit by Stephen Hill (@self_shadow). Optimized approximation maintaining ACES characteristics.
ACES Narkowicz, another ACES approximation by Krzysztof Narkowicz. Slightly different parameterization offering variant highlight handling.
ACES Extended, extended ACES with contrast/saturation controls for additional artistic flexibility.
Game Industry
Lottes, from “Advanced Techniques and Optimization of HDR Color Pipelines” (Lottes 2016). Configurable parameters for HDR max, mid-in, mid-out, and contrast.
Uchimura, used in Gran Turismo. From “HDR theory and practice” (Uchimura 2017). Features three-section curve: toe, linear, and shoulder regions with smooth transitions.
Unreal, used in Unreal Engine 3 up to 4.14. Adapted to approximate ACES curve by Romain Guy. Classic game industry standard.
Uncharted 2, created by John Hable for Uncharted 2, based on Haarm-Pieter Duiker’s work. Complex curve with adjustable shoulder, linear, and toe parameters.
Watch Dogs, used in Ubisoft’s Watch Dogs. Per-channel parameters allowing different highlight compression for RGB channels.
Piece Wise, Piece-Wise Power Curve by John Hable at Epic Games. Segmented curve with different behavior in different luminance ranges.
RomBinDaHouse, by Roman Galashov (@RomanGalashov). Exponential-based with gamma correction post-processing.
CryEngine, CryEngine’s filmic tone mapping curve with classic shoulder/toe control for cinematic game visuals.
Frostbite, DICE’s HDR solution for Battlefield. Based on ACES with adjustments optimized for large outdoor environments.
Call of Duty, tone mapping optimized for military shooter aesthetic with enhanced contrast for tactical gameplay.
Modern and Specialized Operators
Oklab, Oklab color space-based tonemapper. Performs operations in perceptually uniform color space for better color preservation.
Max 3, “Optimized Reversible Tonemapper for Resolve” by Timothy Lottes. Simple and fast: pixel / (1.0 + maxValue).
Max 3 Inverted, variation of Max3 using inverted luminance. Different compression characteristics.
PBR Neutral, PBR Neutral tone mapper by Khronos Group. Specifically designed for PBR workflows to maintain material accuracy with controlled desaturation.
Schlick, Schlick tone mapper. Simple rational function: L_out = L_in / (p + L_in). Very fast and efficient.
Drago, Drago adaptive logarithmic mapping from “Adaptive logarithmic mapping for displaying high contrast scenes” (Drago et al. 2003). Features bias parameter for local adaptation and excellent dynamic range compression.
AGX, latest open-source tonemapper gaining industry adoption. Based on Blender and Filament implementations. Full color pipeline with Rec. 2020 transforms and sigmoid contrast function. Includes optional punchy look enhancement.
Custom S-Curve, fully configurable S-curve with toe/shoulder parameters for complete artistic control over the tone mapping shape.
Academic/Research Operators
Tumblin-Rushmeier, from “Tone Reproduction for Realistic Images” (SIGGRAPH 1993). Classic HDR operator using TVI (Threshold Versus Intensity) function for perceptually accurate reproduction.
Ward, from “A Contrast-Based Scalefactor for Luminance Display” (GDC 1994). Scale factor based on human contrast sensitivity for natural-looking results.
Naka-Rushton, photoreceptor adaptation model from vision science. Classic formula: R = Rmax * I / (I + sigma) for physiologically accurate adaptation.
Weber-Fechner, based on Weber-Fechner law from psychophysics. Perceptually linear mapping using S = k * log(I/I0).
Michaelis-Menten, saturation curve from enzyme kinetics applied to vision. Formula: v = Vmax * S / (Km + S) for biological vision simulation.
Artistic Operators
Bleach Bypass, film processing technique that skips the bleaching step. Creates a desaturated, high-contrast look popular in cinema.
Cross-Process, simulates processing film in wrong chemicals. Creates a vintage, psychedelic appearance with color shifts.
Vintage Film, Kodachrome-like simulation with warm tones, lifted blacks, and reduced saturation for a nostalgic look.
Technicolor, three-strip Technicolor simulation for classic Hollywood look with vibrant, saturated colors.
Sepia, warm brown monochrome for old photograph appearance.
Parameter Configuration
With ‘Intensity’ you can control the overall strength of the effect [0.0 - 1.0]. If it is 0, the effect will not be active.
Tonemapping Operator
Choose from 52 different tonemapping algorithms, each with unique characteristics. The operators are organized into families based on their mathematical foundations:
| Family | Operators |
|---|---|
| Classical | Linear, Logarithmic, Exponential, Clamping |
| Reinhard | Simple Reinhard, Luma Reinhard, Luma Inverted Reinhard, White Luma Reinhard, Reinhard Extended |
| Filmic | Filmic, Filmic Aldridge, Hejl 2015, Uncharted 2, Watch Dogs, Piece Wise |
| ACES | ACES, ACES Oscars, ACES Hill, ACES Narkowicz, ACES Extended |
| Game Industry | Lottes, Uchimura, Unreal, RomBinDaHouse, CryEngine, Frostbite, Call of Duty |
| Modern | Oklab, Max 3, Max 3 Inverted, PBR Neutral, Schlick, Drago, AGX, Custom S-Curve |
| Academic | Tumblin-Rushmeier, Ward, Naka-Rushton, Weber-Fechner, Michaelis-Menten |
| Artistic | Bleach Bypass, Cross-Process, Vintage Film, Technicolor, Sepia |
Operator-Specific Parameters
Some operators expose additional controls:
| Parameter | Range | Default | Used By |
|---|---|---|---|
| White Level | 0.0 to 5.0 | 1.0 | Linear, Logarithmic, WhiteLumaReinhard, Hejl2015, Clamping, Schlick, Drago, Tumblin-Rushmeier, Ward, Naka-Rushton, Michaelis-Menten, Bleach Bypass, Reinhard Extended, Custom S-Curve |
| Cutoff | 0.0 to 0.5 | 0.025 | Filmic Aldridge |
| Linear White | 0.5 to 2.0 | 1.5 | Watch Dogs |
| Linear Color | 0.5 to 2.0 | 1.5 | Watch Dogs |
| AGX Punchy Look | Boolean | true | AGX |
| Toe Strength | 0.0 to 1.0 | 0.0 | Reinhard Extended, Custom S-Curve |
| Shoulder Strength | 0.0 to 1.0 | 0.0 | Reinhard Extended, Custom S-Curve |
| Contrast | 0.0 to 10.0 | 1.0 | ACES Extended |
| Saturation | 0.0 to 2.0 | 1.0 | ACES Extended |
Color Filter
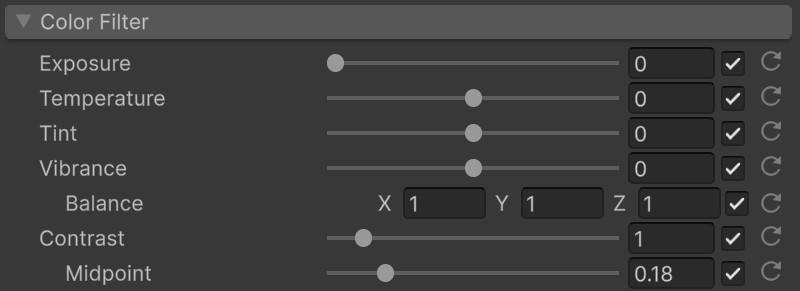
| Parameter | Range | Default | Effect |
|---|---|---|---|
| Exposure | 0.0 to 10.0 | 0.0 | Overall brightness adjustment |
| Color Filter | Color | White | Global color tint applied to the image |
| Temperature | -1.0 to 1.0 | 0.0 | White balance. Negative = cooler (blue), positive = warmer (yellow) |
| Tint | -1.0 to 1.0 | 0.0 | White balance tint. Negative = green, positive = magenta |
| Vibrance | -1.0 to 1.0 | 0.0 | Color vibrance intensity |
| Vibrance Balance | Vector3 | (1, 1, 1) | Per-channel RGB vibrance multipliers |
| Contrast | 0.0 to 10.0 | 1.0 | Overall contrast adjustment |
| Contrast Midpoint | 0.0 to 1.0 | 0.18 | Log of linear contrast midpoint |
Lift, Midtones & Gain
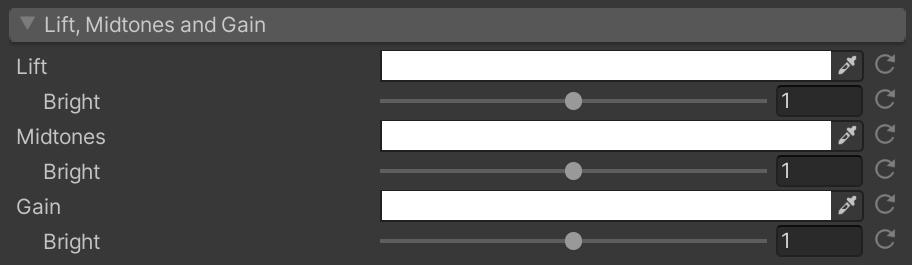
Professional color grading controls inspired by the ASC-CDL standard, providing independent adjustment of shadows, midtones, and highlights.
| Zone | Parameter | Range | Default | Effect |
|---|---|---|---|---|
| Lift (Shadows) | Color | Color | White | RGB shadow color adjustment |
| Brightness | 0.0 to 2.0 | 1.0 | Shadow brightness multiplier | |
| Midtones | Color | Color | White | RGB midtone color adjustment |
| Brightness | 0.0 to 2.0 | 1.0 | Midtone brightness multiplier | |
| Gain (Highlights) | Color | Color | White | RGB highlight color adjustment |
| Brightness | 0.0 to 2.0 | 1.0 | Highlight brightness multiplier |
Tone Curve
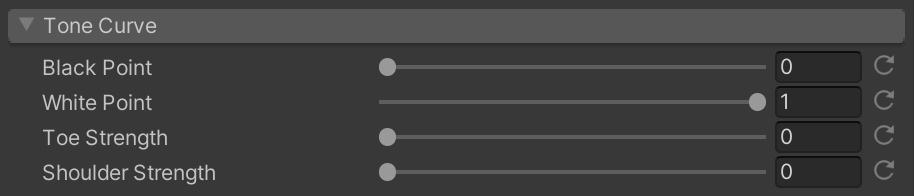
Film-emulation curve adjustments for precise tonal control.
| Parameter | Range | Default | Effect |
|---|---|---|---|
| Black Point | 0.0 to 0.5 | 0.0 | Lifts blacks for a faded film look |
| White Point | 0.5 to 1.0 | 1.0 | Lowers whites for a vintage appearance |
| Toe Strength | 0.0 to 1.0 | 0.0 | Controls shadow rolloff smoothness |
| Shoulder Strength | 0.0 to 1.0 | 0.0 | Controls highlight rolloff smoothness |
Channel Mixer

Remap color channels for creative color effects. Each output channel receives a weighted mix of all three input channels.
| Parameter | Default | Effect |
|---|---|---|
| Red Output | (1, 0, 0) | Controls how much R, G, B input influences red output |
| Green Output | (0, 1, 0) | Controls how much R, G, B input influences green output |
| Blue Output | (0, 0, 1) | Controls how much R, G, B input influences blue output |
Split Toning

Apply different color tints to shadows and highlights independently.
| Parameter | Range | Default | Effect |
|---|---|---|---|
| Highlight Tint | Color | White | Color applied to bright image areas |
| Shadow Tint | Color | White | Color applied to dark image areas |
| Balance | -1.0 to 1.0 | 0.0 | Negative favors shadows, positive favors highlights |
Selective Color
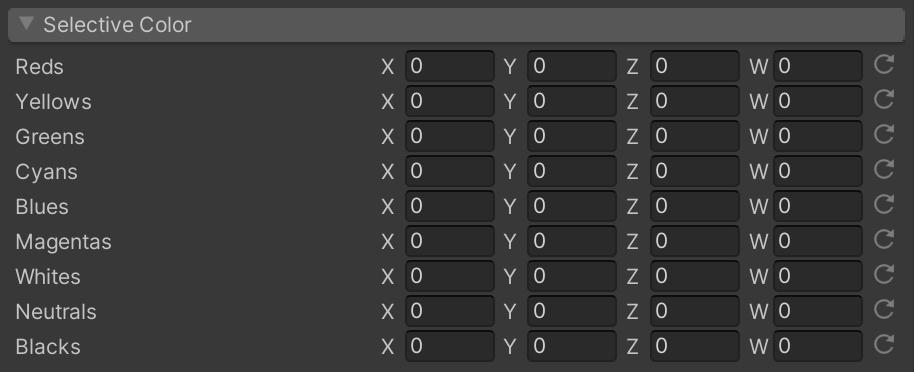
CMYK adjustments for specific color ranges. Each of the 9 color ranges (Reds, Yellows, Greens, Cyans, Blues, Magentas, Whites, Neutrals, Blacks) supports independent Cyan, Magenta, Yellow, and Black adjustments in the range [-1.0, 1.0].
Advanced Vibrance
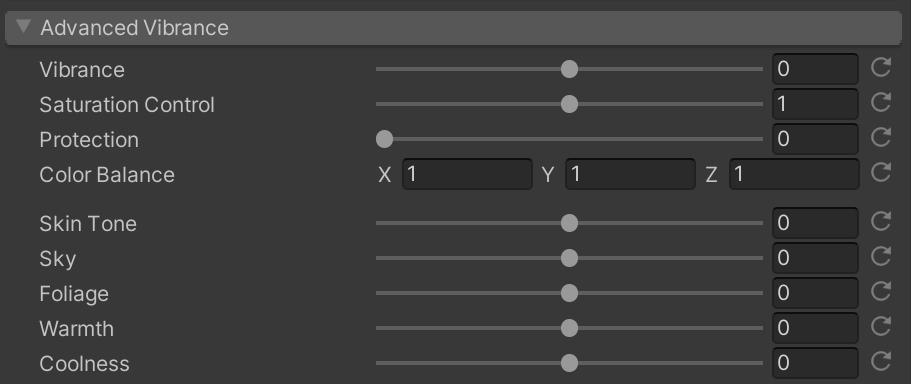
Enhanced vibrance controls with selective adjustments for specific color families.
| Parameter | Range | Default | Effect |
|---|---|---|---|
| Vibrance | -1.0 to 1.0 | 0.0 | Increases saturation of unsaturated colors while protecting already saturated ones |
| Saturation | 0.0 to 2.0 | 1.0 | Overall saturation strength |
| Protect | 0.0 to 1.0 | 0.0 | Protects already saturated colors from vibrance. Higher = less effect on saturated colors |
| Color Balance | Vector3 | (1, 1, 1) | Per-channel RGB vibrance balance |
| Skin Tone | -1.0 to 1.0 | 0.0 | Vibrance adjustment specifically for skin tones |
| Sky | -1.0 to 1.0 | 0.0 | Vibrance adjustment for sky/blue tones |
| Foliage | -1.0 to 1.0 | 0.0 | Vibrance adjustment for green foliage |
| Warmth | -1.0 to 1.0 | 0.0 | Vibrance adjustment for warm colors (red/orange/yellow) |
| Coolness | -1.0 to 1.0 | 0.0 | Vibrance adjustment for cool colors (blue/cyan) |
Color Grading
| Parameter | Range | Effect | Default |
|---|---|---|---|
| Brightness | -1.0 to 1.0 | Additive luminance offset | 0.0 |
| Gamma | 0.1 to 10.0 | Nonlinear tonal mapping (inverted) | 1.0 |
| Hue | 0.0 to 1.0 | Color wheel rotation | 0.0 |
| Saturation | 0.0 to 2.0 | Color intensity relative to luminance | 1.0 |
Runtime Control
The effect integrates with Unity’s Volume system for seamless runtime parameter modification. Access the TonemapperVolume component through the Volume Profile.
using UnityEngine;
using UnityEngine.Rendering;
using FronkonGames.Artistic.Tonemapper;

// ...

[SerializedField]
private VolumeProfile volumeProfile;

// ...

// Access the effect
if (volumeProfile.TryGet(out TonemapperVolume volume))
{
    // Enable/disable effect
    volume.intensity.value = 1.0f; // 0.0 = disabled

    // Select tonemapping operator
    volume.tonemapperOperator.value = Operators.ACES;

    // Configure color filter
    volume.exposure.value = 1.0f;
    volume.temperature.value = 0.1f;
    volume.vibrance.value = 0.2f;

    // Adjust tone curve
    volume.blackPoint.value = 0.02f;
    volume.whitePoint.value = 0.95f;
    volume.toeStrength.value = 0.3f;

    // Split toning
    volume.highlightTint.value = new Color(1.0f, 0.95f, 0.9f);
    volume.shadowTint.value = new Color(0.9f, 0.9f, 1.0f);
    volume.splitBalance.value = 0.2f;

    // Advanced vibrance
    volume.advancedVibrance.value = 0.3f;
    volume.vibranceSkinTone.value = -0.1f;
    volume.vibranceSky.value = 0.2f;

    // Apply color correction
    volume.contrast.value = 1.1f;
    volume.saturation.value = 1.0f;
}
For a more detailed example, check the code in the demo scene.
💬 Comic
Comic simulates the halftone printing technique used in comics and newspapers. The effect converts the image into a pattern of colored dots at configurable angles for each CMYK channel, combined with edge detection to produce ink-stroke outlines characteristic of comic book art.
The shader converts each pixel to CMYK color space, then renders each channel as a rotated dot pattern at the specified angle. The dot size varies with the channel’s intensity, producing the classic halftone gradient effect. Edge detection is applied separately using a Sobel-like operator to generate the characteristic bold outlines.
Requisites
To ensure optimal performance and compatibility, your project must meet the following requirements:
- Unity: 6000.0.58f2 or higher.
- Universal RP: 17.0.3 or higher.
Instalation Guide
Step 1: Add Renderer Feature
The effect must be registered in your project’s URP configuration:
- Locate your Universal Renderer Data asset.
- Click Add Renderer Feature and select Fronkon Games > Artistic > Comic.
Step 2: Configure the Volume
To apply the effect to your scene:
- Create a Volume component (Global or Local).
- In the Volume component, create or assign a Volume Profile.
- Click Add Override and select Fronkon Games > Artistic > Comic.
- Enable the ‘Intensity’ parameter (and any others you wish to modify).
Parameter Configuration
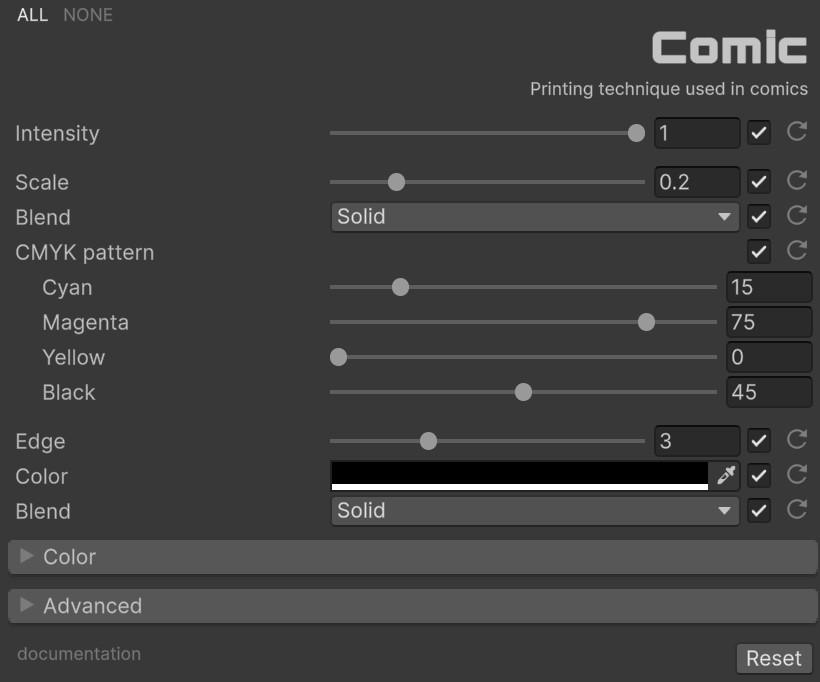
With ‘Intensity’ you can control the overall strength of the effect [0.0 - 1.0]. If it is 0, the effect will not be active.
Halftone Parameters
| Parameter | Range | Default | Effect |
|---|---|---|---|
| Scale | 0.01 to 1.0 | 0.2 | Size of the halftone dots. Smaller values produce finer dot patterns |
| Color Blend | Enum (23 modes) | Solid | Color blend operation used to mix the halftone pattern with the original image |
| Edge | 0.0 to 10.0 | 3.0 | Intensity of the ink-stroke edge detection overlay |
| Edge Color | Color | Black | Color of the edge strokes |
| Edge Color Blend | Enum (23 modes) | Solid | Blend operation for the edge overlay |
| CMYK Pattern | Vector4 [0-90] | (15, 75, 0, 45) | Rotation angle in degrees for each CMYK channel (Cyan, Magenta, Yellow, Black) |
Color Grading
Standard color correction parameters apply to the final output.
| Parameter | Range | Effect | Default |
|---|---|---|---|
| Brightness | -1.0 to 1.0 | Additive luminance offset | 0.0 |
| Contrast | 0.0 to 10.0 | Mid-tone contrast expansion | 1.0 |
| Gamma | 0.1 to 10.0 | Nonlinear tonal mapping (inverted) | 1.0 |
| Hue | 0.0 to 1.0 | Color wheel rotation | 0.0 |
| Saturation | 0.0 to 2.0 | Color intensity relative to luminance | 1.0 |
Runtime Control
The effect integrates with Unity’s Volume system for seamless runtime parameter modification. Access the ComicVolume component through the Volume Profile.
using UnityEngine;
using UnityEngine.Rendering;
using FronkonGames.Artistic.Comic;

// ...

[SerializedField]
private VolumeProfile volumeProfile;

// ...

// Access the effect
if (volumeProfile.TryGet(out ComicVolume volume))
{
    // Enable/disable effect
    volume.intensity.value = 1.0f; // 0.0 = disabled

    // Configure halftone
    volume.scale.value = 0.15f;
    volume.colorBlend.value = ColorBlends.Solid;

    // Configure edges
    volume.edge.value = 4.0f;
    volume.edgeColor.value = Color.black;
    volume.edgeColorBlend.value = ColorBlends.Solid;

    // Custom CMYK angles
    volume.cmykPattern.value = new Vector4(15.0f, 75.0f, 0.0f, 45.0f);

    // Apply color correction
    volume.contrast.value = 1.3f;
    volume.saturation.value = 1.2f;
}
For a more detailed example, check the code in the demo scene.
Preset Configurations
| Preset | Key Settings | Look |
|---|---|---|
| Classic Halftone | Scale = 1.0, Edge = 0.0, CMYK Pattern = (15, 54, 0, 45), Brightness = 0.1, Gamma = 0.35 | Pure halftone dots without outlines, bright and warm |
| Bold Outlines | Scale = 0.88, Edge = 4.0, Edge Blend = Burn, Gamma = 0.4, Saturation = 1.5 | Strong ink outlines with vivid saturated colors |
| Pop Art | Scale = 1.0, Edge = 10.0, Edge Blend = Overlay, Edge Color = White, Brightness = -0.5, Saturation = 2.0 | High-contrast pop art with white overlay edges |
| Manga | Edge = 4.0, Contrast = 2.0, Saturation = 0.0, Gamma = 0.4 | Black and white manga-style with strong contrast |
🌌 Neon
Neon creates a synthwave-inspired effect that highlights image edges with animated cycling colors. The effect applies edge detection with configurable thickness and strength, then colorizes the detected edges with a time-animated hue rotation, producing the characteristic glowing neon aesthetic. Optional fisheye distortion and depth-based attenuation provide additional creative control.
Requisites
To ensure optimal performance and compatibility, your project must meet the following requirements:
- Unity: 6000.0.58f2 or higher.
- Universal RP: 17.0.3 or higher.
Instalation Guide
Step 1: Add Renderer Feature
The effect must be registered in your project’s URP configuration:
- Locate your Universal Renderer Data asset.
- Click Add Renderer Feature and select Fronkon Games > Artistic > Neon.
Step 2: Configure the Volume
To apply the effect to your scene:
- Create a Volume component (Global or Local).
- In the Volume component, create or assign a Volume Profile.
- Click Add Override and select Fronkon Games > Artistic > Neon.
- Enable the ‘Intensity’ parameter (and any others you wish to modify).
Parameter Configuration
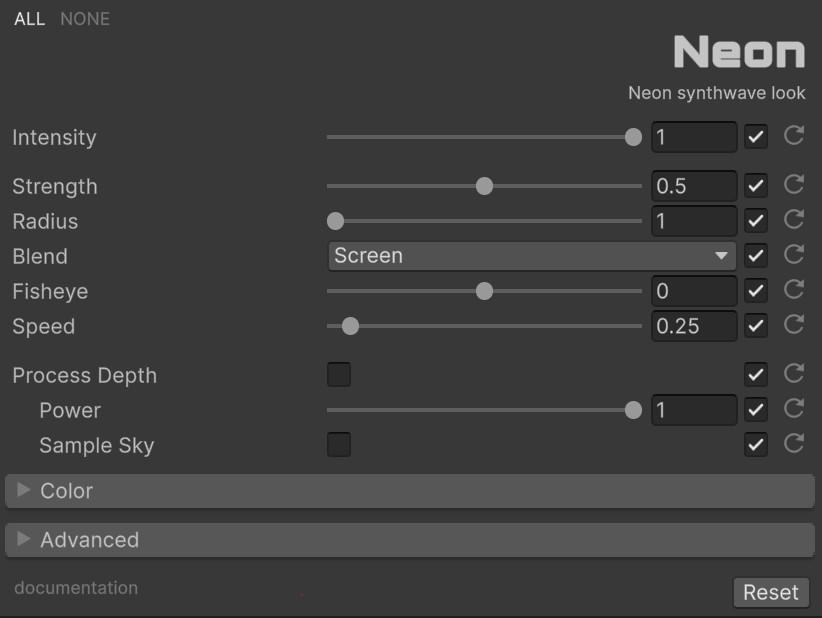
With ‘Intensity’ you can control the overall strength of the effect [0.0 - 1.0]. If it is 0, the effect will not be active.
Neon Parameters
These parameters control the core neon edge appearance. The effect detects edges in the image and renders them as glowing colored lines whose hue cycles over time. Radius sets the line thickness, Strength controls how prominently edges glow, and Speed drives the animated color rotation that gives the effect its signature synthwave look.
| Parameter | Range | Default | Effect |
|---|---|---|---|
| Strength | 0.0 to 1.0 | 0.5 | Edge detection power. Higher values produce brighter, more visible neon edges |
| Radius | 1 to 20 | 1 | Thickness of the neon edge lines in pixels |
| Blend | Enum (23 modes) | Screen | Color blend operation used to mix the neon edges with the original image |
| Fisheye | -1.0 to 1.0 | 0.0 | Lens distortion. Positive = fisheye (barrel), negative = anti-fisheye (pincushion) |
| Speed | 0.0 to 5.0 | 0.25 | Speed of the hue cycling animation on the neon edges |
Depth Processing
Activate ‘Process Depth’ to make the effect attenuate with distance from the camera.
| Parameter | Range | Default | Effect |
|---|---|---|---|
| Process Depth | Boolean | false | Enables depth-based effect attenuation |
| Depth Power | 0.0 to 1.0 | 1.0 | Controls how quickly the effect fades with distance |
| Sample Sky | Boolean | false | Whether the effect is applied to the sky |
Color Grading
Standard color correction parameters apply to the final output.
| Parameter | Range | Effect | Default |
|---|---|---|---|
| Brightness | -1.0 to 1.0 | Additive luminance offset | 0.0 |
| Contrast | 0.0 to 10.0 | Mid-tone contrast expansion | 1.0 |
| Gamma | 0.1 to 10.0 | Nonlinear tonal mapping (inverted) | 1.0 |
| Hue | 0.0 to 1.0 | Color wheel rotation | 0.0 |
| Saturation | 0.0 to 2.0 | Color intensity relative to luminance | 1.0 |
Runtime Control
The effect integrates with Unity’s Volume system for seamless runtime parameter modification. Access the NeonVolume component through the Volume Profile.
using UnityEngine;
using UnityEngine.Rendering;
using FronkonGames.Artistic.Neon;

// ...

[SerializedField]
private VolumeProfile volumeProfile;

// ...

// Access the effect
if (volumeProfile.TryGet(out NeonVolume volume))
{
    // Enable/disable effect
    volume.intensity.value = 1.0f; // 0.0 = disabled

    // Configure neon edges
    volume.strength.value = 0.7f;
    volume.radius.value = 2;
    volume.blend.value = ColorBlends.Screen;
    volume.speed.value = 0.3f;

    // Add fisheye distortion
    volume.fisheye.value = 0.2f;

    // Enable depth attenuation
    volume.processDepth.value = true;
    volume.depthPower.value = 0.8f;
    volume.sampleSky.value = false;

    // Apply color correction
    volume.contrast.value = 1.2f;
    volume.saturation.value = 1.3f;
}
For a more detailed example, check the code in the demo scene.
Preset Configurations
| Preset | Key Settings | Look |
|---|---|---|
| Synthwave | Radius = 2, Process Depth = true, Blend = Screen, Speed = 0.25 | Classic neon synthwave with animated hue cycling |
| High Contrast | Radius = 2, Process Depth = true, Contrast = 1.4 | Boosted contrast neon edges for dramatic scenes |
| Monochrome Neon | Radius = 2, Process Depth = true, Saturation = 0.0 | Desaturated neon edges for a noir-cyberpunk look |
| Solid Color | Radius = 2, Process Depth = true, Blend = Solid, Intensity = 0.75 | Solid color neon overlay with reduced intensity |
🔆 Spark
Spark adds bloom and ray-of-light effects to the brightest areas of the image. The effect generates configurable star-shaped light rays with chromatic dispersion, barrel distortion, and noise, producing cinematic lens flare and glint effects. A brightness threshold controls which pixels generate rays, while downsampling options allow performance tuning.
Requisites
To ensure optimal performance and compatibility, your project must meet the following requirements:
- Unity: 6000.0.58f2 or higher.
- Universal RP: 17.0.3 or higher.
Instalation Guide
Step 1: Add Renderer Feature
The effect must be registered in your project’s URP configuration:
- Locate your Universal Renderer Data asset.
- Click Add Renderer Feature and select Fronkon Games > Artistic > Spark.
Step 2: Configure the Volume
To apply the effect to your scene:
- Create a Volume component (Global or Local).
- In the Volume component, create or assign a Volume Profile.
- Click Add Override and select Fronkon Games > Artistic > Spark.
- Enable the ‘Intensity’ parameter (and any others you wish to modify).
Parameter Configuration
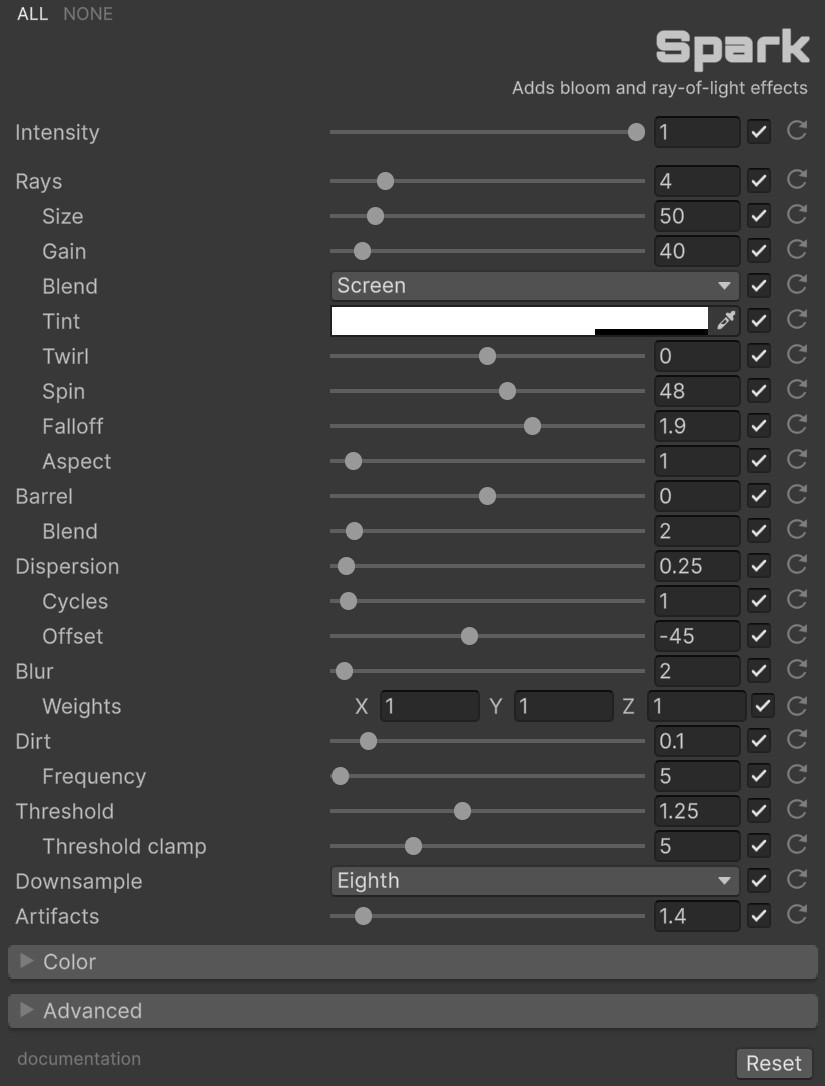
With ‘Intensity’ you can control the overall strength of the effect [0.0 - 1.0]. If it is 0, the effect will not be active.
Ray Parameters
Define the visual shape of each spark. Rays sets the number of arms, Size their length, and Spin their rotation. Twirl curves the arms for more organic shapes, while Aspect stretches them horizontally for anamorphic lens flare looks.
| Parameter | Range | Default | Effect |
|---|---|---|---|
| Rays | 1 to 20 | 4 | Number of points (arms) each spark has |
| Gain | 0.0 to 500.0 | 40.0 | Overall brightness of the spark rays |
| Size | 1.0 to 400.0 | 50.0 | Length of the spark arms |
| Spin | -360.0 to 360.0 | 48.0 | Rotation angle of the spark pattern in degrees |
| Twirl | -1.0 to 1.0 | 0.0 | Bends the arms of the sparks for curved ray effects |
| Falloff | -2.0 to 4.0 | 1.9 | Dissolves the ends of the spark arms |
| Aspect | 0.01 to 20.0 | 1.0 | Stretches stars for anamorphic spark effects |
| Blend | Enum (23 modes) | Screen | Color blend operation for mixing sparks with the image |
| Tint | Color | White (0.7 alpha) | Color tint applied to the spark rays |
Threshold & Quality
Controls which bright pixels in the scene generate sparks. Only pixels exceeding the Threshold brightness produce rays, while Threshold Clamp caps the maximum contribution. Down Sample reduces the internal resolution for better performance at the cost of detail.
| Parameter | Range | Default | Effect |
|---|---|---|---|
| Threshold | 0.0 to 3.0 | 1.25 | Minimum brightness level for ray generation. Highlights darker than this are ignored |
| Threshold Clamp | 0.0 to 20.0 | 5.0 | Maximum brightness cap. Highlights brighter than this don’t increase the glint further |
| Down Sample | Enum | Eighth | Resolution downsample for performance. Lower resolution = faster but lower quality |
| Artifacts | 0.1 to 16.0 | 1.4 | Reduces stepping artifacts caused by downsampling |
Distortion & Dispersion
Barrel warps the spark pattern around the screen center, simulating curved lens elements. Dispersion splits each ray into a rainbow of colors along its length, mimicking the chromatic dispersion seen in real glass optics.
| Parameter | Range | Default | Effect |
|---|---|---|---|
| Barrel | -10.0 to 10.0 | 0.0 | Bends sparks around the center of the frame |
| Barrel Bend | 1.0 to 20.0 | 2.0 | Controls the bendiness of the barrel distortion curve |
| Dispersion | 0.0 to 10.0 | 0.25 | Chromatic color shift along the spark arms |
| Dispersion Cycles | 0.01 to 30.0 | 1.0 | Number of complete rainbow cycles along each arm |
| Dispersion Offset | -360.0 to 360.0 | -45.0 | Hue rotation offset for the dispersion rainbow |
Blur & Noise
Softens and adds texture to the spark pattern. Blur smooths the ray edges for a more natural glow, while Dirt overlays a procedural noise pattern that breaks up the uniformity, simulating imperfections on a camera lens.
| Parameter | Range | Default | Effect |
|---|---|---|---|
| Blur | 0.0 to 100.0 | 2.0 | Smoothness of the spark shape. High values may affect performance |
| Dirt | 0.0 to 1.0 | 0.1 | Noise intensity applied to the spark pattern |
| Dirt Frequency | 0.0 to 1000.0 | 5.0 | Frequency of the noise pattern |
Color Grading
Standard color correction parameters apply to the final output.
| Parameter | Range | Effect | Default |
|---|---|---|---|
| Brightness | -1.0 to 1.0 | Additive luminance offset | 0.0 |
| Contrast | 0.0 to 2.0 | Mid-tone contrast expansion | 1.0 |
| Gamma | 0.01 to 10.0 | Nonlinear tonal mapping (inverted) | 1.0 |
| Hue | 0.0 to 1.0 | Color wheel rotation | 0.0 |
| Saturation | 0.0 to 2.0 | Color intensity relative to luminance | 1.0 |
Runtime Control
The effect integrates with Unity’s Volume system for seamless runtime parameter modification. Access the SparkVolume component through the Volume Profile.
using UnityEngine;
using UnityEngine.Rendering;
using FronkonGames.Artistic.Spark;

// ...

[SerializedField]
private VolumeProfile volumeProfile;

// ...

// Access the effect
if (volumeProfile.TryGet(out SparkVolume volume))
{
    // Enable/disable effect
    volume.intensity.value = 1.0f; // 0.0 = disabled

    // Configure rays
    volume.rays.value = 6;
    volume.gain.value = 50.0f;
    volume.size.value = 80.0f;
    volume.spin.value = 30.0f;
    volume.blend.value = ColorBlends.Screen;

    // Configure threshold
    volume.threshold.value = 1.0f;
    volume.thresholdClamp.value = 5.0f;

    // Add chromatic dispersion
    volume.dispersion.value = 0.5f;
    volume.dispersionCycles.value = 1.5f;

    // Add barrel distortion
    volume.barrel.value = 2.0f;
    volume.barrelBend.value = 3.0f;

    // Apply color correction
    volume.contrast.value = 1.1f;
    volume.saturation.value = 1.0f;
}
For a more detailed example, check the code in the demo scene.
🌀 Radial Blur
Radial Blur increases the feeling of speed and adrenaline by applying a directional blur that radiates from a configurable center point. The effect combines multi-sample radial blur with radial chromatic aberration and fisheye distortion, plus independent color grading for the inner (less blurred) and outer (more blurred) zones.
The shader samples the image multiple times along the radial direction from each pixel toward the center point, averaging the results to produce smooth motion blur. A power-curve gradient controls the transition between the inner and outer zones, while per-channel UV offsets create the characteristic chromatic aberration of high-speed motion.
Requisites
To ensure optimal performance and compatibility, your project must meet the following requirements:
- Unity: 6000.0.58f2 or higher.
- Universal RP: 17.0.3 or higher.
Instalation Guide
Step 1: Add Renderer Feature
The effect must be registered in your project’s URP configuration:
- Locate your Universal Renderer Data asset.
- Click Add Renderer Feature and select Fronkon Games > Artistic > Radial Blur.
Step 2: Configure the Volume
To apply the effect to your scene:
- Create a Volume component (Global or Local).
- In the Volume component, create or assign a Volume Profile.
- Click Add Override and select Fronkon Games > Artistic > Radial Blur.
- Enable the ‘Intensity’ parameter (and any others you wish to modify).
Parameter Configuration
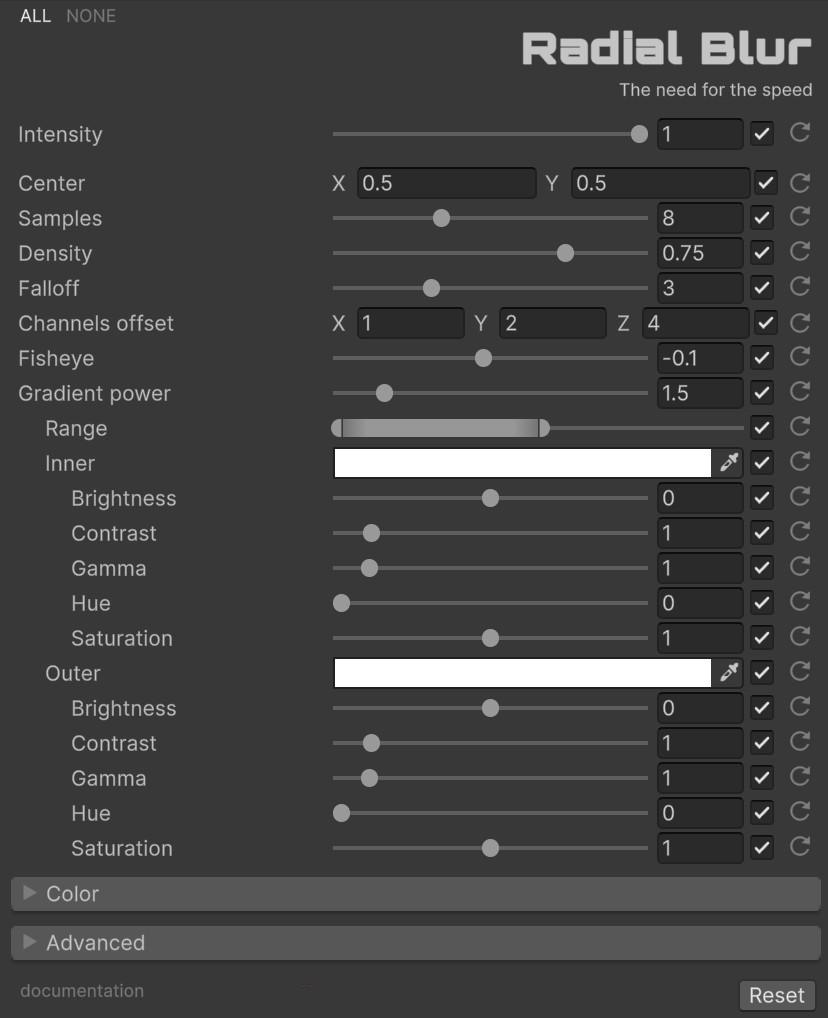
With ‘Intensity’ you can control the overall strength of the effect [0.0 - 1.0]. If it is 0, the effect will not be active.
Core Parameters
These parameters define the blur origin, quality, and shape. The image is sampled multiple times along the radial direction from each pixel toward the Center point, with Samples controlling quality and Density the spread. Channels Offset separates the RGB channels along the blur direction for chromatic aberration, while Fisheye adds barrel or pincushion distortion to the entire frame.
| Parameter | Range | Default | Effect |
|---|---|---|---|
| Center | Vector2 | (0, 0) | Origin point of the radial blur. (0, 0) is the center of the screen |
| Samples | 2 to 20 | 8 | Number of blur samples. Higher = better quality, lower = better performance |
| Density | 0.0 to 1.0 | 0.75 | Distance between blur layers. Controls the spread of the blur |
| Falloff | 0.0 to 10.0 | 3.0 | Blur falloff curve from center to edges |
| Channels Offset | Vector3 | (1, 2, 4) | Per-channel chromatic aberration offset (R, G, B) for radial color fringing |
| Fisheye | -2.0 to 2.0 | -0.1 | Screen warping. Negative = inward deformation, positive = outward |
Zone Configuration
The effect divides the screen into an inner zone (less blur) and an outer zone (more blur), with independent color grading for each.
| Parameter | Range | Default | Effect |
|---|---|---|---|
| Gradient Power | 0.1 to 10.0 | 1.5 | Controls the transition curve between inner and outer zones |
| Range Min | 0.0 to 2.0 | 0.0 | Minimum range for the inner zone boundary |
| Range Max | 0.0 to 2.0 | 1.0 | Maximum range for the outer zone boundary |
Inner Zone Color Grading
Color correction applied to the center of the screen where the blur is weakest. Use this to keep the focal area vivid and sharp-looking.
| Parameter | Range | Default | Effect |
|---|---|---|---|
| Inner Color | Color | White | Tint applied to the inner zone |
| Inner Brightness | -1.0 to 1.0 | 0.0 | Brightness adjustment for the inner zone |
| Inner Contrast | 0.0 to 10.0 | 1.0 | Contrast adjustment for the inner zone |
| Inner Gamma | 0.1 to 10.0 | 1.0 | Gamma correction for the inner zone |
| Inner Hue | 0.0 to 1.0 | 0.0 | Hue rotation for the inner zone |
| Inner Saturation | 0.0 to 2.0 | 1.0 | Saturation for the inner zone |
Outer Zone Color Grading
Color correction applied to the edges of the screen where the blur is strongest. Darkening and desaturating this zone creates a natural tunnel-vision effect.
| Parameter | Range | Default | Effect |
|---|---|---|---|
| Outer Color | Color | White | Tint applied to the outer zone |
| Outer Brightness | -1.0 to 1.0 | 0.0 | Brightness adjustment for the outer zone |
| Outer Contrast | 0.0 to 10.0 | 1.0 | Contrast adjustment for the outer zone |
| Outer Gamma | 0.1 to 10.0 | 1.0 | Gamma correction for the outer zone |
| Outer Hue | 0.0 to 1.0 | 0.0 | Hue rotation for the outer zone |
| Outer Saturation | 0.0 to 2.0 | 1.0 | Saturation for the outer zone |
Color Grading
Standard color correction parameters apply to the final output.
| Parameter | Range | Effect | Default |
|---|---|---|---|
| Brightness | -1.0 to 1.0 | Additive luminance offset | 0.0 |
| Contrast | 0.0 to 10.0 | Mid-tone contrast expansion | 1.0 |
| Gamma | 0.1 to 10.0 | Nonlinear tonal mapping (inverted) | 1.0 |
| Hue | 0.0 to 1.0 | Color wheel rotation | 0.0 |
| Saturation | 0.0 to 2.0 | Color intensity relative to luminance | 1.0 |
Runtime Control
The effect integrates with Unity’s Volume system for seamless runtime parameter modification. Access the RadialBlurVolume component through the Volume Profile.
using UnityEngine;
using UnityEngine.Rendering;
using FronkonGames.Artistic.RadialBlur;

// ...

[SerializedField]
private VolumeProfile volumeProfile;

// ...

// Access the effect
if (volumeProfile.TryGet(out RadialBlurVolume volume))
{
    // Enable/disable effect
    volume.intensity.value = 1.0f; // 0.0 = disabled

    // Configure blur
    volume.center.value = Vector2.zero;
    volume.samples.value = 8;
    volume.density.value = 0.75f;
    volume.falloff.value = 3.0f;

    // Chromatic aberration
    volume.channelsOffset.value = new Vector3(1.0f, 2.0f, 4.0f);

    // Fisheye distortion
    volume.fishEye.value = -0.1f;

    // Zone configuration
    volume.gradientPower.value = 1.5f;
    volume.gradientRangeMin.value = 0.0f;
    volume.gradientRangeMax.value = 1.0f;

    // Darken outer zone for tunnel vision effect
    volume.outerBrightness.value = -0.2f;
    volume.outerSaturation.value = 0.7f;

    // Apply color correction
    volume.contrast.value = 1.1f;
    volume.saturation.value = 1.0f;
}
For a more detailed example, check the code in the demo scene.
Preset Configurations
| Preset | Key Settings | Look |
|---|---|---|
| Speed Boost | Samples = 12, Density = 0.5, Fisheye = -0.75, Outer Brightness = -1.0, Channels Offset = default × 0.25 | Racing speed effect with tunnel vision and fisheye |
| Subtle Motion | Samples = 8, Density = 0.75, Fisheye = -0.1 | Default gentle radial blur for light motion |
| Tunnel Vision | Samples = 12, Density = 1.0, Fisheye = -0.75, Outer Brightness = -1.0, Outer Saturation = 0.7 | Dark outer zone with strong blur and desaturation |
Performance Characteristics
The effect executes in a single render pass. Per-pixel cost scales linearly with the Samples parameter.
Performance considerations:
- Pass Count: 1 blit pass.
- Texture Samples: N per pixel (where N = Samples value) + chromatic aberration offsets.
- Branching: Minimal, uses smooth mathematical functions.
- Memory: No additional textures or compute buffers.
F.A.Q.
Effect Not appearing
If the effect doesn’t appear in your scene:
- Verify Renderer Feature: Check that the renderer feature is added to your Universal Renderer Data asset.
- Check Volume Profile: Ensure a Volume component exists in your scene with the effect override enabled.
- Confirm Intensity: Verify that the Intensity parameter is set to a value greater than 0.0 and enabled.
- Camera Settings: Check that your camera has Post Processing enabled in the Camera component.
How to make the effect also affect the UI?
In order for the UI not to be affected by the effect, you should set the ‘Render Mode’ of your canvas from ‘Screen Space - Overlay’ to ‘Screen Space - Camera’ and dragging your camera with to ‘Render Camera’.
Note that when you make this change, the coordinates of your UI will be in camera space, so you will have to change them.
When Bloom is added, its intensity is too low or the effect stops working.
Bloom’s URP Unity effect is not compatible with postprocessing effects based on ScriptableRendererFeature (like this one).
You will have to add your own one based on ScriptableRendererFeature or you can use this one at no cost ;)
Can I use it in a material?
Yes! Any effect can easily be used on a material. Just follow these steps:
- In the ‘Project’ window, open the ‘Create’ menu with the right mouse button and select ‘Create > Render Texture’.
- Create a new camera and in ‘Output Texture’ select the Render Texture previously created. Remember to activate ‘Post Processing’ and select in ‘Renderer’ where you have the effect added.
- In the material you want to use, select in ‘Base Map’ the Render Texture.
Support
Do you have any problem or any suggestions? Send me an email to fronkongames@gmail.com and I’ll be happy to help you.
Remember that if you want to inform me of an error, it would help me if you sent to me the log file.
If you are happy with this asset, consider write a review in the store
❤️ thanks! ❤️
If you are happy with this asset, consider write a review in the store
❤️ thanks! ❤️