Store
A comprehensive, physically-accurate ballistics simulation system for Unity that provides realistic trajectories, ricochets, penetration mechanics, and advanced ballistic effects for games requiring authentic projectile behavior.
- Physically Accurate: Implements real-world ballistics physics including gravity, air resistance, drag models (G1, G2, G5, G6, G7, G8), and environmental effects.
- High Performance: Built on a custom lightweight Entity Component System (ECS) architecture with Unity Jobs and Burst compilation for optimal performance, capable of handling hundreds of simultaneous projectiles.
- Realistic Ricochets: Physically-based bullet deflection with angle-dependent probability and energy retention based on material properties.
- Advanced Penetration Mechanics: Energy-based projectile penetration through materials with realistic entry/exit behavior and stuck projectile handling.
- Comprehensive Material System: Extensive surface interaction properties with material-specific ballistic characteristics for different surfaces.
- Advanced Effects: Coriolis effect, spin drift, weather simulation, and atmospheric conditions.
- Visual Feedback: Built-in tracer system and comprehensive debug visualization tools.
- Extensive Weapons Database: 380+ real-world weapons with authentic ballistic data including pistols, rifles, shotguns, machine guns, and sniper rifles.
- Educational FPS Demo: Complete SimpleFPS demo system showcasing all features with clean, documented code.
What Can Be Used For
✅ Realistic Ballistics Simulation: Accurate trajectories with proper physics for FPS, military, hunting, …
✅ Material Penetration: Realistic projectile behavior through different materials (wood, metal, concrete, etc).
✅ Ricochet Effects: Physically-based bullet deflection off surfaces .
✅ Long-Range Shooting: Precision ballistics for sniper games with environmental factors.
✅ Performance-Critical Games: Optimized for handling thousands of simultaneous projectiles.
What Is NOT
❌ FPS Controller: While it includes a SimpleFPS system, it’s designed for ballistics simulation, not as a FPS character controller.
❌ Visual Effects System: Focuses on physics simulation rather than muzzle flashes, explosions, or other visual effects.
❌ Weapon Animation System: Doesn’t handle weapon animations, reloading animations, or complex weapon mechanics.
❌ Audio System: Doesn’t provide comprehensive audio management beyond basic demo sounds.
❌ Networking Solution: Designed for single-player simulations, not multiplayer networking.
❌ Energy Weapons or Propelled Projectiles: Designed for ballistic projectiles only, doesn’t support laser weapons, plasma guns, or self-propelled projectiles like rockets and missiles.
Installation
Requirements:
- Unity 6000.0 LTS or newer.
Installation:
- Download and import the
True Ballisticsasset from the Unity Asset Store into your Unity project. - No additional setup is required. The asset is ready to use out of the box!
How to Use
The BallisticsManager component is the central hub of the ballistics system. It manages the lightweight ECS, handles projectile spawning, and coordinates all ballistic systems.
Create an empty GameObject and add the BallisticsManager component (Fronkon Games → True Ballistics → Ballistics Manager)
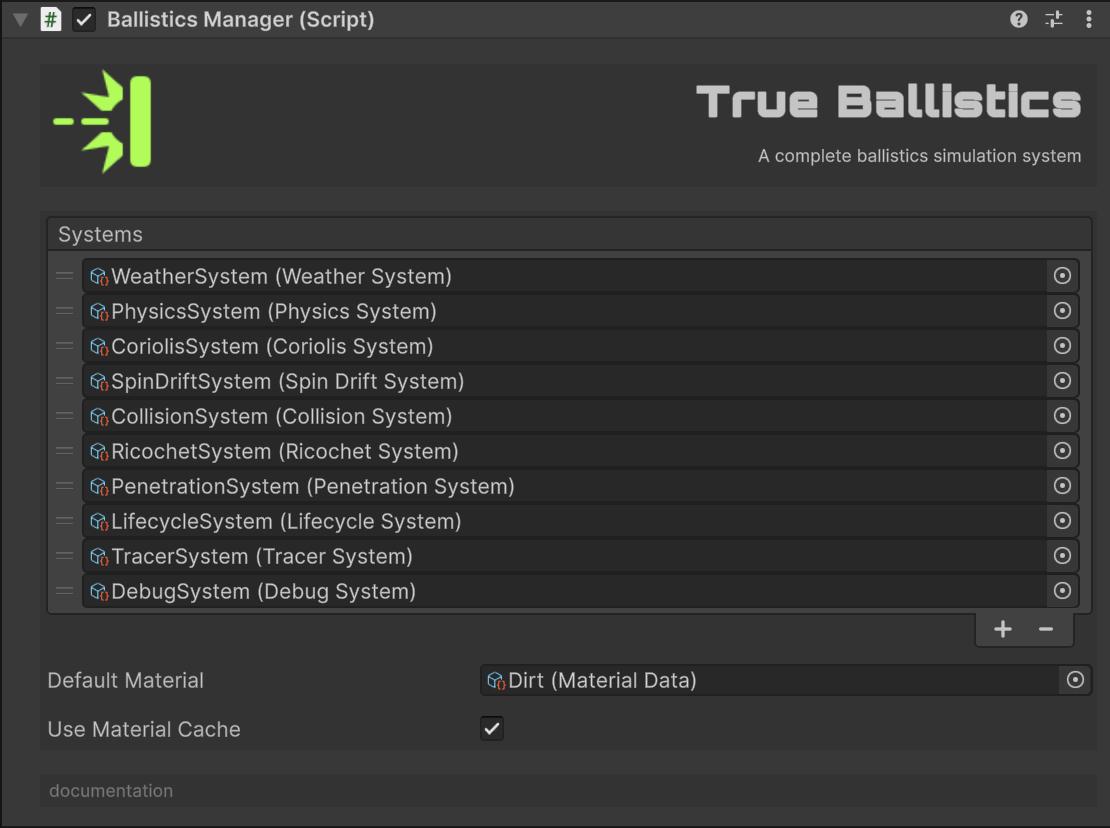
Add systems
Systems are modules that take care of a task. You can add as many as you want in Systems, this way you will only use the ones you need.
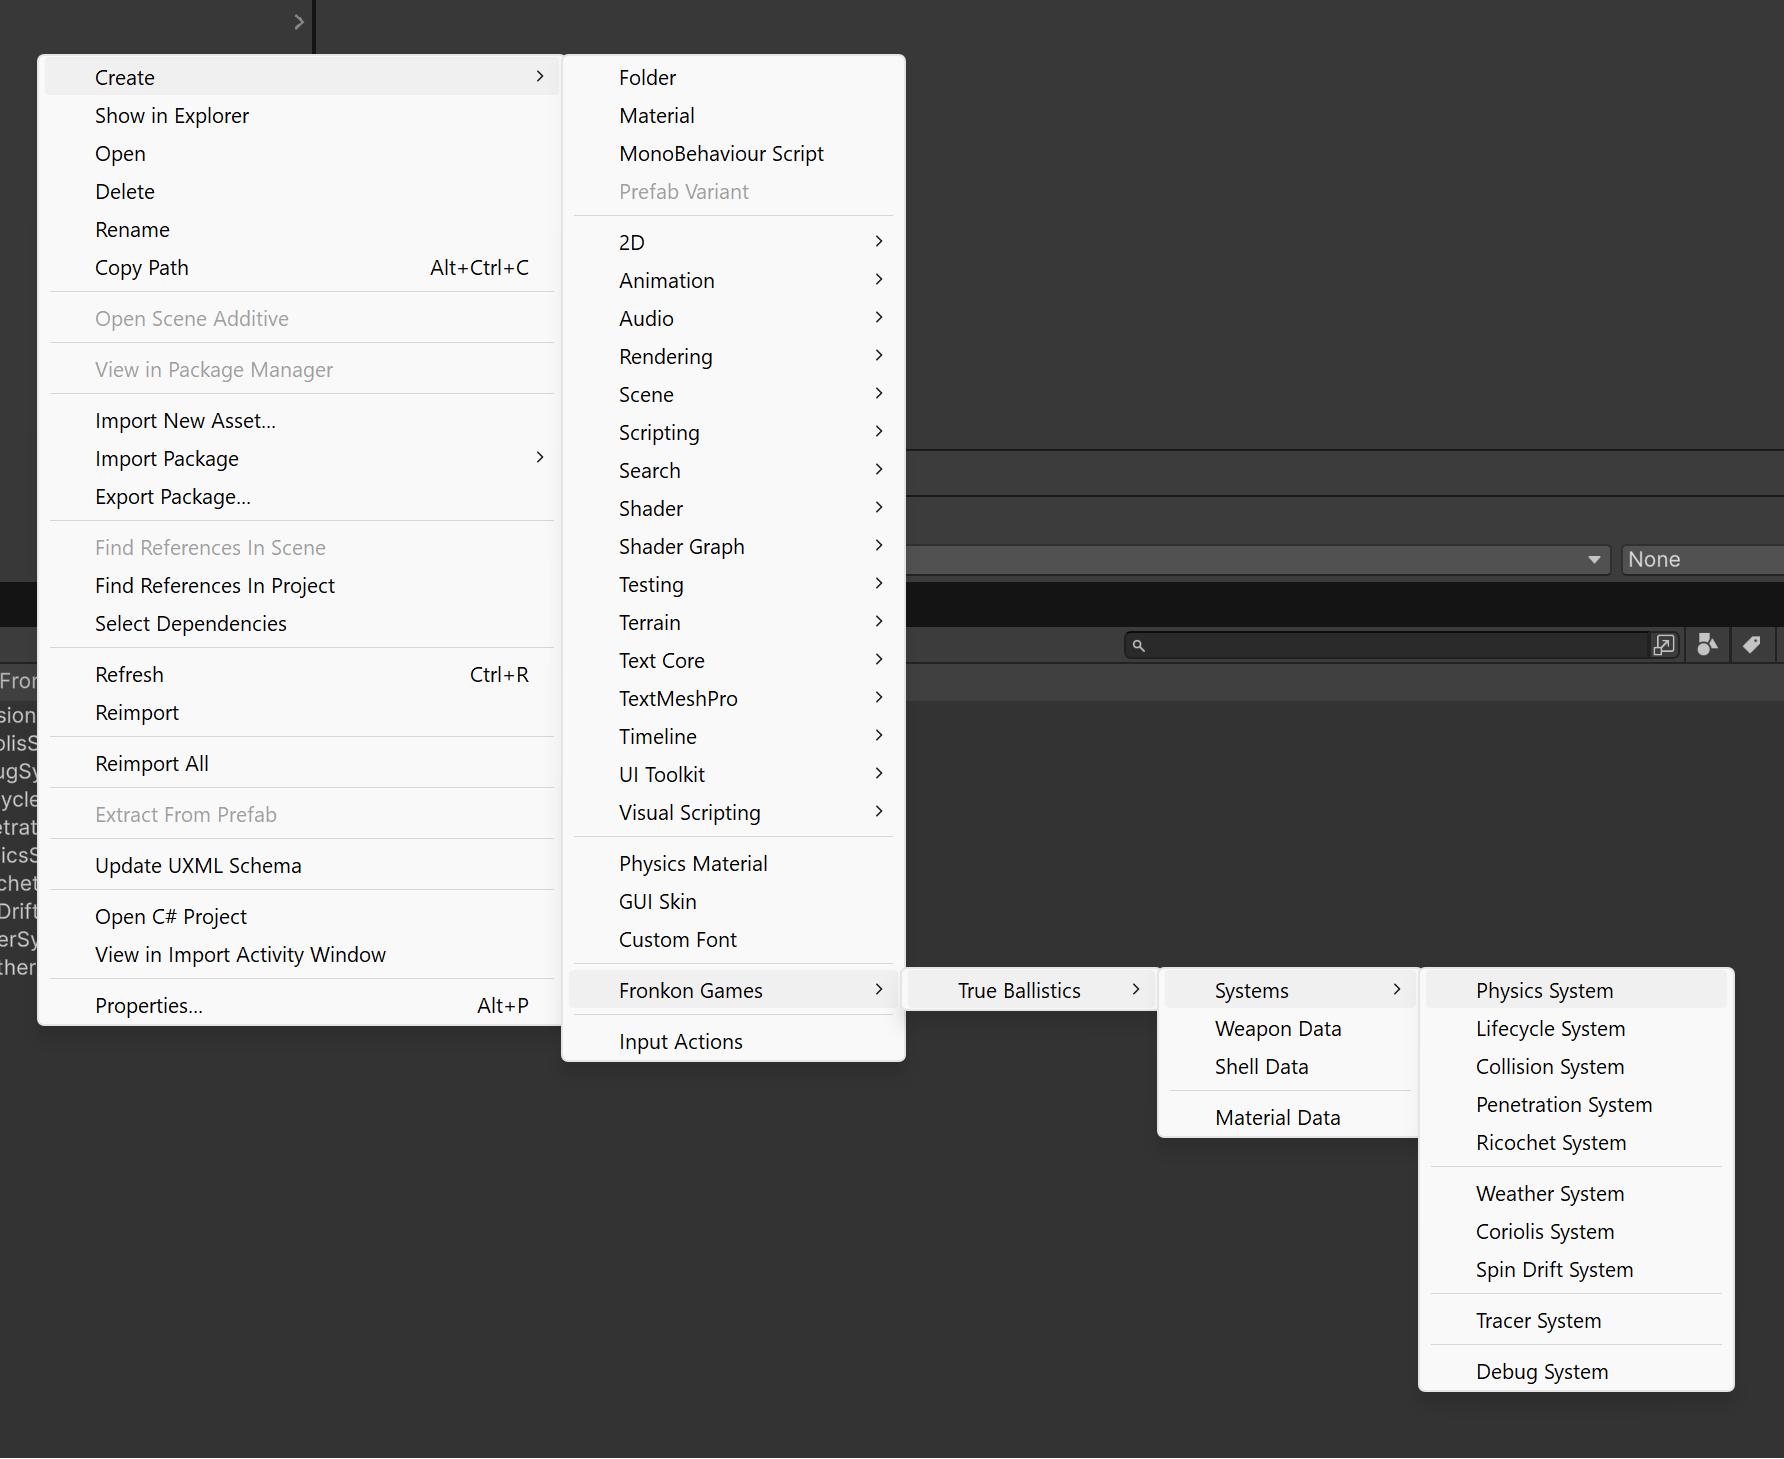
They are ScriptableObjects and therefore files. You can create them from the Project window (Fronkon Games → True Ballistics → Systems)
All the systems included are discussed in more detail below. The minimum recommended systems are:
- Physics System: without this system the projectiles would not move.
- Lifecycle System: is in charge of recycling projectiles. Without this system the projectiles would never be destroyed and when reaching the maximum number (5000 by default), no new ones would be created.
- Collision System: the one in charge of reporting collisions with projectiles.
Once these three systems are added, you can fire a projectile in this way:
// Get the manager instance
BallisticsManager manager = FindFirstObjectByType<BallisticsManager>();

// Spawn a projectile
int projectileEntity = manager.SpawnProjectile(
    weaponData,          // WeaponData ScriptableObject
    transform.position,  // Spawn position
    transform.rotation,  // Spawn rotation
    1.0f,                // Dispersion multiplier
    true,                // Can jam
    1.0f                 // Velocity multiplier
);

// Spawn pellets (for shotguns)
List<int> pellets = manager.SpawnPellets(
    weaponData,          // WeaponData ScriptableObject
    shellData,           // ShellData ScriptableObject
    transform.position,  // Spawn position
    transform.rotation   // Spawn rotation
);
weaponData is another ScriptableObject (a file) with all the relevant data of a weapon model. You have more than 380 in the FronkonGames/TrueBallistics/Data/Weapons folder.
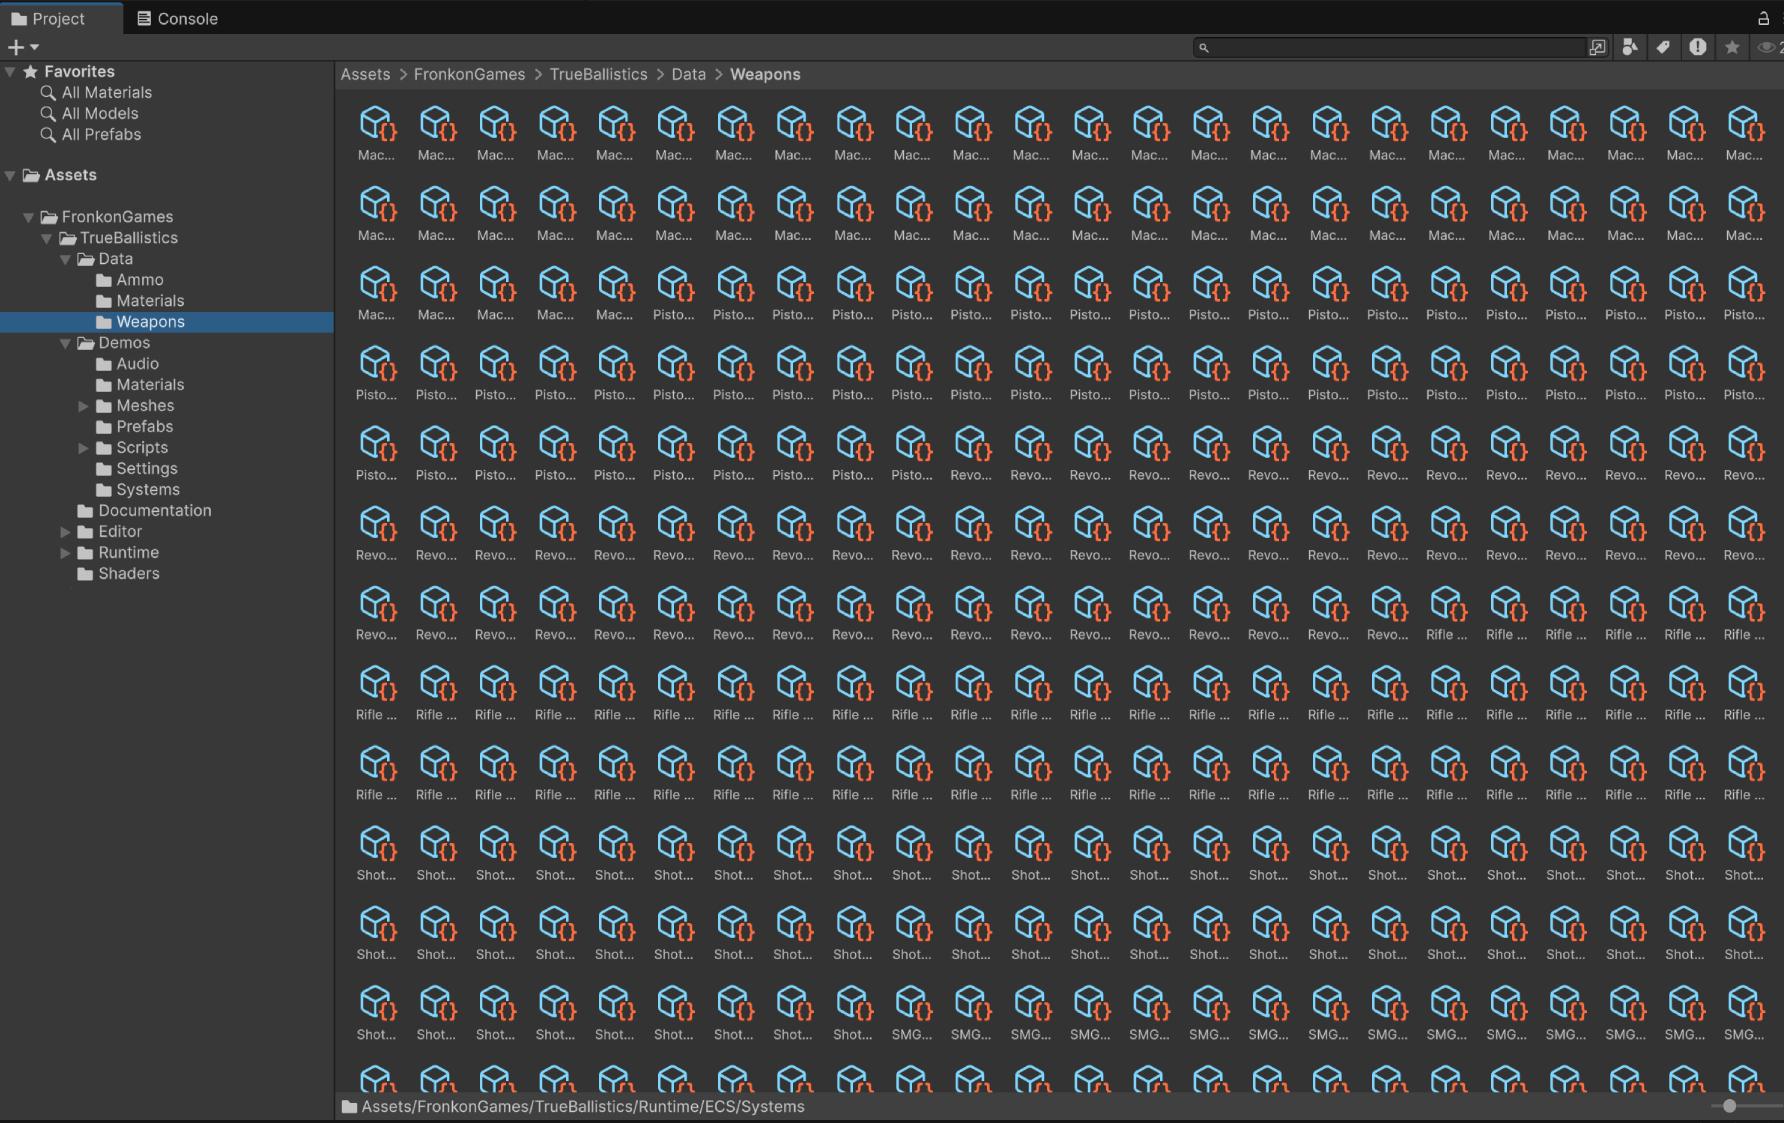
In the case of shotguns, in addition to the corresponding weaponData, you must add shellData, the type of cartridge you want to use. You can find several in FronkonGames/TrueBallistics/Data/Ammo.
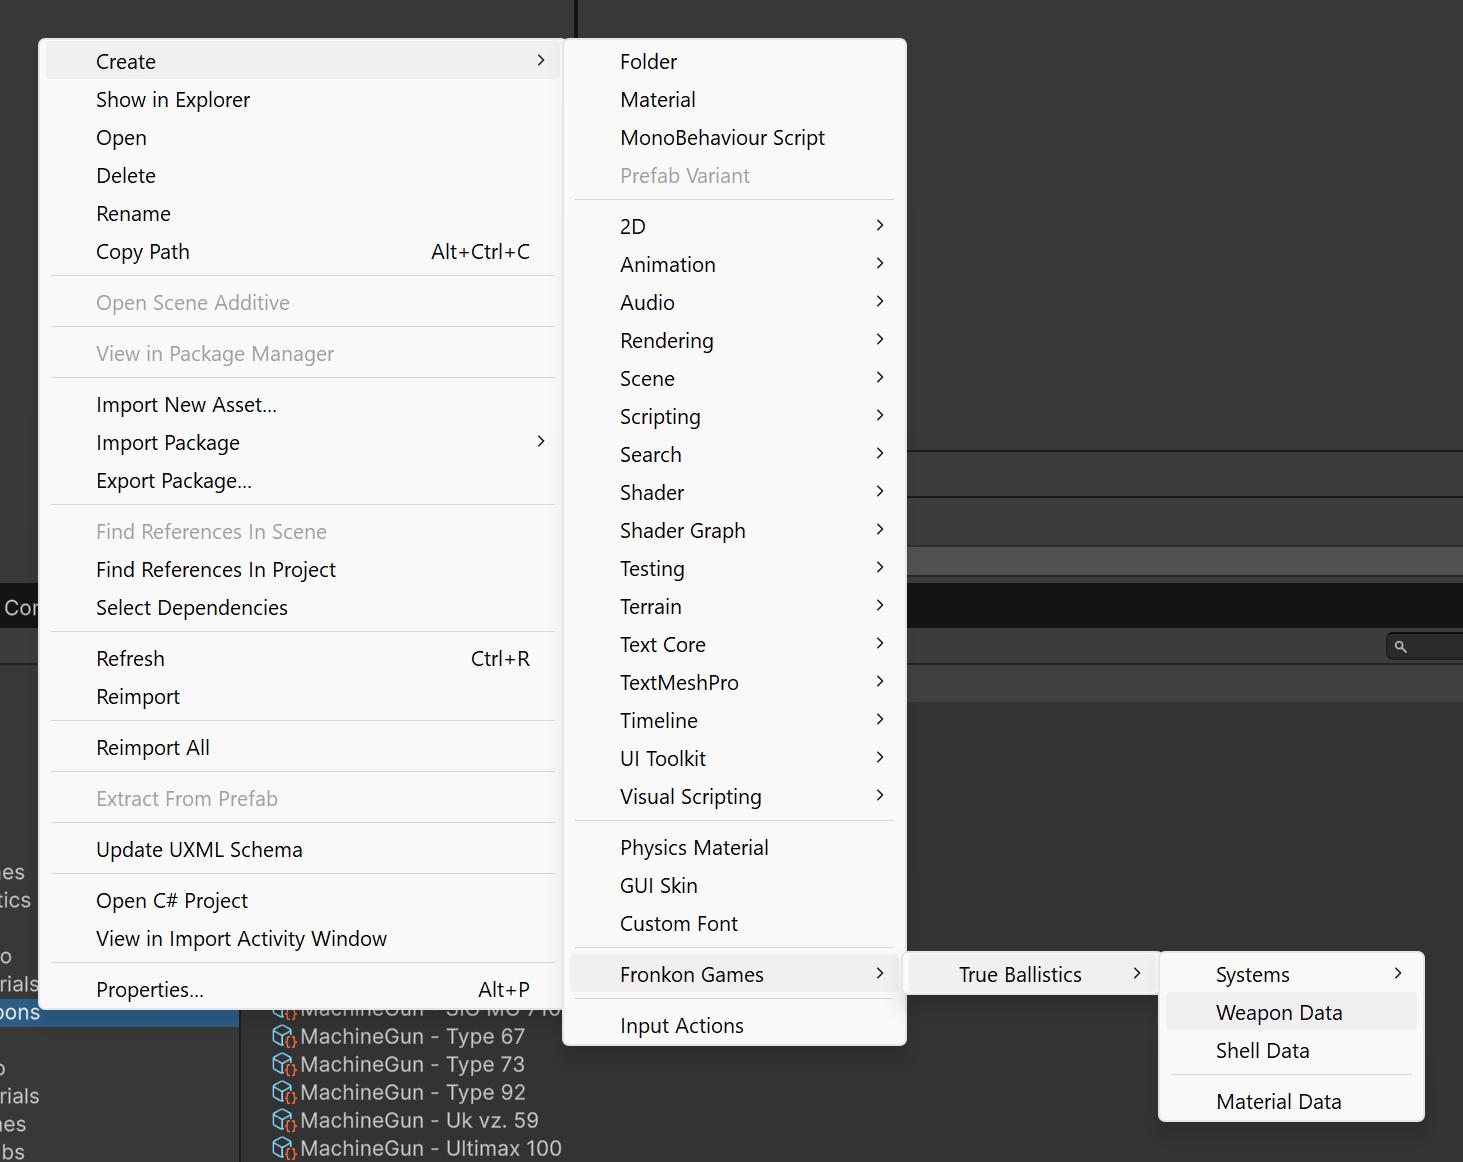
You can create new weapons (and shells) from the Project window (Fronkon Games → True Ballistics → Weapon Data / Fronkon Games → True Ballistics → Shell Data).
This is an example of the weapons included:
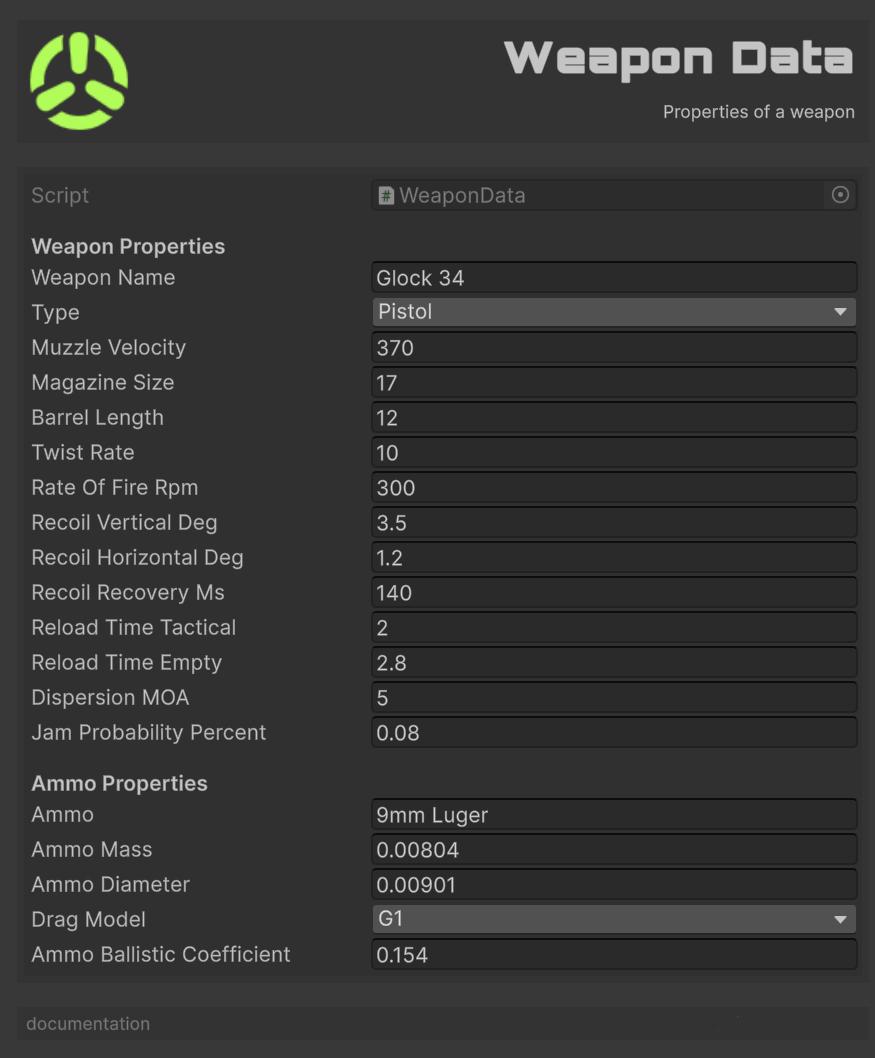
Configuration:
Weapon Name: The name of the weapon.Type: The type of weapon.Muzzle Velocity: The muzzle velocity of the ammo in meters per second.Magazine Size: The size of the magazine.Barrel Length: The length of the barrel in centimeters.Twist Rate: The twist rate of the ammo in inches per 1 meter.Rate Of Fire Rpm: The rate of fire in rounds per minute.Recoil Vertical Deg: The vertical recoil per shot in degrees.Recoil Horizontal Deg: The horizontal recoil per shot in degrees.Recoil Recovery Ms: The time it takes for recoil to recover in milliseconds.Reload Time Tactical: The time it takes to perform a tactical reload in seconds.Reload Time Empty: The time it takes to perform a reload from empty in seconds.Dispersion MOA: The dispersion of the weapon in Minutes of Angle (MOA).Jam Probability Percent: The probability of the weapon jamming, as a percentage.Ammo: The name of the ammo.Ammo Mass: The mass of the ammo in kilograms.Ammo Diameter: The diameter of the ammo in meters.Drag Model: The drag model of the ammo.Ammo Ballistic Coefficient: The ballistic coefficient of the ammo.
Systems
True Ballistics uses a custom lightweight ECS architecture optimized for ballistics simulation:
- Entities: Simple integer IDs representing projectiles (max 5000 concurrent).
- Components: Data structures (PhysicsComponent, DragComponent, etc).
- Systems: Logic processors that operate on entities with specific components.
Physics System

The engine room of True Ballistics. Every frame it gives each projectile a new, physically-plausible position and velocity by applying gravity, aerodynamic drag and wind, then integrating the motion. In essence, it turns the static “bullet stats” you configure into the curved, wind-pushed flight paths you see in-game. Without this system the projectiles would not move.
Features:
- Configurable gravity vector (supports other planets).
- Air density simulation with altitude effects.
- Multiple drag models (G1, G2, G5, G6, G7, G8).
- Wind effects and atmospheric conditions.
- Burst-compiled jobs for performance.
Configuration:
Gravity: Gravity vector (default: Earth’s 9.81 m/s²).- Moon: 1.62 m/s².
- Mars: 3.71 m/s².
- Jupiter: 24.79 m/s².
- Saturn: 10.44 m/s².
- Uranus: 8.87 m/s².
- Neptune: 11.15 m/s².
- Pluto: 0.62 m/s².
- Sun: 274.0 m/s².
- Venus: 8.87 m/s².
- Mercury: 3.70 m/s².
- Io: 1.796 m/s².
- Europa: 1.315 m/s².
- Ganymede: 1.428 m/s².
- Callisto: 1.235 m/s².
Air Density: Air density in kg/m³ (default value is 1.225 kg/m³ at sea level).- 0.001225 kg/m³ at 10,000 meters.
- 0.0001225 kg/m³ at 20,000 meters.
- 0.00001225 kg/m³ at 30,000 meters.
- 0.000001225 kg/m³ at 40,000 meters.
- 0.0000001225 kg/m³ at 50,000 meters.
Speed Of Sound: Speed of sound for Mach calculations (default value is 343 m/s at sea level).- 295 m/s at 10,000 meters.
- 235 m/s at 20,000 meters.
- 196 m/s at 30,000 meters.
- 167 m/s at 40,000 meters.
- 145 m/s at 50,000 meters.
Max Speed: Maximum projectile velocity in m/s (default value is 299,792,458 m/s, the speed of light in vacuum).
If you add Debug System to the system list, you will be able to see the trajectories of the projectiles in the Scene window.
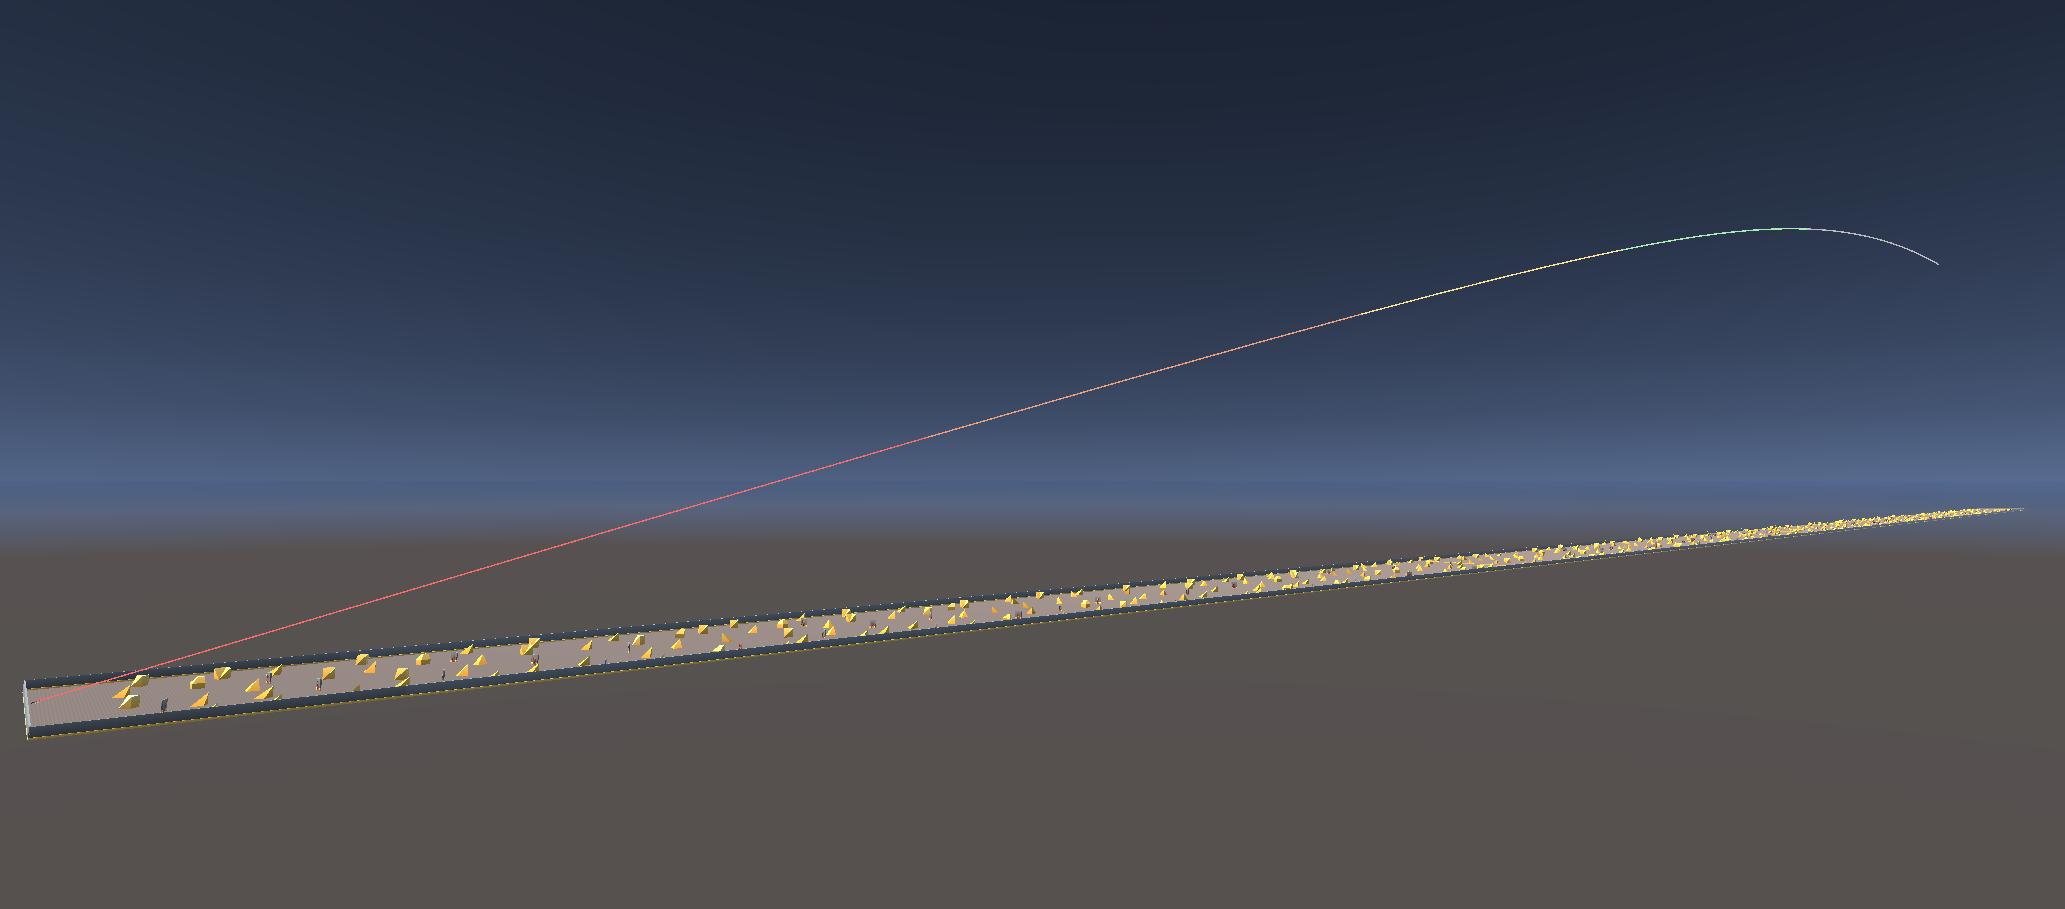
The trajectory of the projectile will have these colors:
| Color | Initial Velocity |
|---|---|
| Red | >=75% |
| Orange | >=50% |
| Yellow | >=25% |
| Green | >=10% |
| Gray | <10% |
Lifecycle System
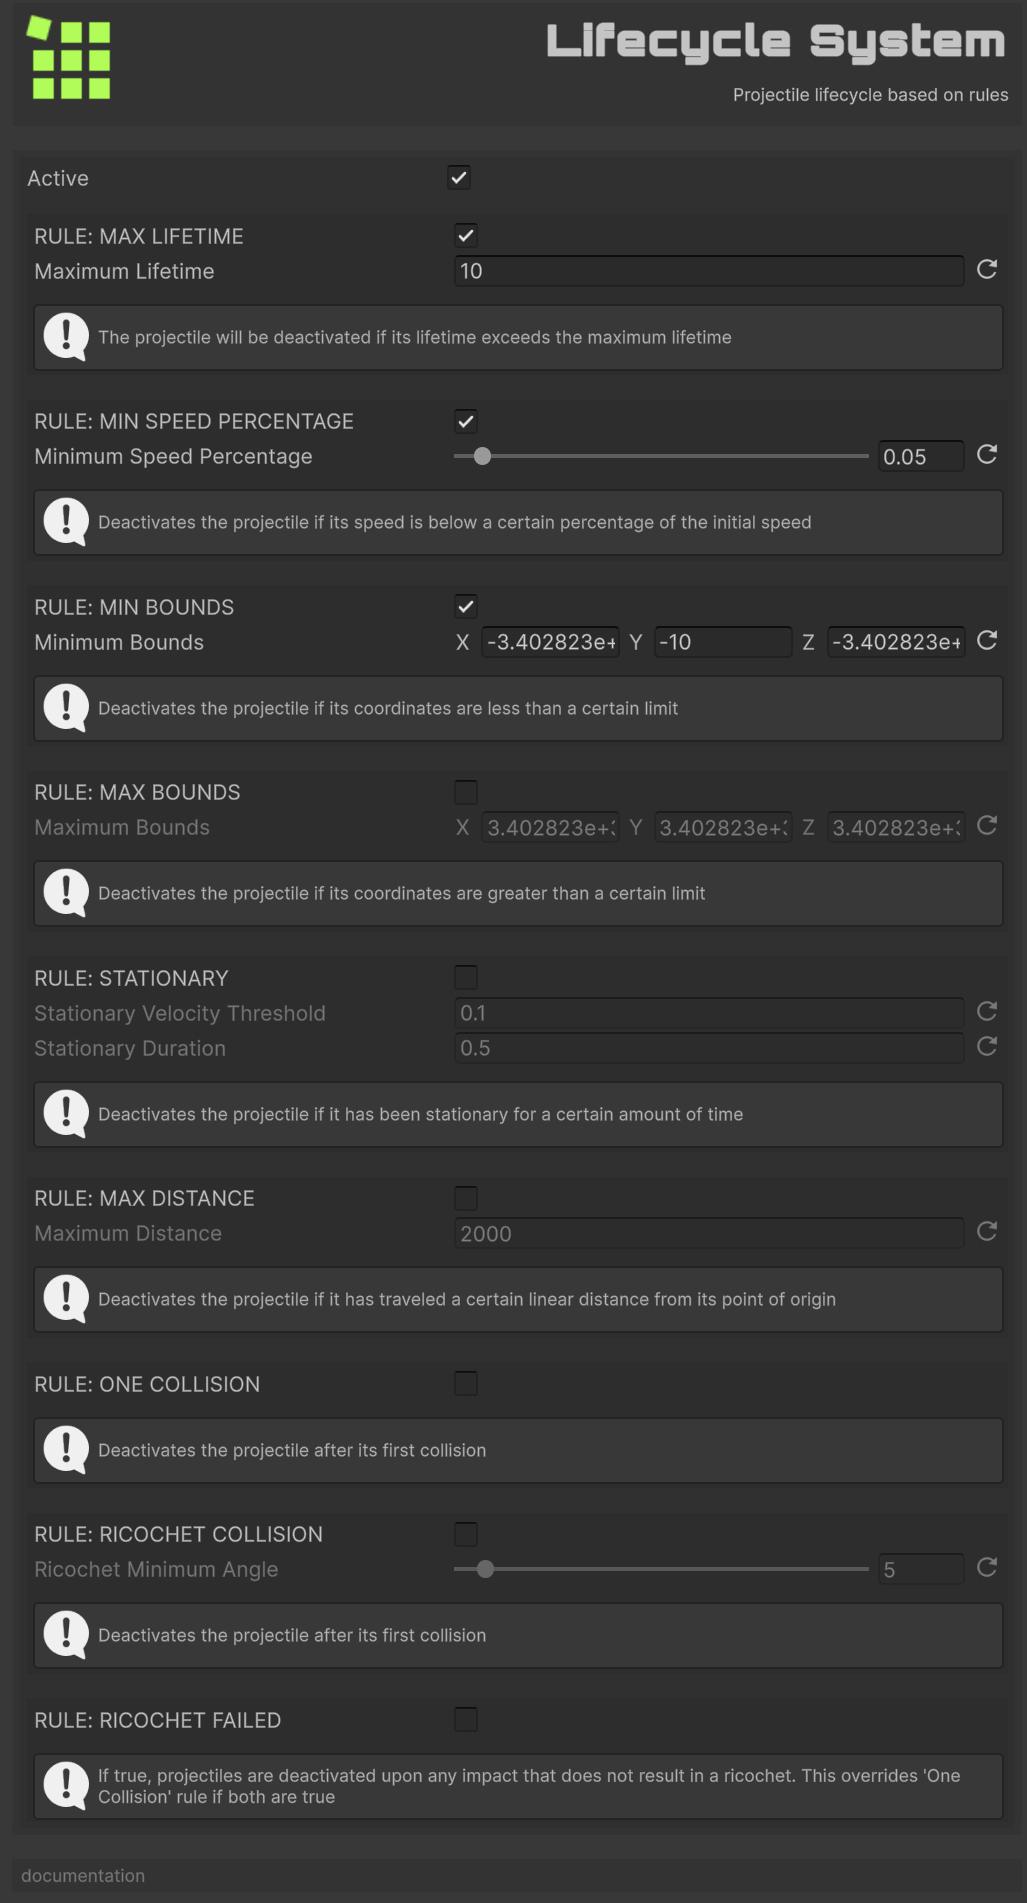
The house-keeper of True Ballistics. Inspects every projectile and safely removes those that have out-lived their time, slowed below a usable speed, strayed beyond configurable bounds, remained stationary too long, travelled too far, or finished their first (or failed) collision. In essence, it cleans up spent rounds so your scene stays lean and performant. Without this system the projectiles would never disappear.
If any of the following (active) rules are met, the projectile is deactivated.
Max Lifetime Rule
Deactivates the projectile if its lifetime has exceeded a certain limit.
Min Speed Percentage Rule
Deactivates the projectile if its speed is below a certain percentage.
Min Bounds Rule
Deactivates the projectile if its coordinates are less than a certain limit.
Max Bounds Rule
Deactivates the projectile if its coordinates are greater than a certain limit.
Stationary Rule
Deactivates the projectile if it has been stationary for a certain amount of time.
Max Distance Rule
Deactivates the projectile if it has traveled a certain linear distance from its point of origin.
One Collision Rule
Deactivates the projectile after its first collision.
If you use the Ricochet System, a bouncing projectile does not count for this rule.
Ricochet Rule
Deactivates the projectile if a ricochet occurred with an angle lower than a certain limit.
Ricochet Failed Rule
If true, projectiles are deactivated upon any impact that does not result in a ricochet. This overrides One Collision Rule if both are true.
Collision System
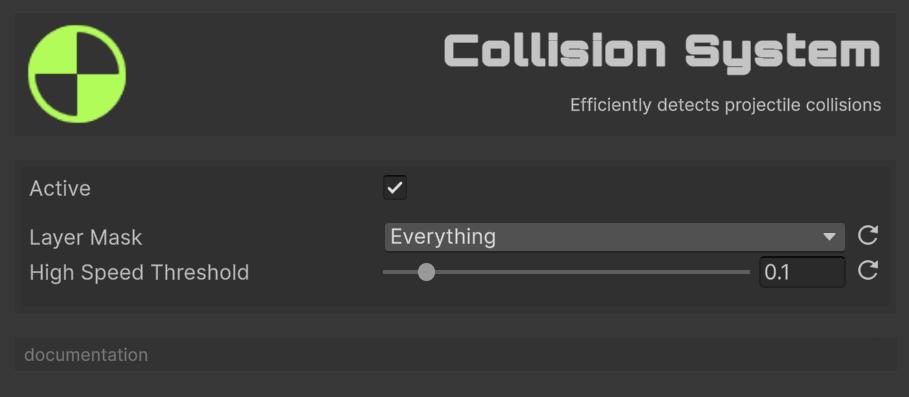
The gate-keeper of True Ballistics. Checks each projectile’s path and decides whether it has struck something—using precise RayCasts for hypersonic rounds and efficient batched SphereCasts for everyone else—then fires events that let ricochet, penetration, VFX and damage systems do their work. In short, it turns flying bullets into meaningful impacts your game can react to. Without this system the projectiles would pass straight through every surface.
Features:
- Raycast for high-speed projectiles.
- Batched SphereCasts for regular projectiles.
- Configurable layer masks.
- Automatic material detection.
Configuration:
Layer Mask: Collision layers.High Speed Threshold: Percentage of the speed of light (default 10%) at which RayCast is used instead of SphereCast (the projectile is considered instantaneous).
Once added to the systems, you can subscribe to the OnProjectileHit events to receive information on each impact.
// Cache all colliders on this object and its children for efficient hit detection
colliders = this.GetComponentsInChildren<Collider>();

// Get the manager instance
BallisticsManager manager = FindFirstObjectByType<BallisticsManager>();

// Subscribe to projectile hit event (don't forget to unsubscribe)
ballisticsManager.OnProjectileHit += OnProjectileHitHandler;

...

private void OnProjectileHitHandler(CollisionInfo info)
{
  // Skip processing if collision info is invalid
  if (info.collider == null)
    return;

  // Check if the hit collider belongs to this object (or any of its children)
  foreach (Collider c in colliders)
  {
    if (c != null && info.collider == c)
    {
      // Doing something
      break;
    }
  }
}
Check these classes in FronkonGames/TrueBallistics/Demos/Scripts for more examples:
- Coin: A coin that oscillates and disappears upon impact.
- DestroyOnHit: The object is destroyed on impact.
- NonKinematicOnHit: Changes a Kinematic object to Non Kinematic on impact.
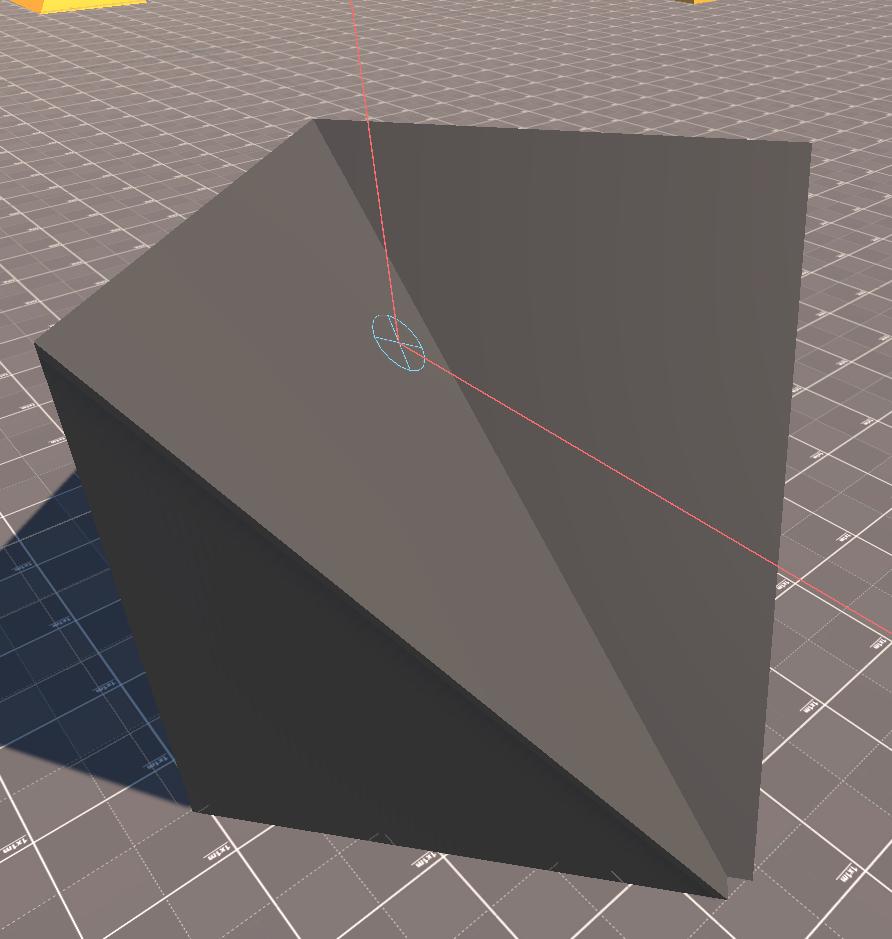
If you add Debug System to the system list, you will be able to see the impacts of the projectiles (a circle with a diagonal cross) in the Scene window.
RigidBodyManager class to see an example of how to do it.
HolesManager and SparksManager classes. Both solutions are quite rudimentary (enough for the purposes of the demo) so I do not recommend using them in production environments.
Ricochet System
The rebound artist of True Ballistics. Whenever a projectile’s impact event arrives, it consults the surface’s ricochet curve and the strike angle to decide: should this round skip off the material or stop dead? If a bounce is warranted it recalculates the outgoing velocity using the surface’s restitution and energy-retention factors, updates the projectile’s flight path in-place, and notifies the rest of the framework (VFX, sound, gameplay logic) through a dedicated ricochet event. If the angle or material rejects the bounce it raises a “ricochet failed” event so penetration or simple impact logic can take over. Without this system the projectiles would never ricochet – every hit would be a full stop or a penetration attempt.
Features:
- Probability-based ricochet calculation.
- Physically-based velocity changes.
- Material-specific restitution.
- Energy retention modeling.
Once added to the systems, you can subscribe to the OnProjectileRicochet events to receive information on each ricochet.
Collision System, an OnProjectileHit event will also be emitted.
If you add Debug System to the system list, you will be able to see the ricochets (a square with an arrow indicating rebound) in the Scene window.
Penetration System
The wall-breaker of True Ballistics. When a projectile strikes and doesn’t ricochet, this system decides whether it bores straight through, deflects inside the material, or grinds to a halt. It measures the round’s kinetic energy against the surface’s yield strength and density, calculates how much power is lost tearing an entry plug and ploughing through the medium, and ray-traces ahead to locate a plausible exit point. Each frame it advances the slug through the obstacle, subtracts drag and fracture work, and updates velocity until it either bursts out the far side (firing “penetration enter” and “exit” events) or becomes embedded (“stuck” event). Without this system the projectiles would stop at the first hit—no through-walls, no over-penetration thrills.
Features:
- Entry/exit point calculation.
- Energy consumption modeling.
- Path deflection on entry.
- Stuck projectile handling.
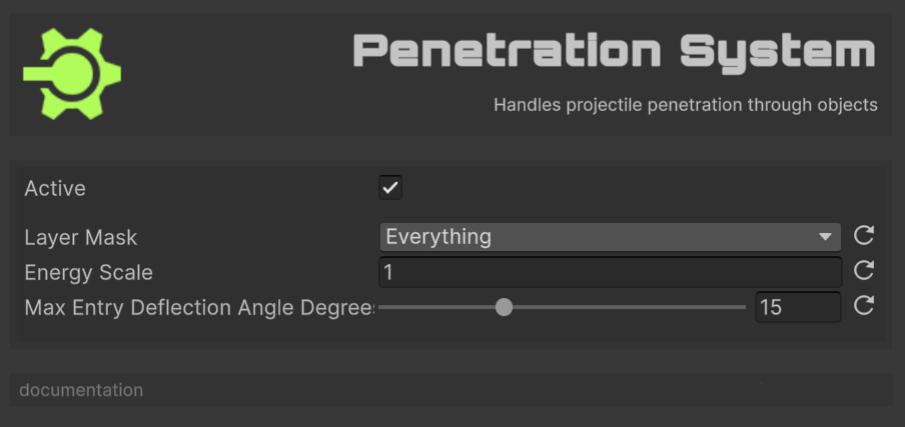
Configuration:
Layer Mask: Layers considered for penetration raycasts.Energy Scale: Scaling factor applied to material strength when computing required energy. Lower than 1.0 will make the projectile more likely to penetrate.Max Entry Deflection Angle: Maximum angle in degrees by which a projectile’s path can be deflected upon entering a surface, based on incidence angle.
This system (and actually Collision and Ricochet) uses Ballistic Material for its calculations. If you do not assign any material to the objects, it will use Default Material from Ballistic Manager (see above). If you do not assign any, the ‘Concrete’ material will be used.
In the FronkonGames/TrueBallistics/Data/Materials folder you have a few materials already defined. You can also create your own (they are ScriptableObjects) from the Project window and using the menu Fronkon Games → True Ballistics → Material Data.
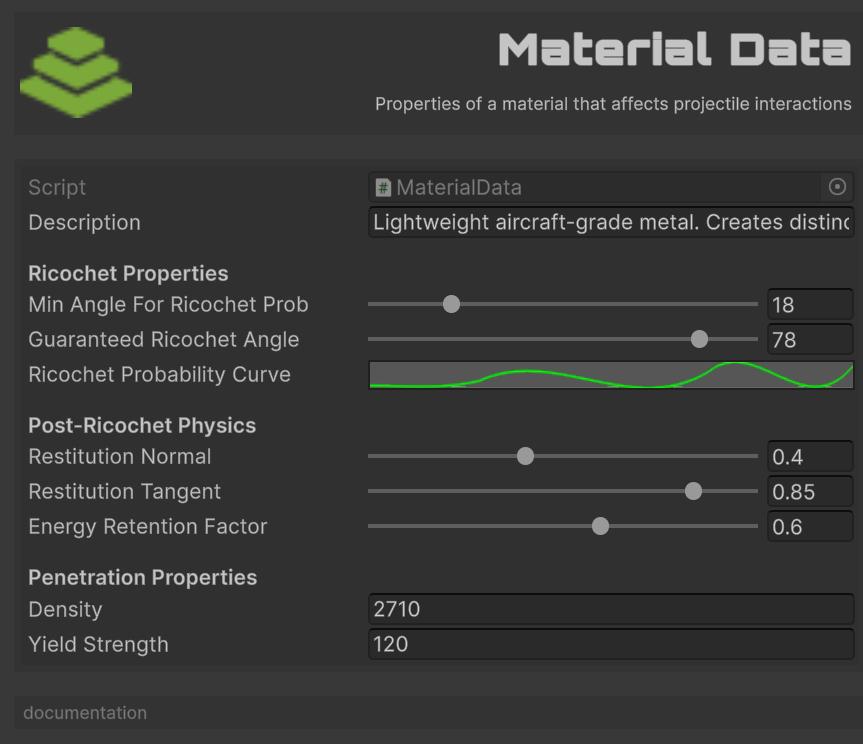
Configuration:
Description: Description of the material.Min Angle For Ricochet Prob: Angle (degrees) from surface normal. Impacts at angles greater than this (grazing angles) have increasing ricochet probability.Guaranteed Ricochet Angle: Angle (degrees) from surface normal. Impacts at angles greater than this (very grazing angles) will always ricochet if probability is met.Ricochet Probability Curve: Curve defining ricochet probability (Y-axis, 0-1) based on impact angle with surface normal (X-axis, 0-90 degrees). Higher angles = more grazing.Restitution Normal: Coefficient of restitution for the velocity component normal to the surface (0 = no bounce, 1 = perfect bounce).Restitution Tangent: Coefficient of restitution for the velocity component tangential to the surface (0 = sticks, 1 = no friction).Energy Retention Factor: Overall percentage of kinetic energy retained after ricochet (0 = all lost, 1 = all retained). Applied AFTER restitution effects if both are used conceptually.Density: Density of the material in kg/m^3. Used for penetration calculations.Yield Strength: Yield strength of the material in MPa. Higher values resist penetration.
Add the Ballistic Material component to the objects you want to specify a material. Remember that they must be at the same level as the collider that detects the impact.
Ballistic Material you can activate Use Material Cache to improve performance, but note that if you do so, you will not be able to change at runtime the material of the objects.
Three events related to projectile penetration are use:
- OnProjectilePenetrationEnter: When a projectile penetration starts (enters an object).
- OnProjectilePenetrationExit: When a projectile exits an object after penetration.
- OnProjectilePenetrationStuck: When a projectile gets stuck inside an object.
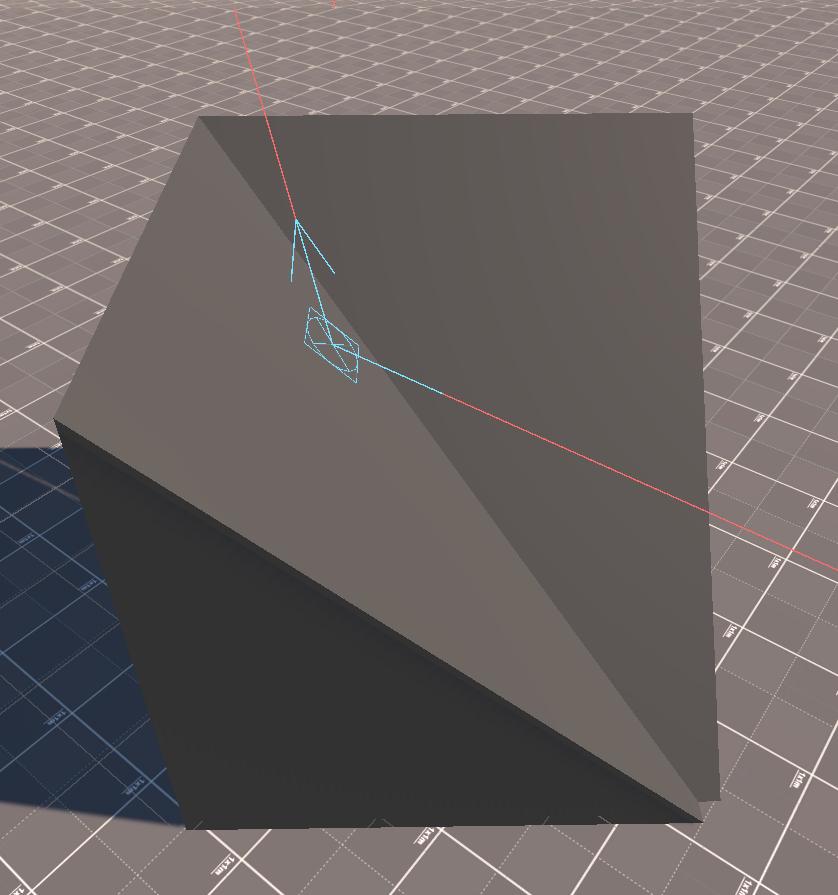
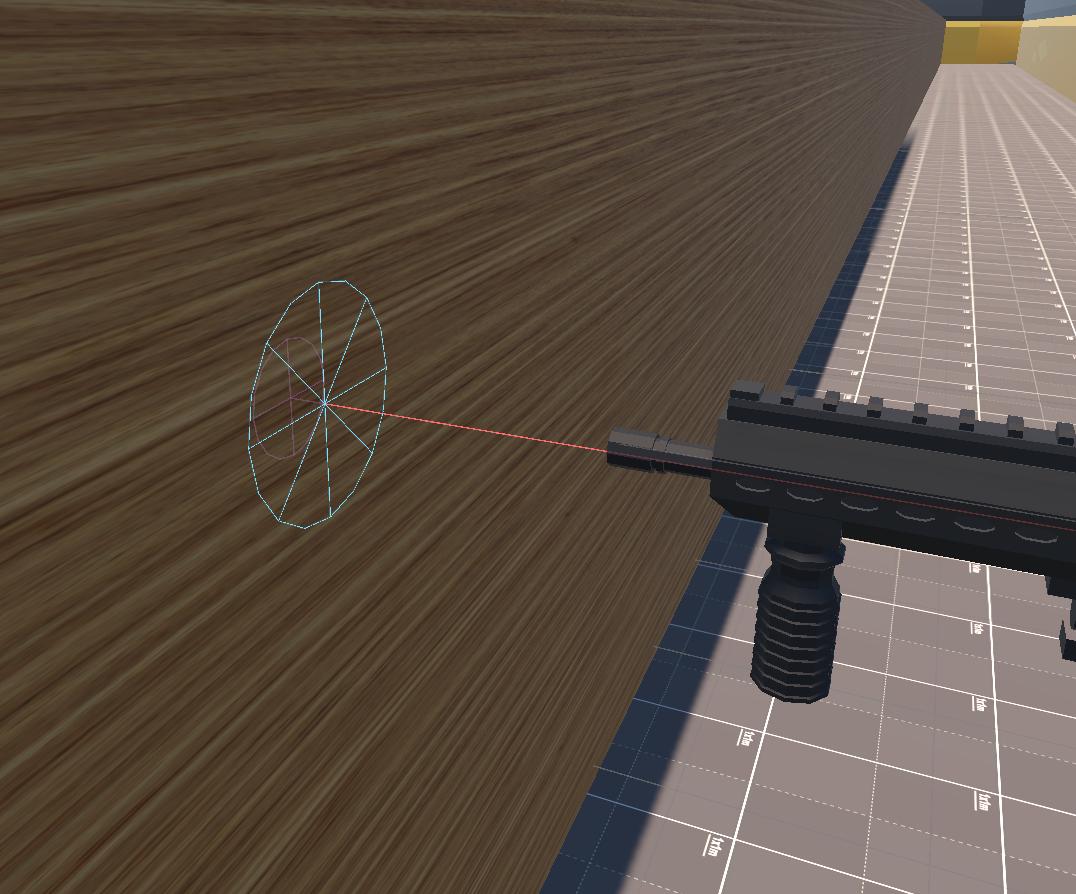
If you add Debug System to the system list, you will be able to see the the entry point (a circle with a vertical cross), the trajectory (in cyan color) and the exit point (a circle with a vertical cross).
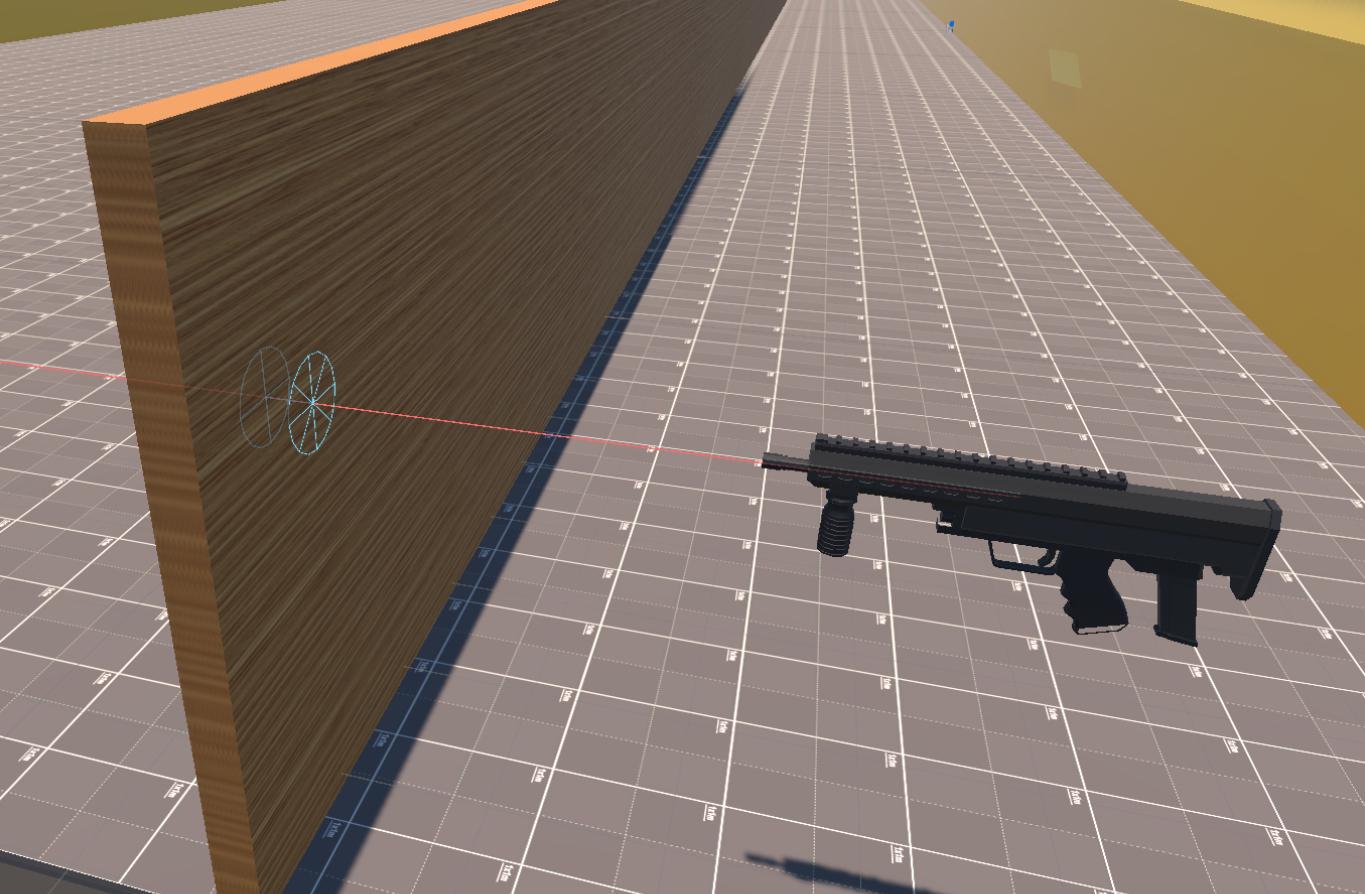
If the projectile gets stuck inside the object, you will see its trajectory (in magenta) and the point where the projectile is (magenta circle with vertical cross).
Some considerations:
- Objects with a width of less than 1mm will be ignored.
- On objects 10 meters or more wide, penetration will always fail.
Tracer System
The show-stopper of True Ballistics. For every projectile that carries a TracerComponent it whips up glowing streaks completely on the GPU: a compute shader extrudes two tiny quads (tail + head), scales them to weapon-specific length/width, and modulates brightness by speed so supersonic rounds blaze while slow pellets barely glow. The system keeps per-weapon settings, batches all tracers each frame, and renders them once per camera—so you get cinematic bullet trails that cost virtually nothing on the CPU. Without this system the projectiles would be invisible bolts of math.
✅ Runs entirely on the GPU, so hundreds of tracers cost virtually nothing on the CPU.
✅ Brightness scales with speed, weapon presets let you tweak length/width per gun, and head/tail materials create a convincing muzzle-flash “dot” with a fading tail.
✅ Batches once per camera, so it plays nicely with split-screen or Scene/Game views in the Editor.
❌ No mesh geometry, the compute shader only emits flat quads.
❌ Ricochet bends aren’t visualised, when the Ricochet System changes velocity, the previous tail is discarded and a new straight one begins; you never see the actual kink where the round bounced.
Features:
- Compute shader-based geometry generation.
- Per-weapon-type configuration.
- Brightness based on velocity.
- Separate head/tail materials.
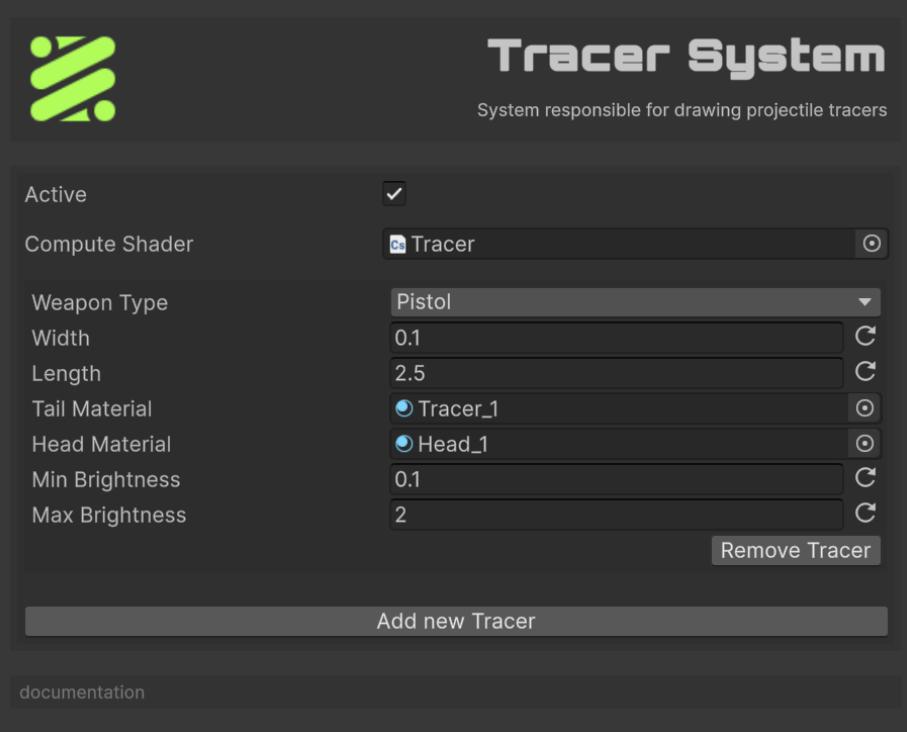
The Compute Shader field must point at “Tracer.compute” that ships with the package (FronkonGames/TrueBallistics/Shaders/Tracer.compute). If you create your own shader (to change color ramps, vertex layout, etc) simply drag that asset into the same slot.
You can add as many Tracers as you want, normally one per weapon type. If a weapon type does not have an associated Tracer, it is ignored.
Configuration:
Weapon Type: Which weapons use this preset.Width: Thickness of the tail quad.Length: World-space length of the streak (metres).Tail Material/Head Material: You must use ‘Fronkon Games/True Ballistics/Tracer’ or similar.Min Brightness: Brightness multiplier at 0 m/s (projectile stopped).Max Brightness: Brightness multiplier at initial speed, the system interpolates between min/max as the round slows down.
A Tracer has this geometry:
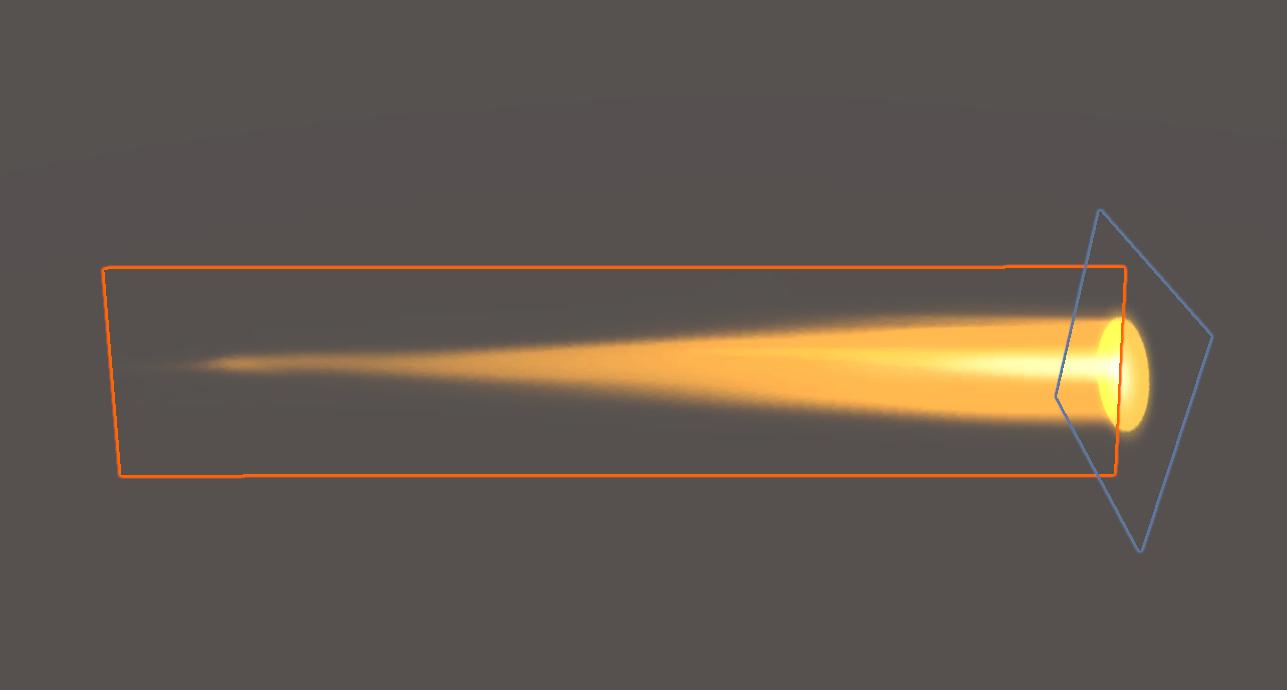
The tail (orange box) is oriented on its longitudinal axis facing the camera. As from the front and from behind you can hardly see anything, the head is a quad that always remains vertical. This way the projectile will be seen from any angle.
Weather System
The atmosphere-tuner of True Ballistics. Each frame it recalculates air density from altitude and temperature, spices it with a precipitation factor, and exposes a scene-wide wind vector. The rest of the pipeline then uses those values to adjust drag, drop, and drift, making shots feel different on a misty mountain peak than on a hot, windless desert range. Without this system every map would behave like a calm sea-level firing line.
Features:
- Altitude-based air density.
- Temperature effects.
- Wind simulation.
- Precipitation effects.
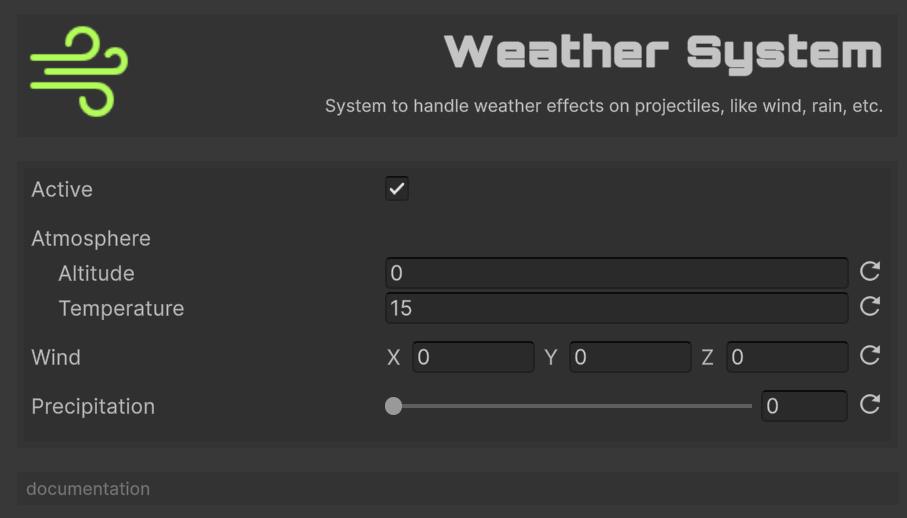
Configuration:
Altitude: Altitude in meters.Temperature: Temperature in Celsius.Wind: Wind vector in m/s.- Smoke rises vertically: 0-0.5 m/s
- Smoke drifts slightly: 0.5-1.5 m/s
- Leaves rustle: 1.6-3.3 m/s
- Light flags extended: 3.4-5.4 m/s
- Raises dust and loose paper: 5.5-7.9 m/s
- Small trees sway: 8.0-10.7 m/s
- Large branches move: 10.8-13.8 m/s
- Whole trees move: 13.9-17.1 m/s
- Breaks twigs off trees: 17.2-20.7 m/s
- Structural damage possible: 20.8-24.4 m/s
- Considerable damage: 24.5-28.4 m/s
- Widespread damage: 28.5-32.6 m/s
- Extreme damage: 32.7-60.0 m/s
Precipitation: Precipitation intensity (0-1).- Clear conditions: 0.
- Light mist or drizzle: 0.0 - 0.2
- Gentle rain: 0.2 - 0.4
- Steady rainfall: 0.4 - 0.6
- Intense precipitation: 0.6 - 0.8
- Extreme heavy rain: 0.8 - 1.0
Coriolis System
The planet-spinner of True Ballistics. Computes the Coriolis acceleration from the planet’s rotation and current latitude, then adds that deflection to every in-flight projectile—giving long-range shots the subtle sideways (and slight vertical) drift sharpshooters expect. Without this system the world would feel motionless and high-precision sniping would miss that authentic curve.
Features:
- Configurable planetary parameters.
- Latitude-based calculations.
- Realistic deflection patterns.
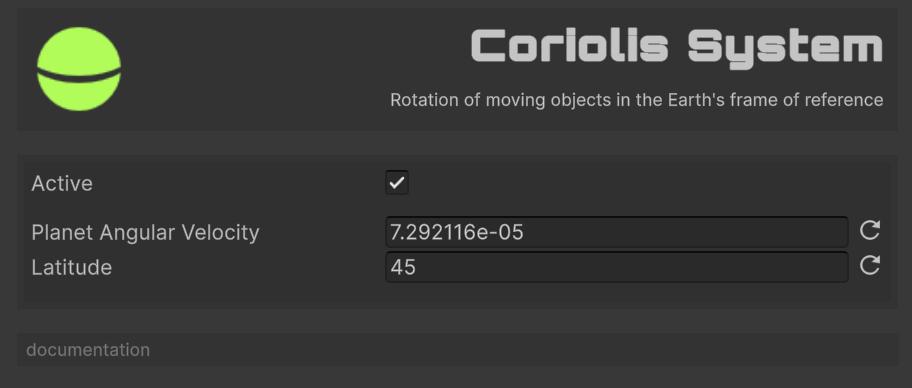
Configuration:
Planet Angular Velocity: Planet rotation rate.Latitude: Observer latitude.
Spin Drift System
The gyroscopic nudger of True Ballistics. After each physics step it estimates the Magnus-type side force produced by a bullet’s spin (based on twist rate, caliber, barrel length and current speed), then nudges velocity and position to mimic real-world spin drift—those subtle inches of right/left drift you spot on long-range targets. Without this system rotated projectiles would fly straight, robbing marksmen of that final layer of authenticity.
Features:
- Magnus effect calculation.
- Twist rate considerations.
- Barrel length effects.
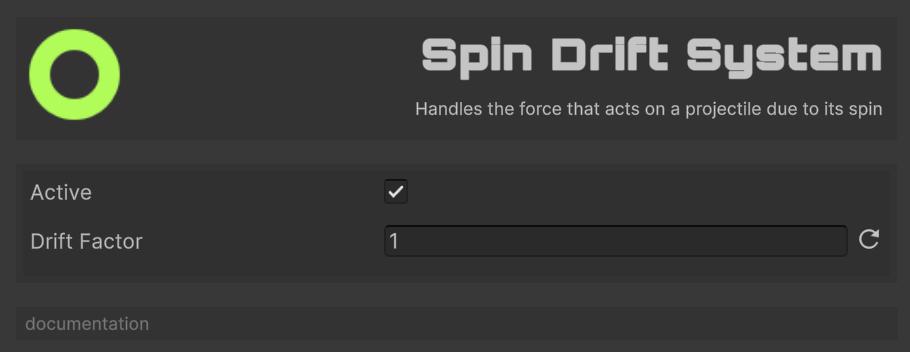
Configuration:
Drift Factor: Overall drift scaling.
Debug System
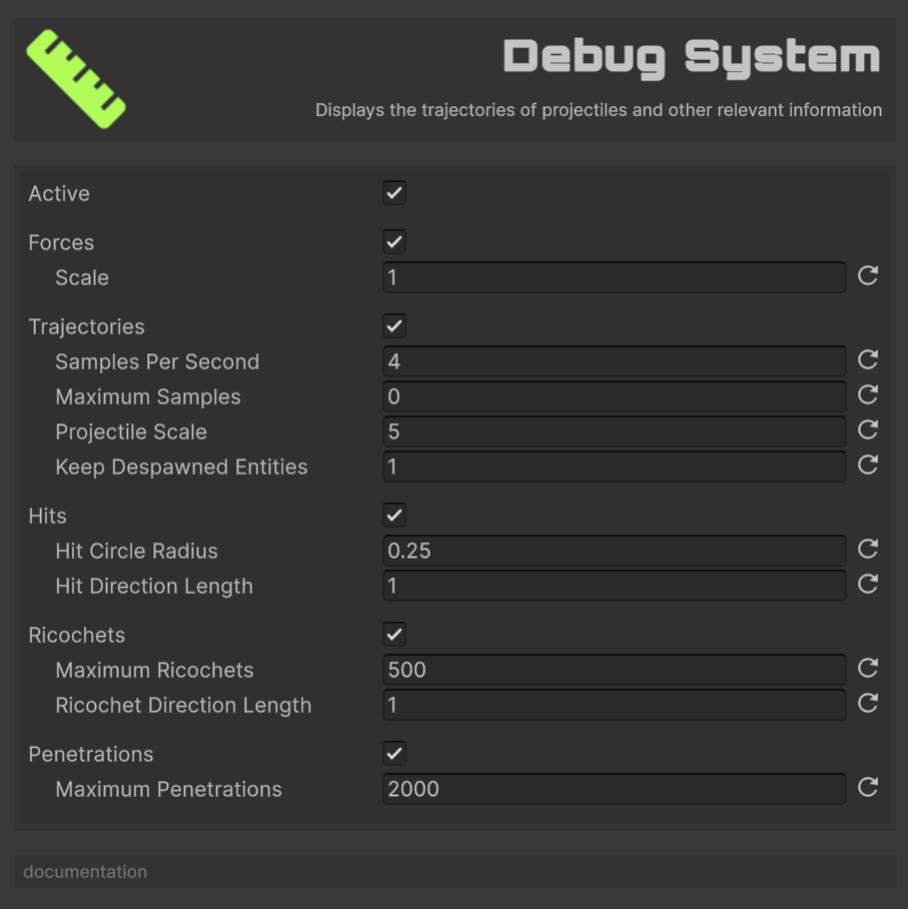
The x-ray goggles of True Ballistics. In the Unity Editor it samples every active projectile, stores positions, forces, impacts and ricochet/penetration data, then draws colour-coded gizmos: flight paths fade from red to gray with speed loss, force vectors sprout from the tracer, and icons mark hits, bounces and stuck rounds. Despawned trajectories linger for a set time so you can pause, inspect and fine-tune your settings. Disabled in builds, it’s pure dev tooling—turn it on when you need answers, off when you ship.
Features:
- Trajectory visualization with speed coloring
- Force vector display
- Impact point markers
- Ricochet and penetration visualization
- Configurable retention time
Forces
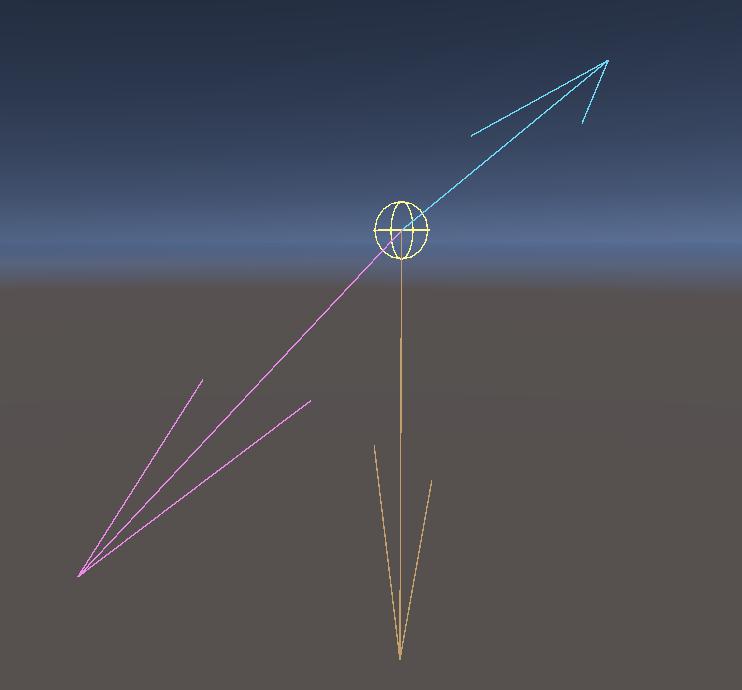
It shows the position of the projectile (yellow sphere), its momentum (cyan arrow), gravity (orange arrow) and the sum of the other forces acting on the projectile (magenta arrow).
Trayectories
Shows the trajectory of the projectile, colored according to the percentage of the initial velocity:
| Color | Initial Velocity |
|---|---|
| Red | >=75% |
| Orange | >=50% |
| Yellow | >=25% |
| Green | >=10% |
| Gray | <10% |
Configuration:
Samples Per Second: How many trajectory points the system records for each active projectile every second. Higher values = smoother lines but more memory/Gizmos; lower values = coarse, lighter.Maximum Samples: Hard cap on points stored per projectile. 0 means unlimited; any positive number stops recording once that count is reached (older points are then dropped).Projectile Scale: Uniform size multiplier for the sphere/mesh that represents each live round in the Scene view. Useful when your game world is tiny (scale < 1) or huge (> 1).Keep Despawned Entities: Time in seconds to keep drawing a projectile’s last trajectory after it has been despawned. 0 = remove immediately; > 0 lets you pause/inspect past shots for that duration before they are purged.
Hits
Shows the points at which the projectile collides with an object.
Configuration:
Hit Circle Radius: Increase it if impacts are hard to spot, decrease it if the circles cover too much of the scene.Hit Direction Length: Next to each impact disc the system also draws a line‐arrow that shows the incoming shot direction.
Ricochets
It shows the points at which the projectile bounces off a material.
Configuration:
Maximum Ricochets: Limits how many ricochet events the Debug System keeps and draws at once. 0 = no limit (every bounce is stored and shown), positive value = only the most-recent N ricochets are retained; older ones are discarded.Ricochet Direction Length: The length, in world metres, of the two arrows the system draws at each ricochet point: one for the incoming velocity, one for the outgoing velocity.
Penetrations
It shows the points and trajectories of the projectile penetrating objects.
Configuration:
Maximum Penetrations: Sets how many penetration events the Debug System retains and visualises at once. 0 = unlimited (every entry/exit/stuck point is kept). Any positive number keeps only the most-recent N events, discarding older ones.
Customs Systems
Creating a custom system involves inheriting from SystemBase and implementing the required methods:
[CreateAssetMenu(fileName = "CustomSystem", menuName = "My Game/Custom System")]
public class CustomSystem : SystemBase
{
  // Execution order (lower = earlier)
  public override int ExecutionOrder => 1500;

  // System initialization
  public override void Initialize(BallisticsManager manager)
  {
      base.Initialize(manager);
      // Setup system resources
  }

  // Called before physics update
  public override void PreTick(float deltaTime)
  {
      if (!active) return;
      // Pre-physics logic
  }

  // Main system update
  public override void Tick(float deltaTime)
  {
      if (!active) return;
      // Main system logic
  }

  // Called after physics update
  public override void PostTick(float deltaTime)
  {
      if (!active) return;
      // Post-physics logic
  }

  // System cleanup
  public override void DeInitialize()
  {
      // Cleanup resources
      base.DeInitialize();
  }
}
Example: Simple Gravity Well System
[CreateAssetMenu(fileName = "GravityWellSystem", menuName = "My Game/Gravity Well System")]
public class GravityWellSystem : SystemBase
{
  [Header("Gravity Well Settings")]

  // Scene object that defines the attractor position.
  public Transform gravityWellCenter;

  // Pull strength (think “G” constant). Bigger = stronger attraction.
  public float gravityWellStrength = 10.0f;

  // Effective range in metres. Outside this radius nothing happens.
  public float gravityWellRadius = 50.0f;

  // Run shortly after PhysicsSystem.
  public override int ExecutionOrder => SystemExecution.Physics + 50;

  // Called once per frame after other systems have updated positions.
  public override void PostTick(float deltaTime)
  {
    // Skip early if disabled or no centre assigned.
    if (!active || gravityWellCenter == null)
      return;

    // Grab the PhysicsComponent array for fast indexed access.
    var physicsComponents = manager.GetComponentArray<PhysicsComponent>();

    // Iterate over every possible entity slot.
    for (int i = 0; i < BallisticsManager.MaxEntities; i++)
    {
      // Ignore unused slots.
      if (!manager.entities[i])
        continue;

      // Reference (not copy) for in-place modification.
      ref var physics = ref physicsComponents[i];

      // Vector from projectile to well.
      Vector3 toWell   = gravityWellCenter.position - physics.position;
      float   distance = toWell.magnitude;

      // Only act inside the radius and avoid divide-by-zero when very close.
      if (distance < gravityWellRadius && distance > 0.1f)
      {
        // Inverse-square fall-off: F = G / r².
        float   force        = gravityWellStrength / (distance * distance);
        Vector3 gravityForce = toWell.normalized * force * physics.mass;

        // Integrate acceleration into velocity ( v += a Δt ).
        physics.velocity += gravityForce * deltaTime / physics.mass;
      }
    }
  }
}
Simple FPS
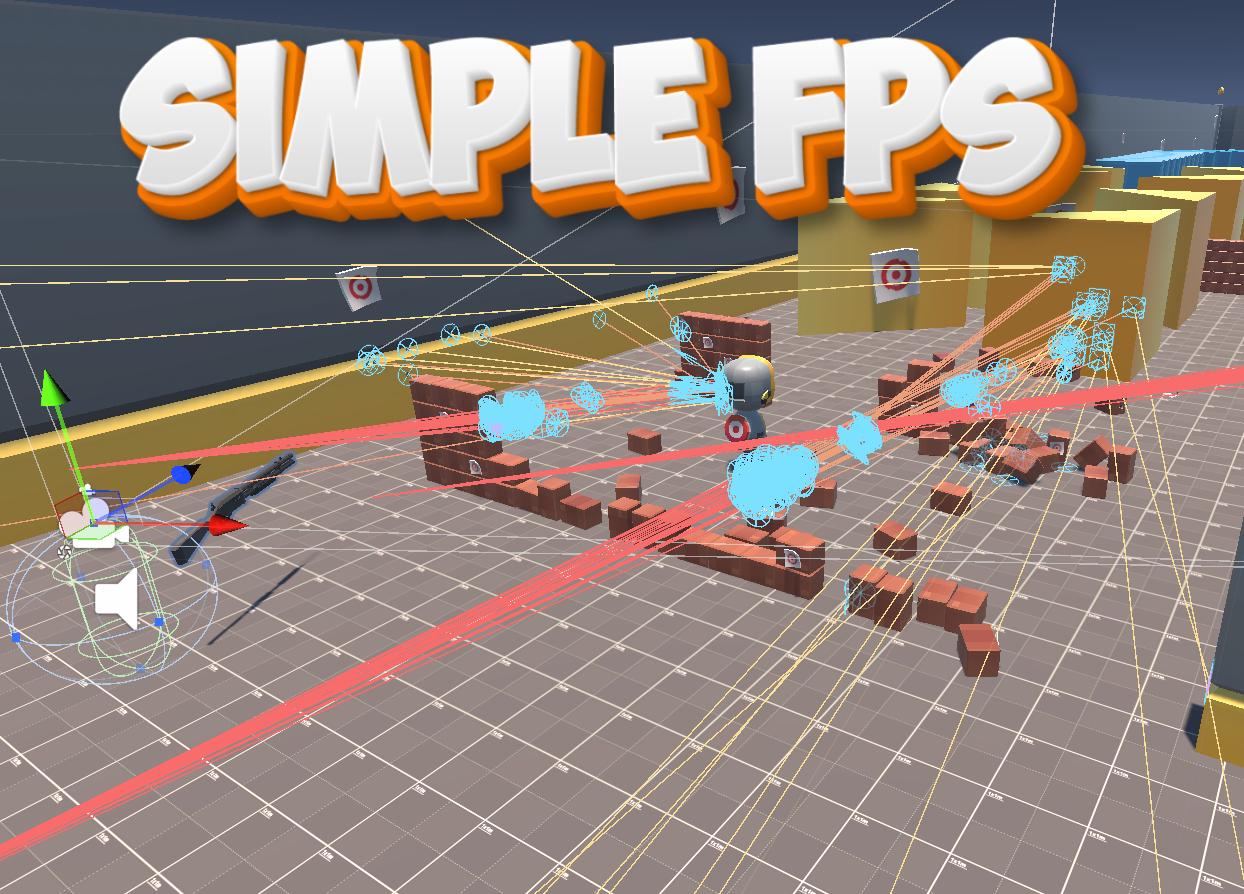
Simple FPS is a self-contained first-person-shooter sandbox that ships with True Ballistics to show—rather than just tell—how the library plugs into a game loop.
At its core it is an event-driven micro-framework: every time the player moves, fires, changes weapons or collides with the world, a strongly-typed event is raised and routed through a lightweight dependency container that “auto-wires” the correct listeners.
Because each piece of behaviour lives in its own MonoBehaviour (input, movement, camera, weapon, inventory, audio, player physics), you can open any script and see a single, well-scoped responsibility with clear comments.
Although the package is fully functional, it deliberately avoids sophisticated gameplay systems; its goal is to be a clean, minimal reference you can dissect, copy into prototypes or use to validate weapon settings before integrating True Ballistics into your own project.
No official support is offered beyond this educational purpose.
Support
Do you have any problem or any suggestions? Send me an email to fronkongames@gmail.com and I’ll be happy to help you.
Remember that if you want to inform me of an error, it would help me if you sent to me the log file.
If you are happy with this asset, consider write a review in the store
❤️ thanks! ❤️
If you are happy with this asset, consider write a review in the store
❤️ thanks! ❤️