Store

‘Spice Up’ is a collection of fullscreen post-processing effects designed to add impact, distortion, feedback, and stylized camera treatment to first-person and VR games. Each effect can be used as a standalone package, but inside the bundle they share the same URP workflow, volume-driven runtime model, and editor conventions.
It consists of the following effects:
- 🩸 Damage, a health and hit feedback system with directional indicators.
- 🍺 Drunk, unstable vision with oscillation, blinking, and chromatic distortion.
- 🌈 Stoned, psychedelic color deformation with YIQ-based controls.
- 🧊 Frozen, layered frost, distortion, and cold-screen tinting.
- ⚔️ Slash, a cinematic screen-split with glow, smoke, and distortion.
- 💨 Speed Lines, anime-inspired radial velocity streaks.
- 👀 Double Vision, oscillating image separation and color offsets.
- 🌧️ Rain, animated droplets, trails, and layered wet-screen effects.
- 👻 Ghost Vision, creature-like tunnel vision with animated noise.
- 📺 Scanner, CCTV, monitor, and robotic-display artifacts.
- ☠️ Death Screen, a blood wipe for death or defeat states.
- 🌙 Purkinje, low-light adaptation inspired by human night perception.
- 💥 Broken Screen, procedural fractures and impact distortion.
- 💓 Pulse, expanding pulses driven by timed progress.
- 🌪️ Shake, screen shake with zoom, distortion, and aberration.
- 🟢 Night Vision, a rich night vision system with gradients and UI overlays.
- 🎥 BodyCam, body camera optics with blur, flare, and sensor artifacts.
- ✨ Lens Flare, cinematic flare generation for bright scenes.
- 🌫️ Blurry, blurred vision built from frame history.
You can obtain each effect separately, but if you want more effects, you might be interested in ’SPICE UP BUNDLE’ where you can find them all at a special price!
Bundle Requirements
All ‘Spice Up’ effects are developed for ‘Universal Render Pipeline’ (URP), which means they do not work with Built-In or HDRP.
Unity 6 or Higher
The current bundle is centered on Unity 6 and the URP Render Graph workflow. You will need URP 17.0.3 or higher installed. If you need help with setup, follow the official URP installation guide.
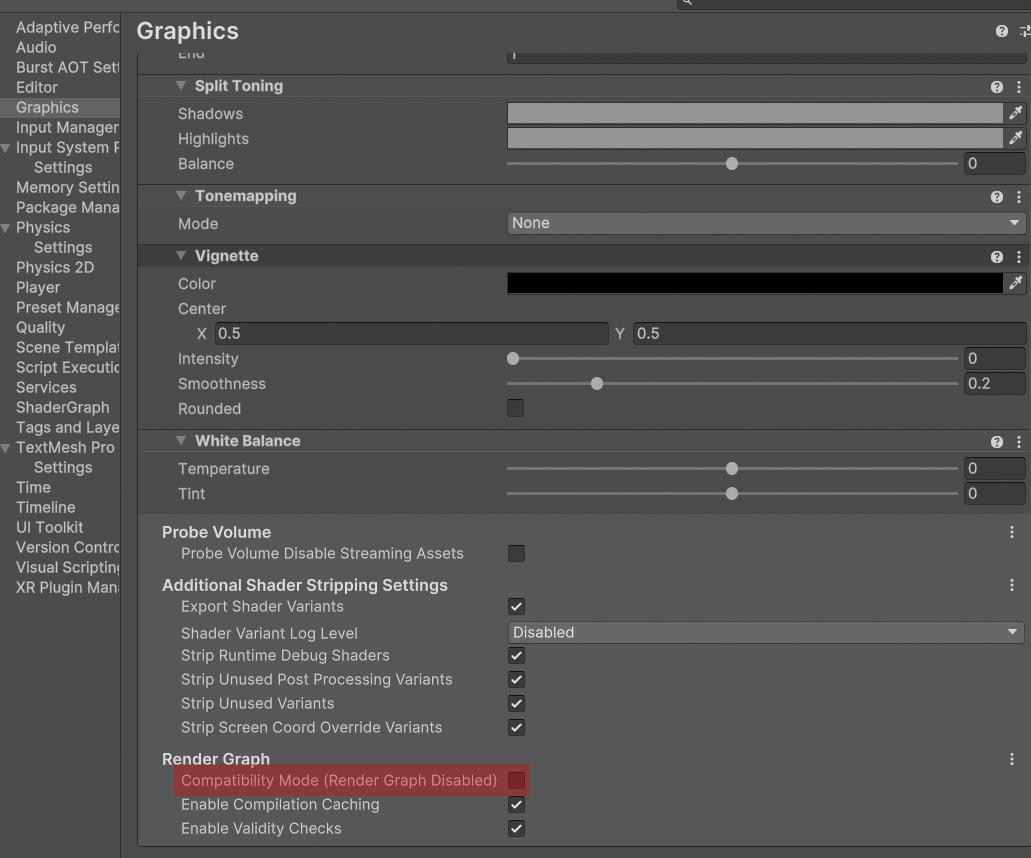
Make sure that ‘Compatibility Mode’ is disabled in ‘Project Settings > Graphics > Render Graph’.
Installation
Step 1: Add Renderer Feature
The effects must be registered in your project’s URP configuration:
- Locate your Universal Renderer Data asset.
- Click Add Renderer Feature and select the desired distortion from Fronkon Games > Retro.
Once installed, you have to add the effect you want to use from ‘Retro’ as a ‘Render Feature’. This official tutorial tells how to do it.
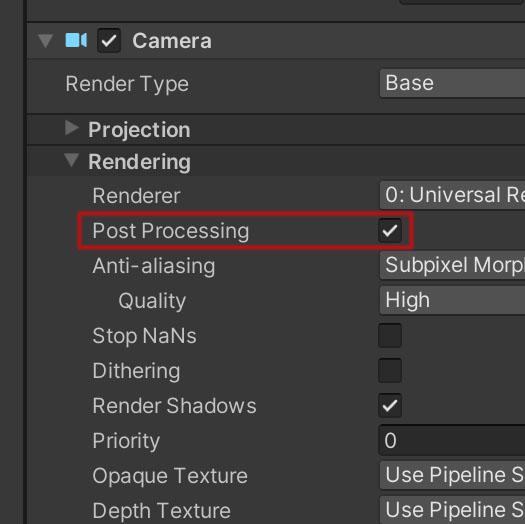
Remember that the camera you are using must have the ‘Post Processing’ option enabled.
‘Quality’ levels (Project Settings > Quality) can have their own active ‘Render Pipeline Asset’.
If so, whatever you assign in ‘Scriptable Render Pipeline Settings’ in ‘Graphics’ will be ignored.
Remember to add the effect to the quality levels you want to use.
Step 2: Configure The Volume
To apply the effects to your scene:
- Create a Volume component (Global or Local) or select one that has already been created.
- In the Volume component, create or assign a Volume Profile.
- Click Add Override and select the desired distortion from Fronkon Games > Retro.
- Enable the ‘Intensity’ parameter (and any others you wish to modify).
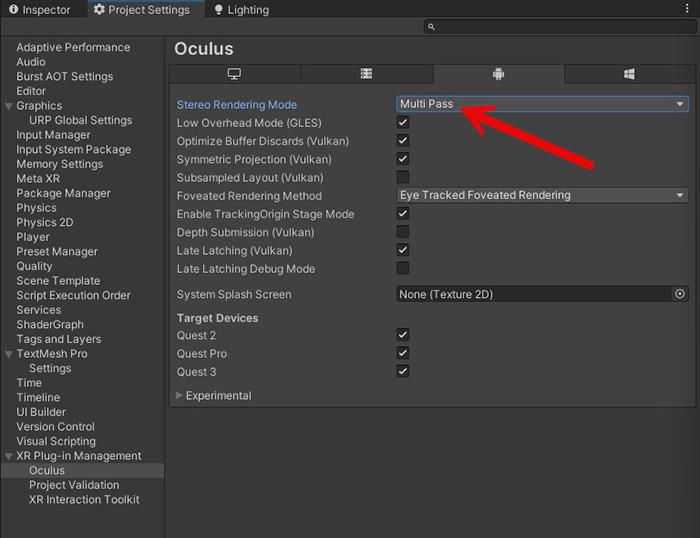
VR
To increase compatibility with VR devices, I recommend that you select ‘Stereo Rendering Mode’ in ‘Multi Pass’ mode:
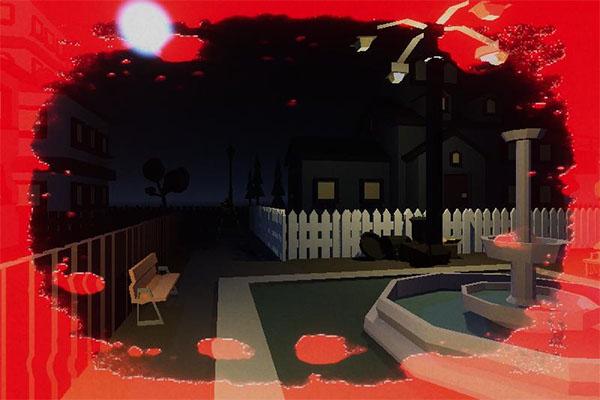
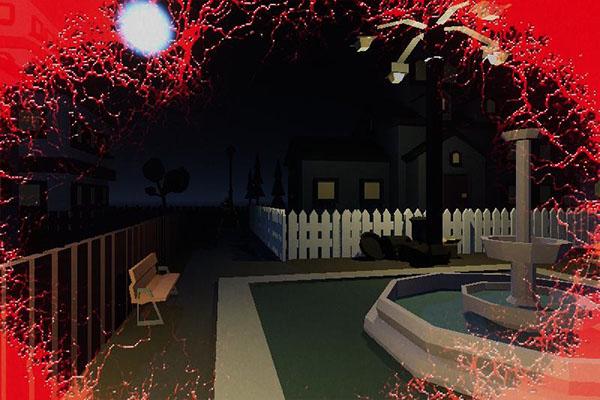
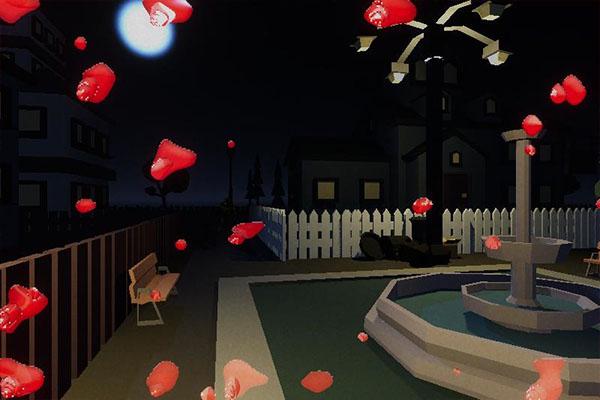
🩸 Damage
‘Damage’ is a complete hit-feedback effect for health loss, impacts, and low-health stress. It combines continuous injured-eye visuals with optional directional hit indicators and flash feedback.
Requisites
To ensure optimal performance and compatibility, your project must meet the following requirements:
- Unity: 6000.0.58f2 or higher.
- Universal RP: 17.0.3 or higher.
Installation Guide
Step 1: Add Renderer Feature
The effect must be registered in your project’s URP configuration:
- Locate your Universal Renderer Data asset.
- Click Add Renderer Feature and select Fronkon Games > Spice Up > Damage.
Step 2: Configure the Volume
To apply the effect to your scene:
- Create a Volume component (Global or Local).
- In the Volume component, create or assign a Volume Profile.
- Click Add Override and select Fronkon Games > Spice Up > Damage.
- Enable the ‘Intensity’ parameter and the damage-related fields you want to control.
Parameter Configuration
With ‘Intensity’ you can control the overall strength of the effect [0.0 - 1.0]. If it is 0, the effect will not be active.
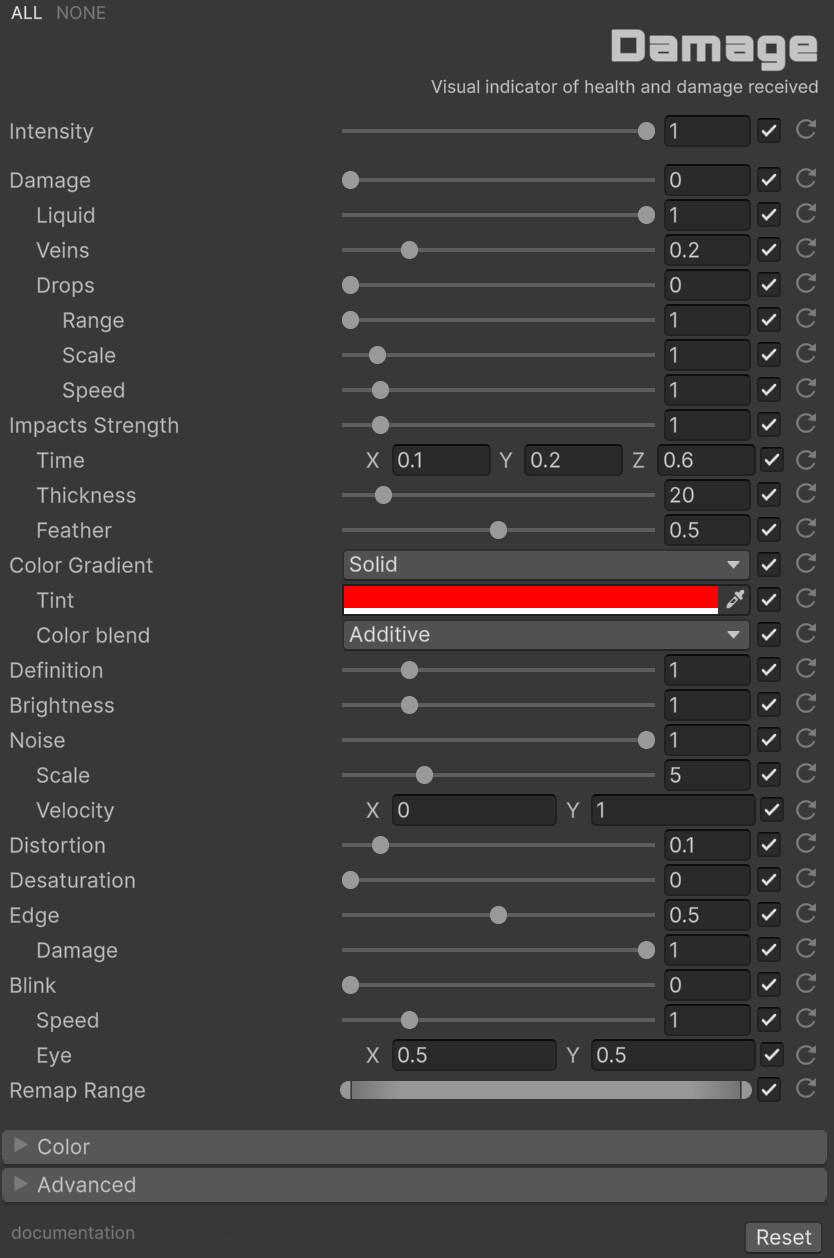
Damage
The main ‘Damage’ block in the custom inspector defines the continuous injury state, including the nested Liquid, Veins, and Drops controls shown under it.
|
|
|
| Liquiq | Veins | Drops |
|
|
The base damage look is controlled by normalized health feedback and three layered visual systems.
| Damage | Normalized damage value [0, 1] that drives the core effect |
| Liquid | Main injured-eye liquid layer |
| Veins | Capillary/vein overlay contribution |
| Drops | Dynamic droplets over the image |
| Drops Range / Scale / Speed | Layer count, droplet size, and disappearance speed |
Impacts Strength
In the custom inspector, the ‘Impacts Strength’ block controls the strength, timing, thickness, and softness of flash hits and directional indicators.
| Impacts Strength | Global strength of flash and directional indicators |
| Time | Rise, hold, and fall timing of hits |
| Thickness | Width of directional hit markers |
| Feather | Softness of indicator edges |
Color Gradient
This ‘Color Gradient’ section in the custom inspector controls how the damage overlay is tinted and blended, including the conditional tint slots shown for multi-color gradients.
| Color Gradient | Selects the gradient mode used by the effect |
| Tint / Tint #0 / Tint #1 | Available color fields depending on the selected gradient mode |
| Color blend | Blend mode used to composite the damage color |
Definition
This standalone ‘Definition’ control appears next in the custom inspector and adjusts the border definition of the liquid layer.
| Definition | Border definition of the liquid |
Brightness
This standalone ‘Brightness’ control appears after Definition in the custom inspector and adjusts the brightness of the liquid effect itself.
| Brightness | Brightness of the liquid effect |
Noise
The custom inspector groups these controls under ‘Noise’, where they define the animated Voronoi breakup applied over the damage effect.
| Noise | Strength of the animated breakup |
| Scale | Noise scale |
| Velocity | Noise movement direction and speed |
Distortion
This standalone ‘Distortion’ control appears after Noise in the custom inspector and determines how much the damage refracts the background image.
| Distortion | Refraction applied to the background image |
Desaturation
This standalone ‘Desaturation’ control appears after Distortion in the custom inspector and drains color from unaffected areas as damage increases.
| Desaturation | Drains color from unaffected areas |
Edge
Under ‘Edge’ in the custom inspector, these controls shape the outer contour of the effect.
| Edge | Extra border shaping and edge emphasis |
| Damage | Additional damage emphasis inside the edge block |
Blink
The ‘Blink’ block in the custom inspector controls eyelid-style vision closure plus the visible eye position.
| Blink | Eyelid-style interruption of vision |
| Speed | Blink speed |
| Eye | Focus point of the blink effect |
Remap Range
This final control matches the ‘Remap Range’ slider shown at the bottom of the custom inspector and lets you compress or expand the damage response curve.
| Remap Range | Compress or expand the response curve |
Runtime Control
using UnityEngine;
using UnityEngine.Rendering;
using FronkonGames.SpiceUp.Damage;

[SerializeField] private VolumeProfile volumeProfile;

private void ApplyDamage(float normalizedDamage)
{
  if (volumeProfile.TryGet(out DamageVolume volume))
  {
    volume.intensity.overrideState = true;
    volume.damage.overrideState = true;
    volume.desaturation.overrideState = true;

    volume.intensity.value = 1.0f;
    volume.damage.value = Mathf.Clamp01(normalizedDamage);
    volume.desaturation.value = normalizedDamage > 0.5f ? 0.25f : 0.0f;
  }
}
💡 Take a look at the code in the included demo to learn more about how the effect works.
Impacts Manager
ImpactsManager is an optional runtime helper for flash hits and directional indicators. It reads the active DamageVolume, animates hit timing automatically, and can show up to 4 simultaneous directional indicators.
- Target: usually the damaged actor or player transform.
- Hit(float damage, Transform damager): main runtime entry point.
damageshould be normalized to[0, 1]. - Stop(): resets current flash and indicator state.
If Target and damager are both valid, the helper computes the hit direction relative to the target. If damager is null, it falls back to a centered flash-only response.
Performance Characteristics
The effect executes in a single full-screen render pass, but visual complexity varies with the enabled layers.
- Pass Count: 1 blit pass.
- Texture Samples: Moderate and dependent on enabled layers such as drops and noise.
- Complexity: O(1) per pixel with extra branch cost for layered damage features.
Usage Patterns and Presets
Survival Horror
For slow-building stress and heavy low-health pressure:
- Damage: 0.6 - 1.0
- Liquid: 1.0
- Veins: 0.3 - 0.6
- Desaturation: 0.3 - 0.7
- Blink: 0.2 - 0.5
Shooter Hit Feedback
For punchy directional impacts with less permanent obstruction:
- Damage: 0.15 - 0.4
- Impacts Strength: 1.0 - 2.5
- Time: fast rise, short hold
- Liquid: 0.5 - 0.8
- Distortion: 0.05 - 0.15
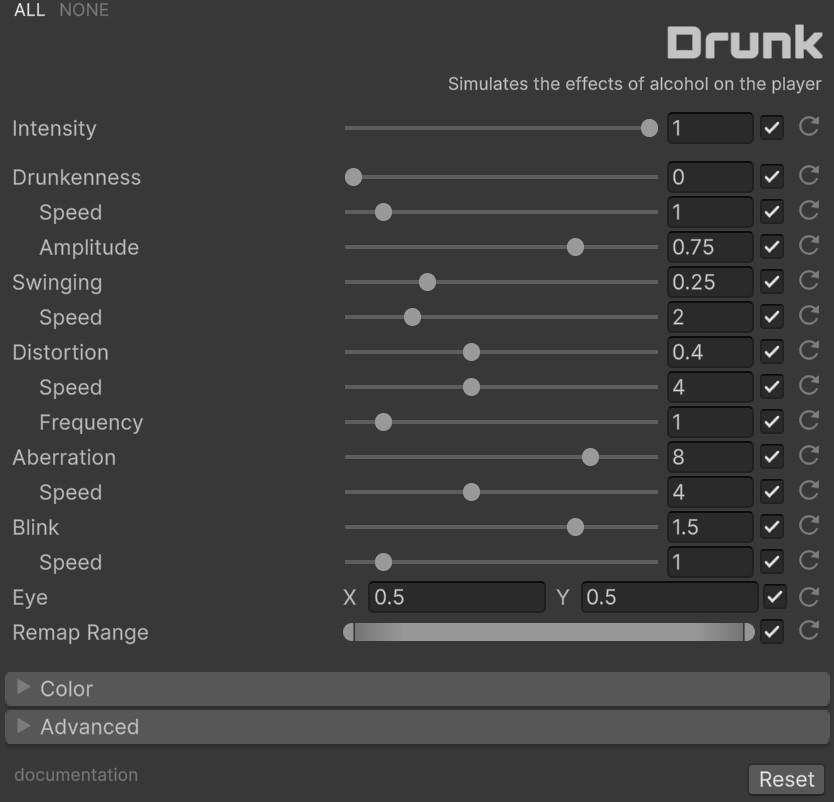
🍺 Drunk
‘Drunk’ simulates alcohol-induced instability with oscillation, head sway, distortion, blinking, and chromatic aberration.
Requisites
To ensure optimal performance and compatibility, your project must meet the following requirements:
- Unity: 6000.0.58f2 or higher.
- Universal RP: 17.0.3 or higher.
Installation Guide
Step 1: Add Renderer Feature
- Locate your Universal Renderer Data asset.
- Click Add Renderer Feature and select Fronkon Games > Spice Up > Drunk.
Step 2: Configure the Volume
- Create a Volume component (Global or Local).
- In the Volume component, create or assign a Volume Profile.
- Click Add Override and select Fronkon Games > Spice Up > Drunk.
- Enable ‘Intensity’ and the drunkenness-related parameters you want to animate.
Parameter Configuration
With ‘Intensity’ you can control the overall strength of the effect [0.0 - 1.0]. If it is 0, the effect will not be active.
Drunkenness
The custom inspector starts this group with ‘Drunkenness’, which defines the main alcohol-induced wobble and its nested Speed and Amplitude controls.
| Drunkenness | Main normalized strength of the effect |
| Speed | Speed of the core oscillation |
| Amplitude | Amplitude of the overall wobble |
Swinging
Here the custom inspector switches to the ‘Swinging’ block, which controls the slower head sway layered on top of the base drunken wobble.
| Swinging | Head sway strength |
| Speed | Head sway speed |
Distortion
The ‘Distortion’ block in the custom inspector is where the animated screen warping is configured.
| Distortion | Animated image warping |
| Speed | Distortion animation speed |
| Frequency | Distortion wave frequency |
Aberration
Inside the custom inspector, ‘Aberration’ defines how strongly the color channels separate over time.
| Aberration | Chromatic offset and channel separation |
| Speed | Aberration animation speed |
Blink
This ‘Blink’ block in the custom inspector controls the eyelid-style interruption of vision.
| Blink | Eyelid-style interruption of vision |
| Speed | Blink speed |
Eye
This standalone ‘Eye’ control appears after Blink in the custom inspector and sets the focus point used by the blink effect.
| Eye | Focus point of the blink effect |
Remap Range
This final control matches the ‘Remap Range’ slider shown at the bottom of the custom inspector and lets you tame or exaggerate high drunkenness values.
| Remap Range | Remap extreme values into a more usable range |
Runtime Control
using UnityEngine;
using UnityEngine.Rendering;
using FronkonGames.SpiceUp.Drunk;

[SerializeField] private VolumeProfile volumeProfile;

private void SetDrunkLevel(float value)
{
  if (volumeProfile.TryGet(out DrunkVolume volume))
  {
    volume.intensity.overrideState = true;
    volume.drunkenness.overrideState = true;
    volume.drunkenness.value = value;
    volume.intensity.value = 1.0f;
  }
}
💡 Take a look at the code in the included demo to learn more about how the effect works.
Performance Characteristics
The effect executes in a single pass and remains lightweight unless multiple distortions are pushed to high values.
- Pass Count: 1 blit pass.
- Texture Samples: Low to moderate.
- Complexity: O(1) per pixel with animated trigonometric distortion.
Usage Patterns and Presets
Slight Intoxication
For a readable but impaired screen:
- Drunkenness: 0.2 - 0.4
- Swinging: 0.1 - 0.2
- Distortion: 0.15 - 0.3
- Aberration: 1.0 - 3.0
Severe Drunkenness
For near-loss-of-control presentation:
- Drunkenness: 0.7 - 1.0
- Amplitude: 0.75 - 1.0
- Distortion: 0.4 - 0.8
- Blink: 1.0 - 1.8
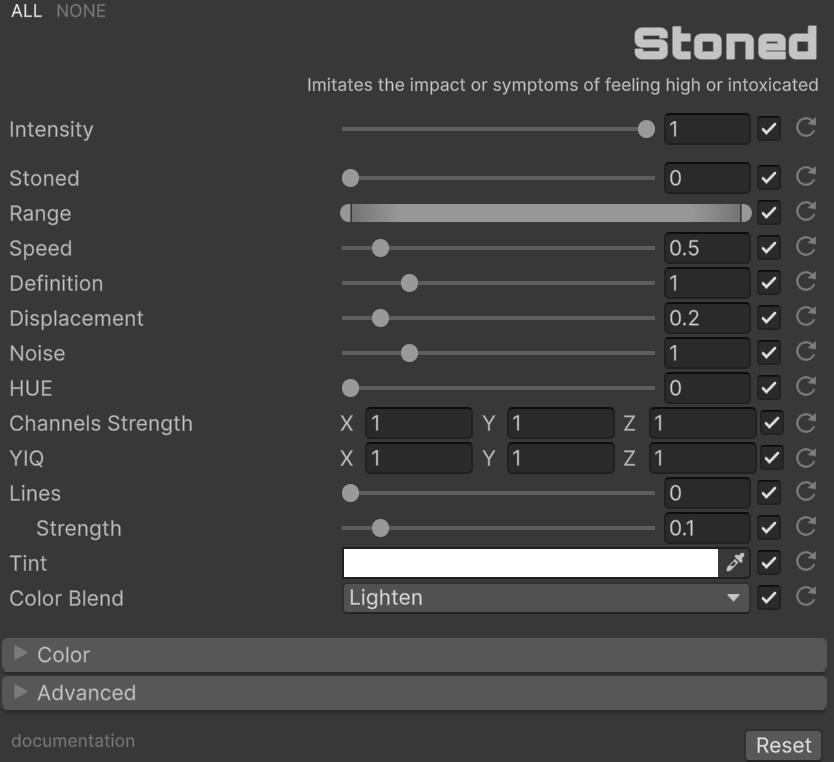
🌈 Stoned
‘Stoned’ is a psychedelic effect focused on color-space manipulation, screen deformation, YIQ controls, and stylized line generation.
Requisites
To ensure optimal performance and compatibility, your project must meet the following requirements:
- Unity: 6000.0.58f2 or higher.
- Universal RP: 17.0.3 or higher.
Installation Guide
Step 1: Add Renderer Feature
- Locate your Universal Renderer Data asset.
- Click Add Renderer Feature and select Fronkon Games > Spice Up > Stoned.
Step 2: Configure the Volume
- Create a Volume component (Global or Local).
- In the Volume component, create or assign a Volume Profile.
- Click Add Override and select Fronkon Games > Spice Up > Stoned.
- Enable ‘Intensity’ and the psychedelic parameters you want to control.
Parameter Configuration
With ‘Intensity’ you can control the overall strength of the effect [0.0 - 1.0]. If it is 0, the effect will not be active.
Stoned
This section follows the same sequence users see in the custom inspector, beginning with the main ‘Stoned’ strength control and the standalone fields that come right after it.
| Stoned | Main normalized strength of the effect |
| Range | Clamp or stretch strong values |
| Speed | Speed of the evolving color clouds |
| Definition | Contour sharpness and cloud detail |
| Displacement | Background deformation strength |
| Noise | Extra breakup and granularity |
| Color HUE | Extra hue shift inside the internal color model |
| Channels Strength | Strength of each color channel |
| YIQ | YIQ luma / in-phase / quadrature control |
Lines
The custom inspector places these controls under ‘Lines’, where they shape the stylized streaks layered over the psychedelic pattern.
| Lines | Converts soft structures into stronger neon streaks |
| Strength | Intensity of the line contribution |
Tint
This standalone ‘Tint’ field appears after Lines in the custom inspector and applies a final tint over the result.
| Tint | Final result tint |
Color Blend
This final ‘Color Blend’ control matches the last field in the custom inspector and defines how the effect is composited over the image.
| Color Blend | Blending mode used to composite the effect |
Runtime Control
using UnityEngine;
using UnityEngine.Rendering;
using FronkonGames.SpiceUp.Stoned;

[SerializeField] private VolumeProfile volumeProfile;

private void SetHigh(float value)
{
  if (volumeProfile.TryGet(out StonedVolume volume))
  {
    volume.intensity.overrideState = true;
    volume.stoned.overrideState = true;
    volume.stoned.value = value;
    volume.intensity.value = 1.0f;
  }
}
💡 Take a look at the code in the included demo to learn more about how the effect works.
Performance Characteristics
The effect uses a single render pass with procedural color-space operations.
- Pass Count: 1 blit pass.
- Texture Samples: Low.
- Complexity: O(1) per pixel with procedural color deformation.
Usage Patterns and Presets
Dreamy Potion
For magical intoxication with readable gameplay:
- Stoned: 0.2 - 0.4
- Displacement: 0.1 - 0.25
- Noise: 0.5 - 1.0
- Lines: 0.0 - 0.2
Psychedelic Overload
For strong surrealism:
- Stoned: 0.7 - 1.0
- Definition: 1.5 - 3.0
- YIQ: exaggerated
- Lines: 0.4 - 0.8
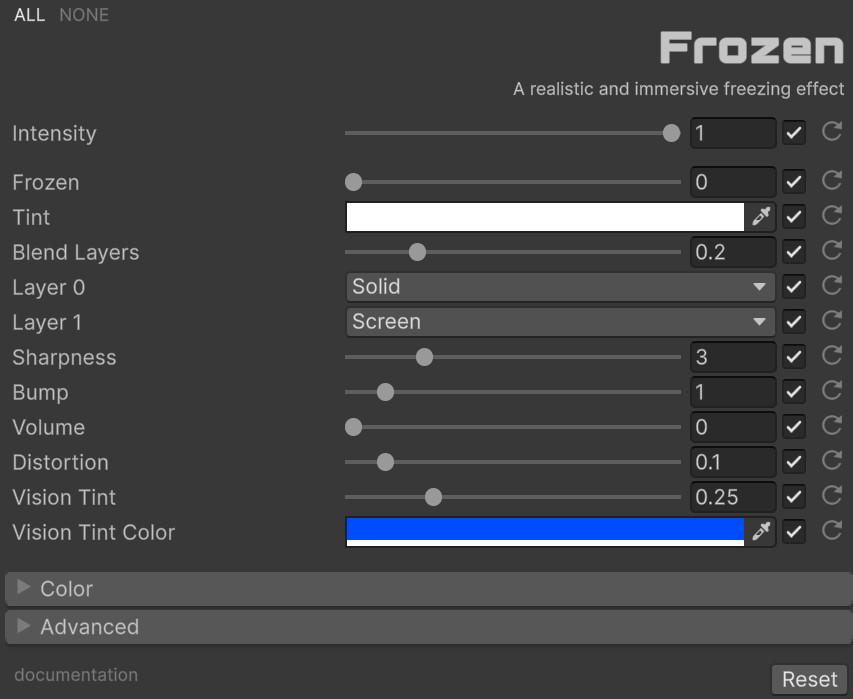
🧊 Frozen
‘Frozen’ creates a layered frost overlay with distortion, cold tinting, and surface detail controls that can range from mild chill to near-complete visual obstruction.
Requisites
To ensure optimal performance and compatibility, your project must meet the following requirements:
- Unity: 6000.0.58f2 or higher.
- Universal RP: 17.0.3 or higher.
Installation Guide
Step 1: Add Renderer Feature
- Locate your Universal Renderer Data asset.
- Click Add Renderer Feature and select Fronkon Games > Spice Up > Frozen.
Step 2: Configure the Volume
- Create a Volume component (Global or Local).
- In the Volume component, create or assign a Volume Profile.
- Click Add Override and select Fronkon Games > Spice Up > Frozen.
- Enable ‘Intensity’ and the frost parameters you want to tune.
Parameter Configuration
With ‘Intensity’ you can control the overall strength of the effect [0.0 - 1.0]. If it is 0, the effect will not be active.
Frozen
The layout below mirrors the custom inspector order, starting with the main ‘Frozen’ strength control and the frost-layer settings that come next.
| Frozen | Main normalized intensity of the freezing state |
| Tint | Main frost tint |
| Blend Layers | Mix between the two frost layers |
| Layer 0 / Layer 1 | Individual blend modes for both layers |
| Bump | Frost relief strength |
| Sharpness | Edge definition |
| Volume | Surface depth feel |
| Distortion | Screen refraction beneath the frost |
| Vision Tint | Strength of the visible-area tint |
| Vision Tint Color | Cold color cast over the visible area |
Runtime Control
using UnityEngine;
using UnityEngine.Rendering;
using FronkonGames.SpiceUp.Frozen;

[SerializeField] private VolumeProfile volumeProfile;

private void SetCold(float value)
{
  if (volumeProfile.TryGet(out FrozenVolume volume))
  {
    volume.intensity.overrideState = true;
    volume.frozen.overrideState = true;
    volume.frozen.value = value;
    volume.intensity.value = 1.0f;
  }
}
💡 Take a look at the code in the included demo to learn more about how the effect works.
Performance Characteristics
The effect executes in a single full-screen pass with layered procedural detail.
- Pass Count: 1 blit pass.
- Texture Samples: Moderate.
- Complexity: O(1) per pixel with additional frost and distortion math.
Usage Patterns and Presets
Light Frostbite
For early environmental exposure:
- Frozen: 0.2 - 0.4
- Distortion: 0.05 - 0.1
- Vision Tint Strength: 0.15 - 0.25
Full Freeze
For critical cold damage:
- Frozen: 0.8 - 1.0
- Blend Layers: 0.4 - 0.6
- Bump: 1.0 - 2.0
- Volume: 0.4 - 0.8
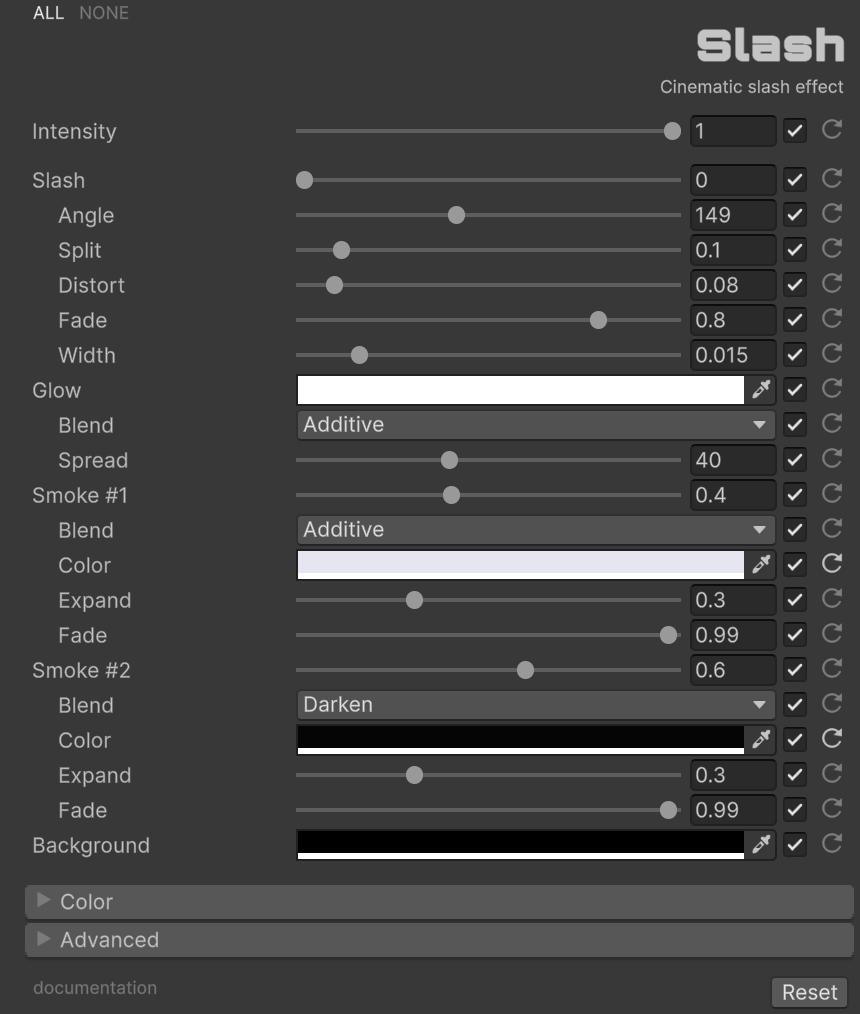
⚔️ Slash
‘Slash’ is a cinematic screen-split effect that simulates a slashing blade cutting across the view. It combines image separation, edge glow, layered smoke, and color grading for dramatic combat or death transitions.
Requisites
To ensure optimal performance and compatibility, your project must meet the following requirements:
- Unity: 6000.0.58f2 or higher.
- Universal RP: 17.0.3 or higher.
Installation Guide
Step 1: Add Renderer Feature
- Locate your Universal Renderer Data asset.
- Click Add Renderer Feature and select Fronkon Games > Spice Up > Slash.
Step 2: Configure the Volume
- Create a Volume component (Global or Local).
- In the Volume component, create or assign a Volume Profile.
- Click Add Override and select Fronkon Games > Spice Up > Slash.
- Enable ‘Intensity’ and the slash parameters you want to control.
Parameter Configuration
With ‘Intensity’ you can control the overall strength of the effect [0.0 - 1.0]. If it is 0, the effect will not be active.
Slash
The main ‘Slash’ block in the custom inspector defines the cut progression, angle, and screen split behavior.
| Slash | Progress of the slash from 0 to 1 |
| Angle | Angle of the slash in degrees |
| Split | Maximum distance the screen halves separate |
| Distort | Refraction strength at the split edge |
| Fade | Point at which the slash itself fades out |
| Width | Thickness of the core slash line |
Glow
The ‘Glow’ block in the custom inspector controls the light bloom along the slash edge.
| Glow | Color of the edge glow |
| Blend | Blend mode used for the glow |
| Spread | Glow spread and softness |
Smoke #1
The first ‘Smoke #1’ block in the custom inspector defines the bright smoke layer that trails the slash.
| Smoke #1 | Size of the white smoke layer |
| Blend | Blend mode for the white smoke |
| Color | White smoke color |
| Expand | Smoke expansion outward from the slash |
| Fade | Point at which the white smoke fades out |
Smoke #2
The ‘Smoke #2’ block in the custom inspector defines the dark smoke layer beneath the bright one.
| Smoke #2 | Size of the dark smoke layer |
| Blend | Blend mode for the dark smoke |
| Color | Dark smoke color |
| Expand | Smoke expansion outward from the slash |
| Fade | Point at which the dark smoke fades out |
Background
This standalone ‘Background’ control appears after the smoke blocks in the custom inspector and sets the color used to hide screen-edge clamping when the image splits.
| Background | Fill color revealed behind the split halves |
Color
Open the ‘Color’ foldout in the custom inspector to adjust the final grading applied to the effect.
| Brightness | Overall brightness |
| Contrast | Overall contrast |
| Gamma | Overall gamma |
| Hue | Global hue shift |
| Saturation | Global saturation |
Runtime Control
using System.Collections;
using UnityEngine;
using UnityEngine.Rendering;
using FronkonGames.SpiceUp.Slash;

[SerializeField] private VolumeProfile volumeProfile;

private IEnumerator PlaySlash(float duration)
{
  if (volumeProfile.TryGet(out SlashVolume volume))
  {
    volume.intensity.overrideState = true;
    volume.progress.overrideState = true;
    volume.progress.value = 0.0f;
    volume.intensity.value = 1.0f;

    float time = 0.0f;
    while (time < duration)
    {
      volume.progress.value = time / duration;
      time += volume.useScaledTime.value ? Time.deltaTime : Time.unscaledDeltaTime;
      yield return null;
    }

    volume.progress.value = 1.0f;
    volume.intensity.value = 0.0f;
  }
}
💡 Take a look at the code in the included demo to learn more about how the effect works.
Slash Controller
SlashController is an optional helper component that animates the slash over time via a coroutine.
- Duration: total time of the slash animation in seconds.
- VolumeProfile: must contain the
SlashVolumeused by the controller. - Play(): starts the slash from progress 0 and animates it to 1.
- Stop(): cancels the animation and resets progress to 0.
- OnStart / OnProgress / OnStop: Unity events fired during playback.
Performance Characteristics
The effect executes in a single full-screen render pass.
- Pass Count: 1 blit pass.
- Texture Samples: Low.
- Complexity: O(1) per pixel.
Usage Patterns and Presets
Sword Strike
For a sharp melee impact:
- Slash: animate 0.0 -> 1.0
- Angle: 149
- Split: 0.05 - 0.15
- Distort: 0.05 - 0.15
- Glow Spread: 30 - 50
Cinematic Kill
For a dramatic finishing blow:
- Slash: animate 0.0 -> 1.0
- Split: 0.2 - 0.4
- Smoke #1 Expand: 0.4 - 0.6
- Smoke #2 Expand: 0.5 - 0.8
- Background: black
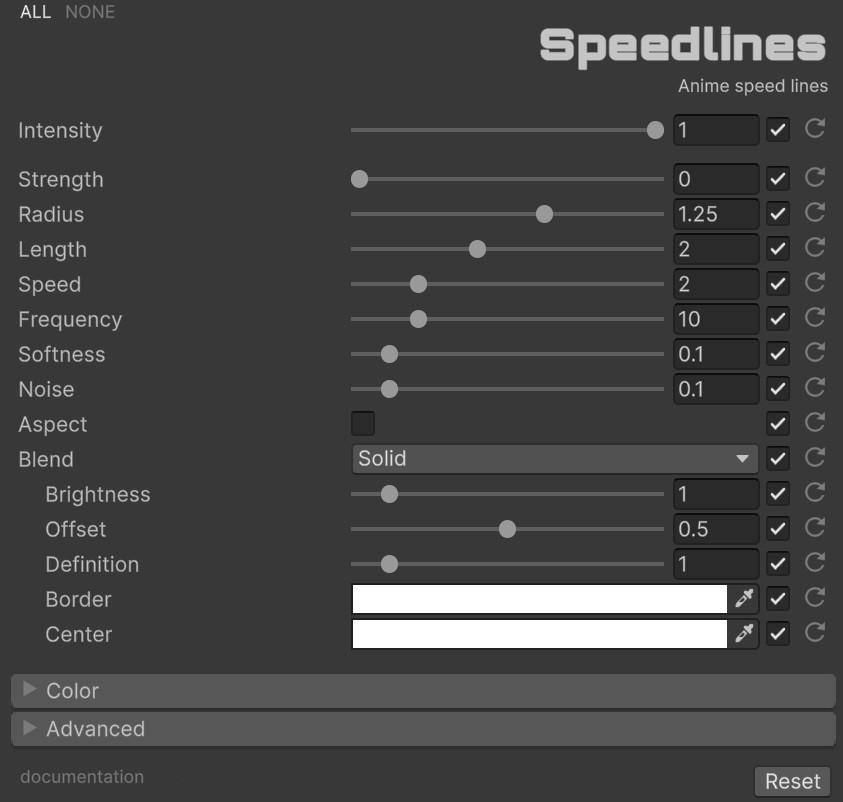
💨 Speed Lines
‘Speed Lines’ generates anime-style radial streaks that amplify velocity, acceleration, and bursts of forward motion.
Requisites
To ensure optimal performance and compatibility, your project must meet the following requirements:
- Unity: 6000.0.58f2 or higher.
- Universal RP: 17.0.3 or higher.
Installation Guide
Step 1: Add Renderer Feature
- Locate your Universal Renderer Data asset.
- Click Add Renderer Feature and select Fronkon Games > Spice Up > Speedlines.
Step 2: Configure the Volume
- Create a Volume component (Global or Local).
- In the Volume component, create or assign a Volume Profile.
- Click Add Override and select Fronkon Games > Spice Up > Speedlines.
- Enable ‘Intensity’ and the line parameters you want to use.
Parameter Configuration
With ‘Intensity’ you can control the overall strength of the effect [0.0 - 1.0]. If it is 0, the effect will not be active.
Strength
The description here follows the custom inspector top to bottom, starting with the main radial-line controls before moving into the nested blend settings.
| Strength | Main line contribution |
| Radius | Overall effect radius |
| Length | Length of the streaks |
| Speed | Motion speed of the streak animation |
| Frequency | Density of the lines |
| Softness | Edge softness |
| Noise | Shape variation |
| Aspect | Preserve circular shape regardless of screen aspect |
Blend
Within the custom inspector, the nested ‘Blend’ block controls how the line colors are generated and composited.
| Blend | Blend mode used to mix the lines with the image |
| Brightness | Brightness of the line coloration |
| Offset | Gradient positioning |
| Definition | Gradient sharpness |
| Border | Border color of the lines |
| Center | Center color of the lines |
Runtime Control
using UnityEngine;
using UnityEngine.Rendering;
using FronkonGames.SpiceUp.Speedlines;

[SerializeField] private VolumeProfile volumeProfile;

private void SetBoost(float value)
{
  if (volumeProfile.TryGet(out SpeedlinesVolume volume))
  {
    volume.intensity.overrideState = true;
    volume.strength.overrideState = true;
    volume.strength.value = value;
    volume.intensity.value = 1.0f;
  }
}
💡 Take a look at the code in the included demo to learn more about how the effect works.
Performance Characteristics
The effect is implemented as a single pass and is generally lightweight.
- Pass Count: 1 blit pass.
- Texture Samples: Low.
- Complexity: O(1) per pixel with procedural radial pattern generation.
Usage Patterns and Presets
Dash Burst
For short ability bursts:
- Strength: 0.3 - 0.6
- Length: 1.5 - 2.5
- Speed: 3.0 - 6.0
Anime Sprint
For exaggerated movement:
- Strength: 0.7 - 1.0
- Frequency: 15 - 30
- Color Brightness: 1.5 - 3.0
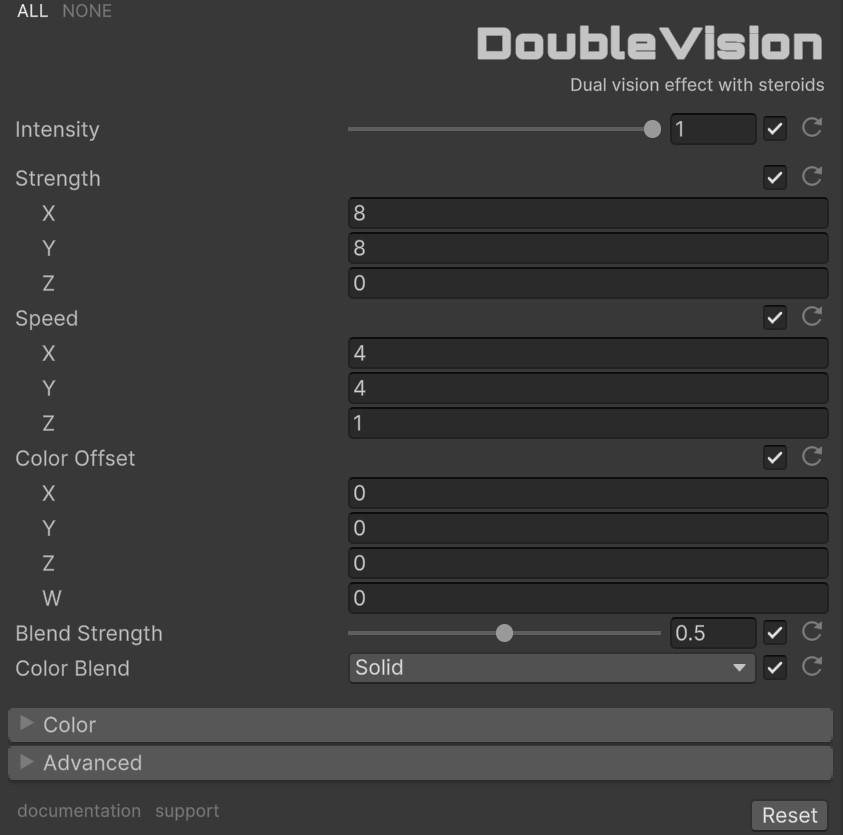
👀 Double Vision
‘Double Vision’ offsets and oscillates the image to create unstable binocular separation, making it ideal for intoxication, disorientation, and impact aftermath.
Requisites
To ensure optimal performance and compatibility, your project must meet the following requirements:
- Unity: 6000.0.58f2 or higher.
- Universal RP: 17.0.3 or higher.
Installation Guide
Step 1: Add Renderer Feature
- Locate your Universal Renderer Data asset.
- Click Add Renderer Feature and select Fronkon Games > Spice Up > Double Vision.
Step 2: Configure the Volume
- Create a Volume component (Global or Local).
- In the Volume component, create or assign a Volume Profile.
- Click Add Override and select Fronkon Games > Spice Up > Double Vision.
- Enable ‘Intensity’ and the separation parameters you want to control.
Parameter Configuration
With ‘Intensity’ you can control the overall strength of the effect [0.0 - 1.0]. If it is 0, the effect will not be active.
Strength
For ‘Double Vision’, the parameter list below keeps the exact inspector order, from the main offsets through the blend settings.
| Strength | Direction and magnitude of the image offset |
| Speed | Oscillation speed on each axis |
| Color Offset | Independent offset for the color channels |
| Blend Strength | Strength of the doubled-image mix |
| Color Blend | Blend operation used to composite the result |
Runtime Control
using UnityEngine;
using UnityEngine.Rendering;
using FronkonGames.SpiceUp.DoubleVision;

[SerializeField] private VolumeProfile volumeProfile;

private void SetDisorientation(float value)
{
  if (volumeProfile.TryGet(out DoubleVisionVolume volume))
  {
    volume.intensity.overrideState = true;
    volume.blendStrength.overrideState = true;
    volume.blendStrength.value = value;
    volume.intensity.value = 1.0f;
  }
}
💡 Take a look at the code in the included demo to learn more about how the effect works.
Performance Characteristics
The effect is lightweight and runs in a single pass.
- Pass Count: 1 blit pass.
- Texture Samples: Low.
- Complexity: O(1) per pixel.
Usage Patterns and Presets
Head Trauma
For impact-induced instability:
- Blend Strength: 0.3 - 0.5
- Strength: medium XY offsets
- Color Offset: subtle
Supernatural Distortion
For paranormal or teleport transitions:
- Blend Strength: 0.5 - 0.8
- Speed: uneven per-axis motion
- Color Offset: noticeable RGB phase split
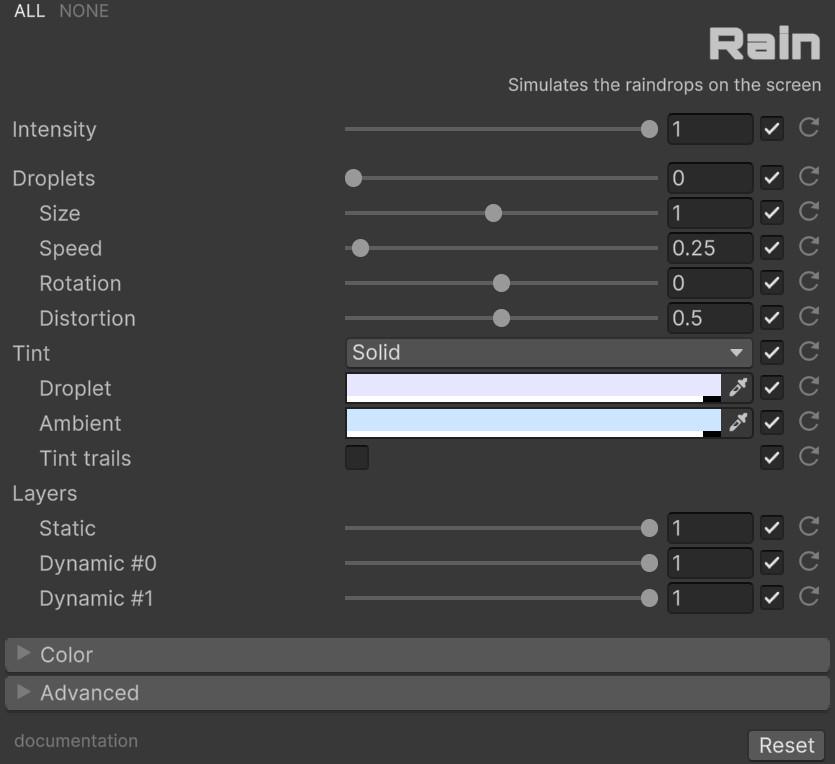
🌧️ Rain
‘Rain’ simulates droplets on glass, visors, cameras, or lenses using layered static and dynamic water behavior.
Requisites
To ensure optimal performance and compatibility, your project must meet the following requirements:
- Unity: 6000.0.58f2 or higher.
- Universal RP: 17.0.3 or higher.
Installation Guide
Step 1: Add Renderer Feature
- Locate your Universal Renderer Data asset.
- Click Add Renderer Feature and select Fronkon Games > Spice Up > Rain.
Step 2: Configure the Volume
- Create a Volume component (Global or Local).
- In the Volume component, create or assign a Volume Profile.
- Click Add Override and select Fronkon Games > Spice Up > Rain.
- Enable ‘Intensity’ and the wet-screen parameters you need.
Parameter Configuration
With ‘Intensity’ you can control the overall strength of the effect [0.0 - 1.0]. If it is 0, the effect will not be active.
Droplets
In the custom inspector, the ‘Droplets’ block controls the amount, size, movement, angle, and refraction of the rain pattern.
| Droplets | Main intensity of the raindrop system |
| Size | Droplet scale |
| Speed | Falling/trailing motion speed |
| Rotation | Overall slant of the drops |
| Distortion | Refraction strength applied to the background |
Tint
The ‘Tint’ block in the custom inspector determines how the droplets, ambient contribution, and moving trails are colored.
| Tint | Blend mode used to tint the effect |
| Droplet | Main droplet tint |
| Ambient | Ambient wet tint, alpha controls influence |
| Tint trails | Also tint moving trails |
Layers
The custom inspector uses the ‘Layers’ block to balance the stationary and moving droplet layers.
| Static | Stationary droplets |
| Dynamic #0 | First moving droplet layer |
| Dynamic #1 | Second moving droplet layer |
Runtime Control
using UnityEngine;
using UnityEngine.Rendering;
using FronkonGames.SpiceUp.Rain;

[SerializeField] private VolumeProfile volumeProfile;

private void SetRain(float value)
{
  if (volumeProfile.TryGet(out RainVolume volume))
  {
    volume.intensity.overrideState = true;
    volume.amount.overrideState = true;
    volume.amount.value = value;
    volume.intensity.value = 1.0f;
  }
}
💡 Take a look at the code in the included demo to learn more about how the effect works.
Performance Characteristics
The effect runs in a single pass and scales mostly with droplet complexity and distortion strength.
- Pass Count: 1 blit pass.
- Texture Samples: Moderate.
- Complexity: O(1) per pixel with layered droplet evaluation.
Usage Patterns and Presets
Light Drizzle
For subtle environmental weather:
- Amount: 0.15 - 0.3
- Size: 0.8 - 1.0
- Static Layer: high
- Dynamic Layers: low
Storm Lens
For wet helmet or camera glass:
- Amount: 0.6 - 1.0
- Distortion: 0.5 - 0.8
- Dynamic Layers: high
- Tint Trails: enabled
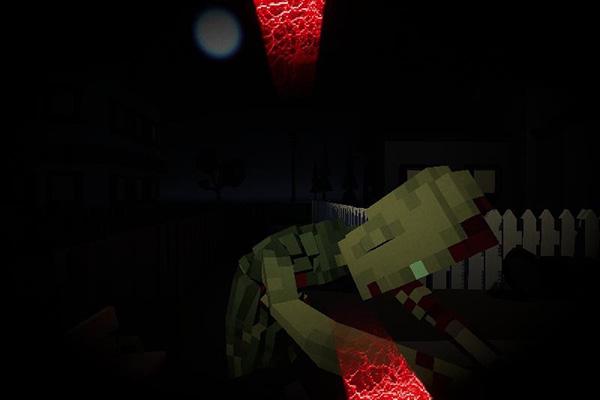
👻 Ghost Vision
‘Ghost Vision’ creates a tunnel-like field of view with animated organic noise, strong inner/outer color separation, and optional custom noise quality.
Requisites
To ensure optimal performance and compatibility, your project must meet the following requirements:
- Unity: 6000.0.58f2 or higher.
- Universal RP: 17.0.3 or higher.
Installation Guide
Step 1: Add Renderer Feature
- Locate your Universal Renderer Data asset.
- Click Add Renderer Feature and select Fronkon Games > Spice Up > Ghost Vision.
Step 2: Configure the Volume
- Create a Volume component (Global or Local).
- In the Volume component, create or assign a Volume Profile.
- Click Add Override and select Fronkon Games > Spice Up > Ghost Vision.
- Enable ‘Intensity’ and the noise/focus parameters you need.
Parameter Configuration

With ‘Intensity’ you can control the overall strength of the effect [0.0 - 1.0]. If it is 0, the effect will not be active.
Quality
This breakdown preserves the exact custom inspector order, starting with the quality selection and the main viewing controls that appear before the color regions.
| Quality | Preset quality mode or custom FBM path |
| High FBM / Low FBM | Custom octave counts when using Quality = Custom |
| Strength | Main intensity of the effect |
| Focus | Center of the viewing cone |
| Speed | Turn/noise motion speed |
| Aperture | Width of the visible inner area |
| Zoom | Magnification feel of the center |
| Aspect Ratio | Preserve aspect ratio in the mask |
Inner Color
The custom inspector exposes these controls under ‘Inner Color’ to style the central viewing region.
| Inner Color | Base tint of the inner region |
| Saturation | Inner-region saturation |
| Brightness | Inner-region brightness |
| Contrast | Inner-region contrast |
| Gamma | Inner-region gamma |
Outer Color
The ‘Outer Color’ block in the custom inspector styles the outer falloff region.
| Outer Color | Base tint of the outer region |
| Blend | Blend mode used for the outer region |
| Saturation | Outer-region saturation |
| Brightness | Outer-region brightness |
| Contrast | Outer-region contrast |
| Gamma | Outer-region gamma |
Debug View
This standalone ‘Debug View’ control appears at the bottom of the custom inspector and visualizes the mask and affected region.
| Debug View | Visualize the mask and affected region |
Runtime Control
using UnityEngine;
using UnityEngine.Rendering;
using FronkonGames.SpiceUp.GhostVision;

[SerializeField] private VolumeProfile volumeProfile;

private void SetSpectralSense(float value)
{
  if (volumeProfile.TryGet(out GhostVisionVolume volume))
  {
    volume.intensity.overrideState = true;
    volume.strength.overrideState = true;
    volume.strength.value = value;
    volume.intensity.value = 1.0f;
  }
}
💡 Take a look at the code in the included demo to learn more about how the effect works.
Performance Characteristics
The effect uses a single pass, but custom quality and octave-heavy noise increase shader cost.
- Pass Count: 1 blit pass.
- Texture Samples: Low.
- Complexity: O(1) per pixel with variable procedural-noise cost.
Usage Patterns and Presets
Monster POV
For predatory tunnel vision:
- Strength: 0.8 - 1.0
- Aperture: 2.0 - 4.0
- Outer Tint: dark or black
Paranormal Detector
For supernatural sensing:
- Strength: 0.3 - 0.6
- Inner Tint: pale or spectral
- Debug View: temporarily enabled while tuning
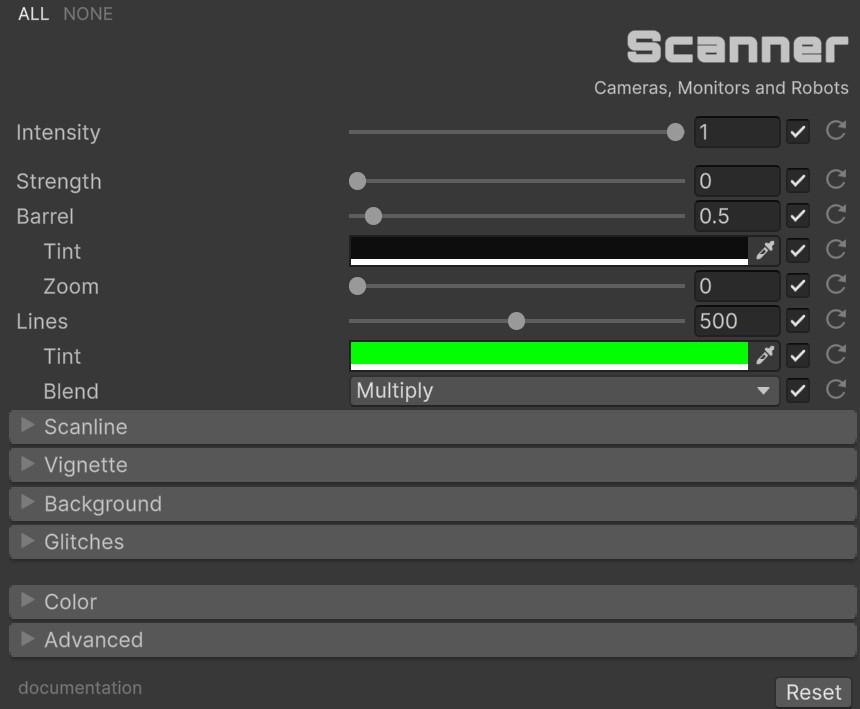
📺 Scanner
‘Scanner’ recreates the look of CCTV feeds, robotic optics, analog monitors, and unstable surveillance video.
Requisites
To ensure optimal performance and compatibility, your project must meet the following requirements:
- Unity: 6000.0.58f2 or higher.
- Universal RP: 17.0.3 or higher.
Installation Guide
Step 1: Add Renderer Feature
- Locate your Universal Renderer Data asset.
- Click Add Renderer Feature and select Fronkon Games > Spice Up > Scanner.
Step 2: Configure the Volume
- Create a Volume component (Global or Local).
- In the Volume component, create or assign a Volume Profile.
- Click Add Override and select Fronkon Games > Spice Up > Scanner.
- Enable ‘Intensity’ and ‘Strength’ plus the display artifacts you want to use.
Parameter Configuration
With ‘Intensity’ you can control the overall strength of the effect [0.0 - 1.0]. If it is 0, the effect will not be active.
Strength
The parameter order here mirrors the custom inspector exactly, starting with the core scanner controls before the foldout sections.
| Strength | Main activation strength of the effect |
| Barrel | CRT-like curvature strength |
| Tint / Zoom | Nested barrel tint and zoom controls |
| Lines | Number of main screen lines |
| Tint / Blend | Nested line tint and blend controls |
Scanline
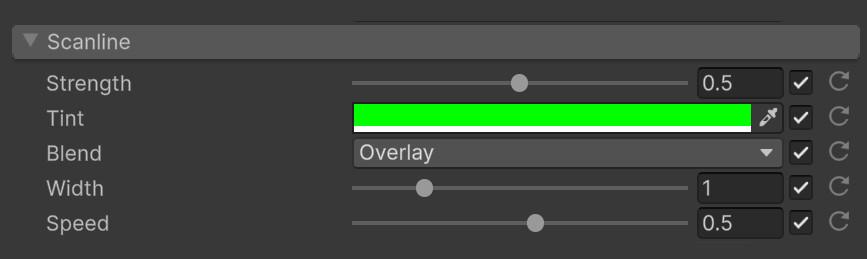
Open the ‘Scanline’ foldout in the custom inspector to control the moving scanline overlay described below.
| Strength | Strength of the scanline overlay |
| Tint | Scanline tint |
| Blend | Scanline blend mode |
| Width | Scanline width |
| Speed | Scanline movement speed |
Vignette

The ‘Vignette’ foldout in the custom inspector controls the edge darkening and flicker settings collected here.
| Strength | Edge darkening amount |
| Blink | Vignette flicker |
Background

These controls live inside the ‘Background’ foldout of the custom inspector and define the spaces between the lines.
| Tint | Background tint |
| Blend | Background blend mode |
Glitches
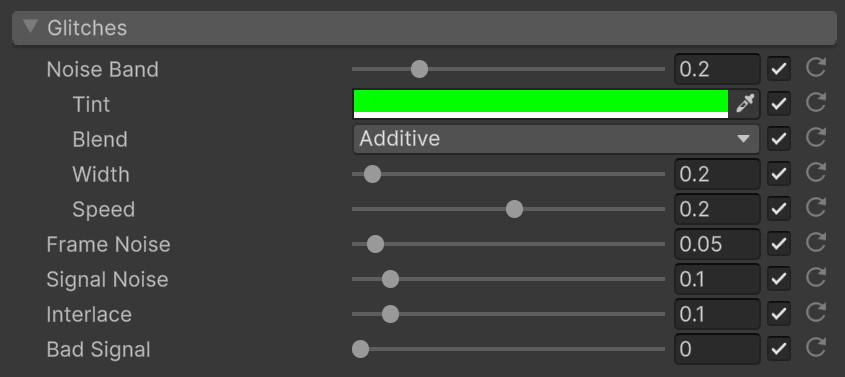
The custom inspector gathers these analog and electronic imperfections inside the ‘Glitches’ foldout.
| Noise Band | Horizontal band artifact strength |
| Tint / Blend / Width / Speed | Nested controls for the noise band |
| Frame Noise | Whole-frame jitter |
| Signal Noise | Static signal instability |
| Interlace | Interlace breakup |
| Bad Signal | Stronger transmission corruption |
Runtime Control
using UnityEngine;
using UnityEngine.Rendering;
using FronkonGames.SpiceUp.Scanner;

[SerializeField] private VolumeProfile volumeProfile;

private void SetScannerStrength(float value)
{
  if (volumeProfile.TryGet(out ScannerVolume volume))
  {
    volume.intensity.overrideState = true;
    volume.strength.overrideState = true;
    volume.strength.value = value;
    volume.intensity.value = 1.0f;
  }
}
💡 Take a look at the code in the included demo to learn more about how the effect works.
Performance Characteristics
The effect runs in a single pass with procedural display artifacts.
- Pass Count: 1 blit pass.
- Texture Samples: Low.
- Complexity: O(1) per pixel.
Usage Patterns and Presets
CCTV Feed
For surveillance cameras:
- Strength: 0.3 - 0.6
- Lines: high
- Barrel: 0.2 - 0.5
- Signal Noise: low to medium
Failing Robot Camera
For damaged mechanical vision:
- Strength: 0.7 - 1.0
- Noise Band: medium/high
- Frame Noise: medium
- Bad Signal: 0.3 - 0.8
☠️ Death Screen
‘Death Screen’ is a blood wipe that can transition the screen from fully visible to almost completely overwhelmed by blood.
Requisites
To ensure optimal performance and compatibility, your project must meet the following requirements:
- Unity: 6000.0.58f2 or higher.
- Universal RP: 17.0.3 or higher.
Installation Guide
Step 1: Add Renderer Feature
- Locate your Universal Renderer Data asset.
- Click Add Renderer Feature and select Fronkon Games > Spice Up > Death Screen.
Step 2: Configure the Volume
- Create a Volume component (Global or Local).
- In the Volume component, create or assign a Volume Profile.
- Click Add Override and select Fronkon Games > Spice Up > Death Screen.
- Enable ‘Intensity’ and the blood wipe parameters you want to animate.
Parameter Configuration
With ‘Intensity’ you can control the overall strength of the effect [0.0 - 1.0]. If it is 0, the effect will not be active.
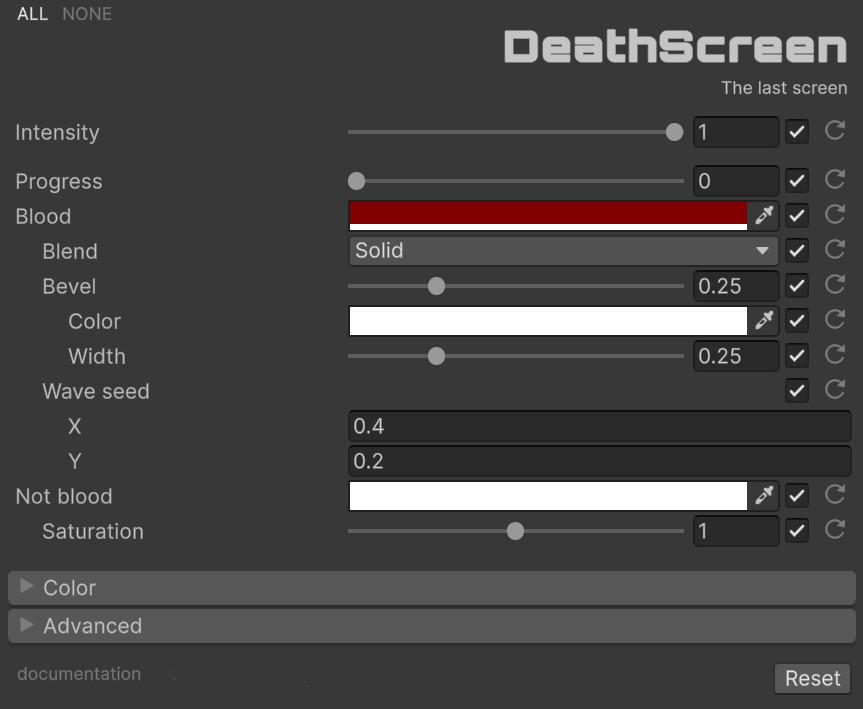
Progress
This section keeps the same order shown in the custom inspector, beginning with the wipe progression and the nested Blood controls.
| Progress | Main wipe progression from 0 to 1 |
| Blood | Color of the blood area |
| Blend | Blend mode of the blood area |
| Bevel | Edge glow strength |
| Color / Width | Nested bevel color and width controls |
| Wave seed | Variation seed for the wipe contour |
Not blood
The ‘Not blood’ block in the custom inspector controls the treatment of the unaffected region.
| Not blood | Color of the unaffected region |
| Saturation | Saturation of the unaffected region |
Runtime Control
using UnityEngine;
using UnityEngine.Rendering;
using FronkonGames.SpiceUp.DeathScreen;

[SerializeField] private VolumeProfile volumeProfile;

private void SetDeathProgress(float value)
{
  if (volumeProfile.TryGet(out DeathScreenVolume volume))
  {
    volume.intensity.overrideState = true;
    volume.progress.overrideState = true;
    volume.progress.value = value;
    volume.intensity.value = 1.0f;
  }
}
💡 Take a look at the code in the included demo to learn more about how the effect works.
Performance Characteristics
The effect is lightweight and based on a single full-screen pass.
- Pass Count: 1 blit pass.
- Texture Samples: Low.
- Complexity: O(1) per pixel.
Usage Patterns and Presets
Defeat Transition
For a clean death-state wipe:
- Progress: animate 0.0 -> 1.0
- Bevel: 0.2 - 0.4
- Blend: Solid
Possession / Corruption
For more stylized takeover effects:
- Progress: medium/high
- Not blood: tinted
- Waves: stronger variation
🌙 Purkinje
‘Purkinje’ simulates the low-light shift in human color perception, where scenes become darker, reds diminish, and blue-green tones become more dominant.
Requisites
To ensure optimal performance and compatibility, your project must meet the following requirements:
- Unity: 6000.0.58f2 or higher.
- Universal RP: 17.0.3 or higher.
Installation Guide
Step 1: Add Renderer Feature
- Locate your Universal Renderer Data asset.
- Click Add Renderer Feature and select Fronkon Games > Spice Up > Purkinje.
Step 2: Configure the Volume
- Create a Volume component (Global or Local).
- In the Volume component, create or assign a Volume Profile.
- Click Add Override and select Fronkon Games > Spice Up > Purkinje.
- Enable ‘Intensity’ and the low-light perception controls you want to use.
Parameter Configuration
With ‘Intensity’ you can control the overall strength of the effect [0.0 - 1.0]. If it is 0, the effect will not be active.
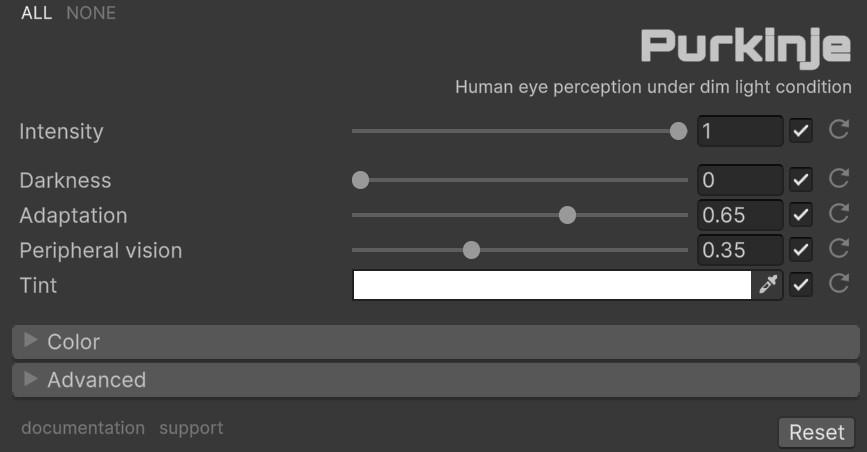
Darkness
For ‘Purkinje’, the explanation below follows the exact custom inspector order from darkness response through the final tint.
| Darkness | Global strength of the low-light adaptation |
| Adaptation | How strongly the effect reacts to scene luminance |
| Peripheral Vision | Makes the effect stronger away from screen center |
| Tint | Final hue shift of the adaptation |
Runtime Control
using UnityEngine;
using UnityEngine.Rendering;
using FronkonGames.SpiceUp.Purkinje;

[SerializeField] private VolumeProfile volumeProfile;

private void SetNightAdaptation(float value)
{
  if (volumeProfile.TryGet(out PurkinjeVolume volume))
  {
    volume.intensity.overrideState = true;
    volume.darkness.overrideState = true;
    volume.darkness.value = value;
    volume.intensity.value = 1.0f;
  }
}
💡 Take a look at the code in the included demo to learn more about how the effect works.
Performance Characteristics
The effect is lightweight and well suited to full-time use in night scenes.
- Pass Count: 1 blit pass.
- Texture Samples: Very low.
- Complexity: O(1) per pixel.
Usage Patterns and Presets
Natural Night Scene
For subtle night adaptation:
- Darkness: 0.2 - 0.4
- Adaptation: 0.5 - 0.7
- Peripheral Vision: 0.2 - 0.35
Horror Darkness
For more oppressive night response:
- Darkness: 0.5 - 0.8
- Tint: cool blue-green
- Peripheral Vision: 0.4 - 0.6
💥 Broken Screen
‘Broken Screen’ generates procedural fractures around an impact point and combines them with glass-like distortion and chromatic aberration.
Requisites
To ensure optimal performance and compatibility, your project must meet the following requirements:
- Unity: 6000.0.58f2 or higher.
- Universal RP: 17.0.3 or higher.
Installation Guide
Step 1: Add Renderer Feature
- Locate your Universal Renderer Data asset.
- Click Add Renderer Feature and select Fronkon Games > Spice Up > Broken Screen.
Step 2: Configure the Volume
- Create a Volume component (Global or Local).
- In the Volume component, create or assign a Volume Profile.
- Click Add Override and select Fronkon Games > Spice Up > Broken Screen.
- Enable ‘Intensity’ and the fracture parameters you want to control.
Parameter Configuration
With ‘Intensity’ you can control the overall strength of the effect [0.0 - 1.0]. If it is 0, the effect will not be active.
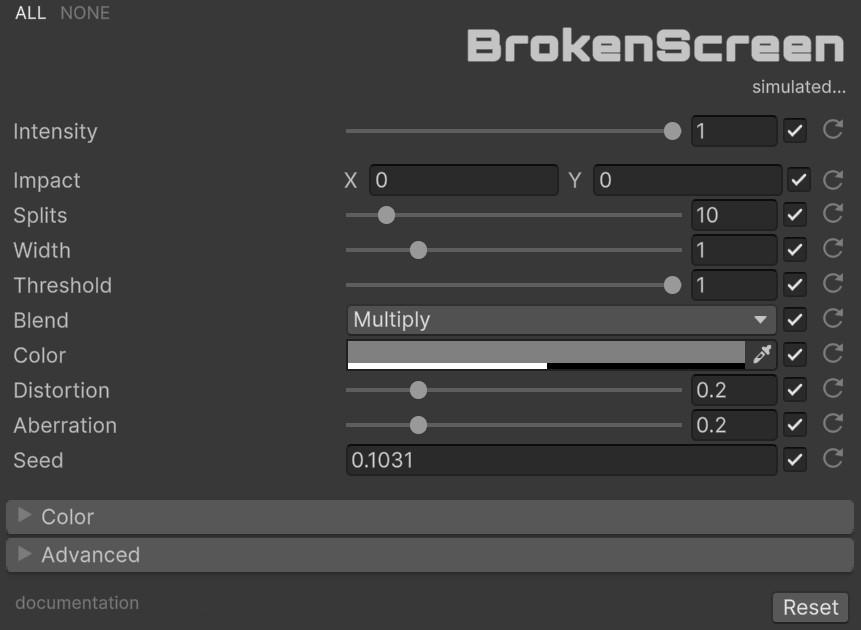
Impact
For ‘Broken Screen’, the controls are documented in the same order they appear in the custom inspector, starting at the impact point and continuing through the fracture styling controls.
| Impact | Fracture center in normalized screen space |
| Splits | Number of fracture branches |
| Width | Thickness of the cracks |
| Threshold | Limit of where fracture coloration is applied |
| Blend | Blend mode used by the fracture color |
| Color | Tint of the broken glass lines |
| Distortion | Refraction strength in the background |
| Aberration | Color separation around the cracks |
| Seed | Random seed for reproducible patterns |
Runtime Control
using UnityEngine;
using UnityEngine.Rendering;
using FronkonGames.SpiceUp.BrokenScreen;

[SerializeField] private VolumeProfile volumeProfile;

private void CrackScreen()
{
  if (volumeProfile.TryGet(out BrokenScreenVolume volume))
  {
    volume.intensity.overrideState = true;
    volume.impact.overrideState = true;
    volume.RandomValues();
    volume.intensity.value = 1.0f;
  }
}
💡 Take a look at the code in the included demo to learn more about how the effect works.
Performance Characteristics
The effect is implemented in one pass and is usually inexpensive.
- Pass Count: 1 blit pass.
- Texture Samples: Low to moderate.
- Complexity: O(1) per pixel.
Usage Patterns and Presets
Bullet Impact
For sharp localized hits:
- Splits: 10 - 20
- Width: 0.5 - 1.2
- Distortion: 0.1 - 0.2
Shattered Visor
For catastrophic damage:
- Splits: 25 - 50
- Aberration: 0.2 - 0.5
- Distortion: 0.25 - 0.5
💓 Pulse
‘Pulse’ creates an expanding frame or shockwave centered on a point of the screen. It is ideal for heartbeat cues, focus pulses, magical scans, or impact waves.
Requisites
To ensure optimal performance and compatibility, your project must meet the following requirements:
- Unity: 6000.0.58f2 or higher.
- Universal RP: 17.0.3 or higher.
Installation Guide
Step 1: Add Renderer Feature
- Locate your Universal Renderer Data asset.
- Click Add Renderer Feature and select Fronkon Games > Spice Up > Pulse.
Step 2: Configure the Volume
- Create a Volume component (Global or Local).
- In the Volume component, create or assign a Volume Profile.
- Click Add Override and select Fronkon Games > Spice Up > Pulse.
- Enable ‘Intensity’ and the pulse parameters you want to animate.
Parameter Configuration
With ‘Intensity’ you can control the overall strength of the effect [0.0 - 1.0]. If it is 0, the effect will not be active.
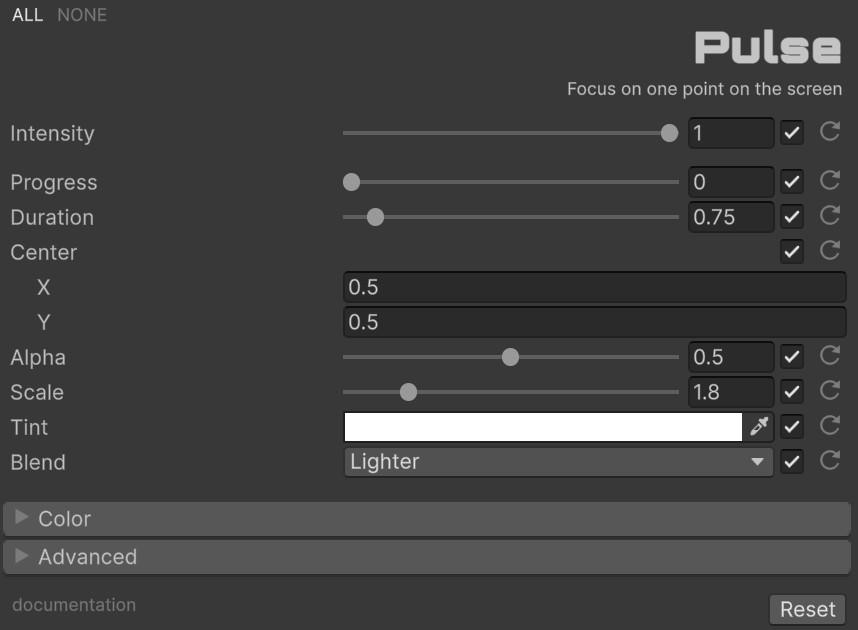
Progress
The ‘Pulse’ parameters are described in inspector order here, from the runtime timeline through the final color and blend controls.
| Progress | Animated pulse timeline from 0 to 1 |
| Duration | Natural duration of the event |
| Center | Pulse origin on the screen |
| Alpha | Maximum transparency of the pulse |
| Scale | Maximum pulse expansion |
| Tint | Pulse color |
| Blend | Blend operation of the pulse |
Runtime Control
using System.Collections;
using UnityEngine;
using UnityEngine.Rendering;
using FronkonGames.SpiceUp.Pulse;

[SerializeField] private VolumeProfile volumeProfile;

private IEnumerator PlayPulse()
{
  if (volumeProfile.TryGet(out PulseVolume volume))
  {
    volume.intensity.overrideState = true;
    volume.progress.overrideState = true;
    volume.progress.value = 0.0f;
    volume.intensity.value = 1.0f;

    float duration = volume.duration.value;
    float time = 0.0f;
    while (time < duration)
    {
      volume.progress.value = time / duration;
      time += volume.useScaledTime.value ? Time.deltaTime : Time.unscaledDeltaTime;
      yield return null;
    }

    volume.progress.value = 0.0f;
  }
}
💡 Take a look at the code in the included demo to learn more about how the effect works.
Performance Characteristics
The effect is lightweight and runs in a single pass.
- Pass Count: 1 blit pass.
- Texture Samples: Low.
- Complexity: O(1) per pixel.
Usage Patterns and Presets
Heartbeat
For medical or stress pulses:
- Duration: 0.5 - 0.8
- Scale: 2.0 - 3.0
- Tint: red
Shockwave
For impact bursts:
- Duration: 0.25 - 0.5
- Scale: 4.0 - 8.0
- Blend: Screen or Additive
🌪️ Shake
‘Shake’ is a screen-space shake effect that combines directional movement with zoom, distortion, and chromatic offsets.
Requisites
To ensure optimal performance and compatibility, your project must meet the following requirements:
- Unity: 6000.0.58f2 or higher.
- Universal RP: 17.0.3 or higher.
Installation Guide
Step 1: Add Renderer Feature
- Locate your Universal Renderer Data asset.
- Click Add Renderer Feature and select Fronkon Games > Spice Up > Shake.
Step 2: Configure the Volume
- Create a Volume component (Global or Local).
- In the Volume component, create or assign a Volume Profile.
- Click Add Override and select Fronkon Games > Spice Up > Shake.
- Enable ‘Intensity’ and the shake parameters you want to animate.
Parameter Configuration
With ‘Intensity’ you can control the overall strength of the effect [0.0 - 1.0]. If it is 0, the effect will not be active.
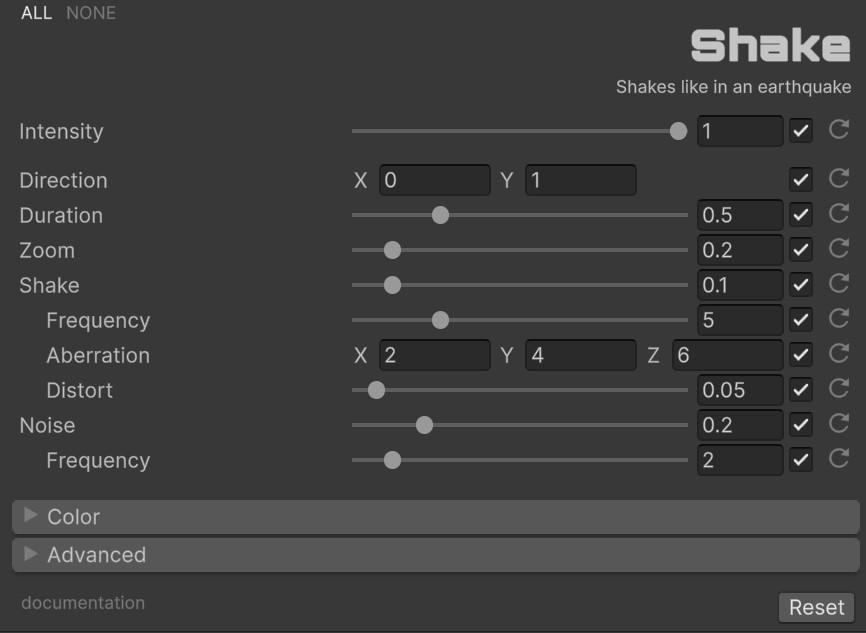
Direction
This section walks through ‘Shake’ in the same order as the custom inspector, starting with direction, duration, and zoom.
| Direction | Base direction of the shake |
| Duration | Duration of one shake event |
| Zoom | Zoom component of the impact |
Shake
The nested ‘Shake’ block in the custom inspector defines the main violent motion layered over the directional impulse.
| Shake | Main shake amplitude |
| Frequency | Shake frequency |
| Aberration | RGB shift during the shake |
| Distort | Extra screen distortion |
Noise
The custom inspector places these extra randomness controls inside the nested ‘Noise’ block.
| Noise | Added randomness and irregularity |
| Frequency | Noise frequency |
Runtime Control
using System.Collections;
using UnityEngine;
using UnityEngine.Rendering;
using FronkonGames.SpiceUp.Shake;

[SerializeField] private VolumeProfile volumeProfile;

private IEnumerator PlayShake()
{
  if (volumeProfile.TryGet(out ShakeVolume volume))
  {
    volume.intensity.overrideState = true;
    volume.progress.overrideState = true;
    volume.progress.value = 0.0f;
    volume.intensity.value = 1.0f;

    float duration = volume.duration.value;
    float time = 0.0f;
    while (time < duration)
    {
      volume.progress.value = time / duration;
      time += volume.useScaledTime.value ? Time.deltaTime : Time.unscaledDeltaTime;
      yield return null;
    }

    volume.progress.value = 0.0f;
  }
}
💡 Take a look at the code in the included demo to learn more about how the effect works.
Performance Characteristics
The effect is implemented as a single pass and remains inexpensive.
- Pass Count: 1 blit pass.
- Texture Samples: Low.
- Complexity: O(1) per pixel.
Usage Patterns and Presets
Small Impact
For weapon kick or minor collisions:
- Duration: 0.1 - 0.25
- Zoom: 0.05 - 0.15
- Shake: 0.05 - 0.15
Earthquake
For prolonged instability:
- Duration: 0.5 - 1.5
- Shake: 0.2 - 0.5
- Noise: 0.2 - 0.6
🟢 Night Vision
‘Night Vision’ is the most feature-rich effect in the bundle. It combines low-resolution rendering, blur, glow, luminance remapping, gradients, edge detection, distortion, noise, scanlines, UI overlays, and vignette shapes in one system.
Requisites
To ensure optimal performance and compatibility, your project must meet the following requirements:
- Unity: 6000.0.58f2 or higher.
- Universal RP: 17.0.3 or higher.
Installation Guide
Step 1: Add Renderer Feature
- Locate your Universal Renderer Data asset.
- Click Add Renderer Feature and select Fronkon Games > Spice Up > Night Vision.
Step 2: Configure the Volume
- Create a Volume component (Global or Local).
- In the Volume component, create or assign a Volume Profile.
- Click Add Override and select Fronkon Games > Spice Up > Night Vision.
- Enable ‘Intensity’ and the vision-system parameters you want to control.
Parameter Configuration
With ‘Intensity’ you can control the overall strength of the effect [0.0 - 1.0]. If it is 0, the effect will not be active.
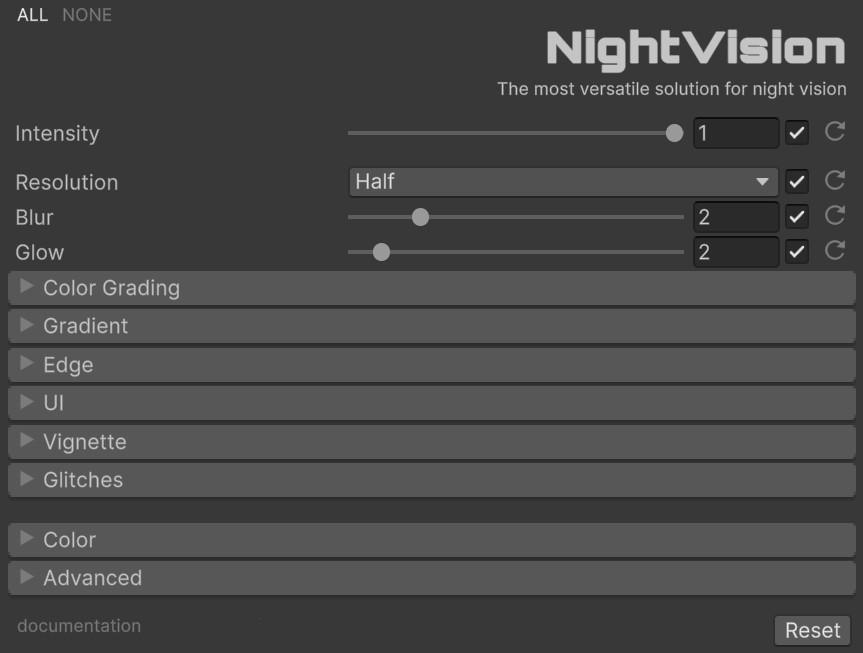
Resolution
For ‘Night Vision’, the parameter flow below matches the exact custom inspector order, starting with resolution, blur, and glow.
| Resolution | Internal render scale of the effect |
| Blur | Blur quality and softness |
| Glow | Additional phosphor glow |
Color Grading

Inside the custom inspector, the ‘Color Grading’ foldout shapes the tonal response before the gradient remap is applied.
| Exposure | Exposure compensation |
| Brightness | Pre-gradient brightness |
| Contrast | Pre-gradient contrast |
| Saturation | Pre-gradient saturation |
Gradient
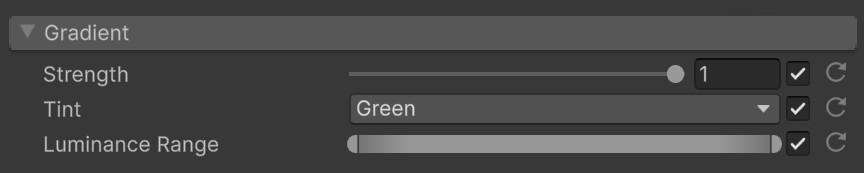
The ‘Gradient’ foldout in the custom inspector controls the luminance remap and the gradient that colors the effect.
| Strength | How strongly the gradient replaces grayscale |
| Tint | Built-in gradient preset selection |
| Custom Gradient | Gradient used when Tint is set to Custom |
| Luminance Range | Brightness range remapping |
Edge
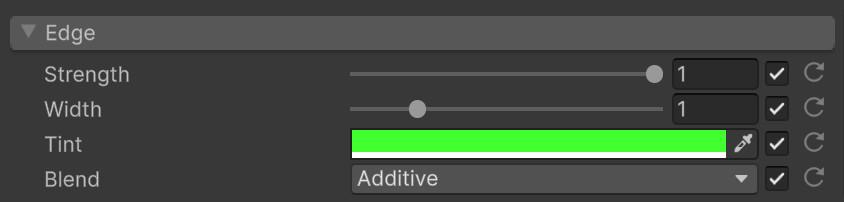
The custom inspector handles edge detection styling inside the ‘Edge’ foldout.
| Strength | Edge detection strength |
| Width | Edge width |
| Tint | Edge tint |
| Blend | Edge blend mode |
UI
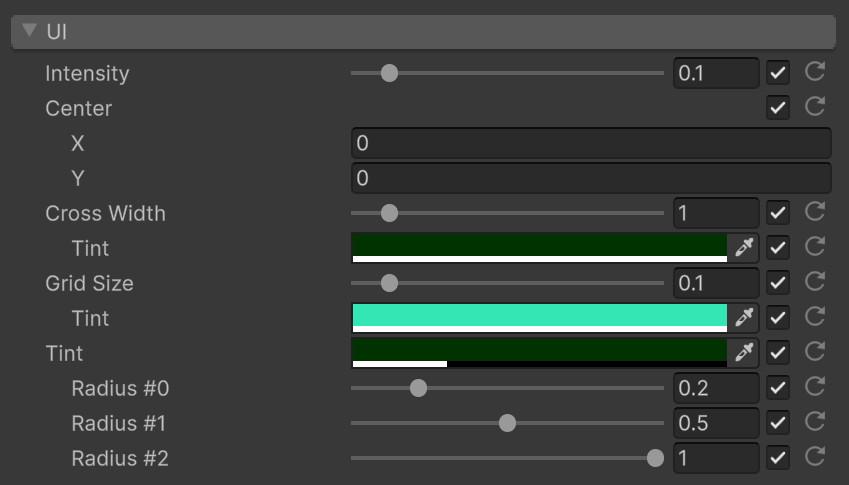
The reticle and overlay elements are configured in the custom inspector under the ‘UI’ foldout.
| Intensity | Overall UI overlay intensity |
| Center | Overlay center |
| Cross Width / Tint | Cross size and color |
| Grid Size / Tint | Grid size and color |
| Tint / Radius #0 / Radius #1 / Radius #2 | Circle tint plus the three circle radii |
Vignette
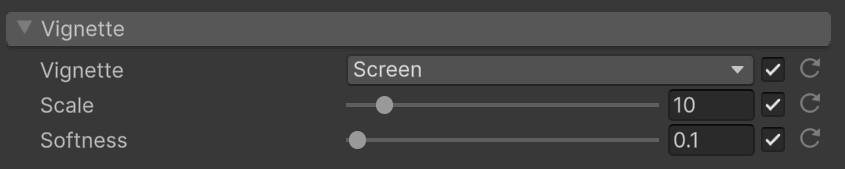
Use the ‘Vignette’ foldout in the custom inspector to configure the framing controls summarized below.
| Vignette | Screen, binocular, or monocular framing mode |
| Scale | Vignette scale |
| Softness | Vignette softness |
Glitches
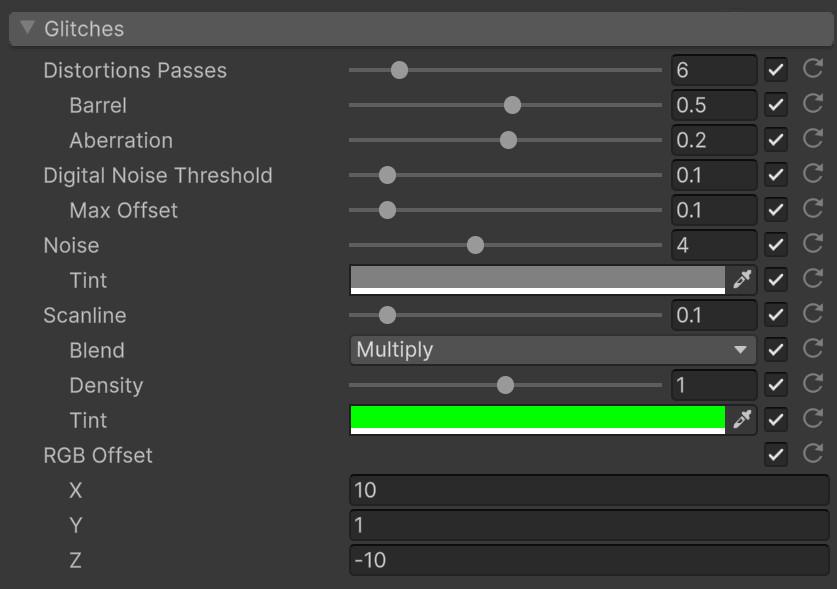
The custom inspector groups the distortion, digital noise, scanline, and RGB-offset artifacts inside the ‘Glitches’ foldout.
| Distortions Passes | Number of distortion passes |
| Barrel / Aberration | Nested barrel distortion and chromatic aberration controls |
| Digital Noise Threshold / Max Offset | Digital-TV noise trigger and maximum offset |
| Noise / Tint | Analog noise amount and tint |
| Scanline / Blend / Density / Tint | Scanline artifact and its nested controls |
| RGB Offset | Black/white bias and phosphor feel |
Runtime Control
using UnityEngine;
using UnityEngine.Rendering;
using FronkonGames.SpiceUp.NightVision;

[SerializeField] private VolumeProfile volumeProfile;

private void SetNightVision(bool enabled)
{
  if (volumeProfile.TryGet(out NightVisionVolume volume))
  {
    volume.intensity.overrideState = true;
    volume.intensity.value = enabled ? 1.0f : 0.0f;
  }
}
💡 Take a look at the code in the included demo to learn more about how the effect works.
Night Vision Manager
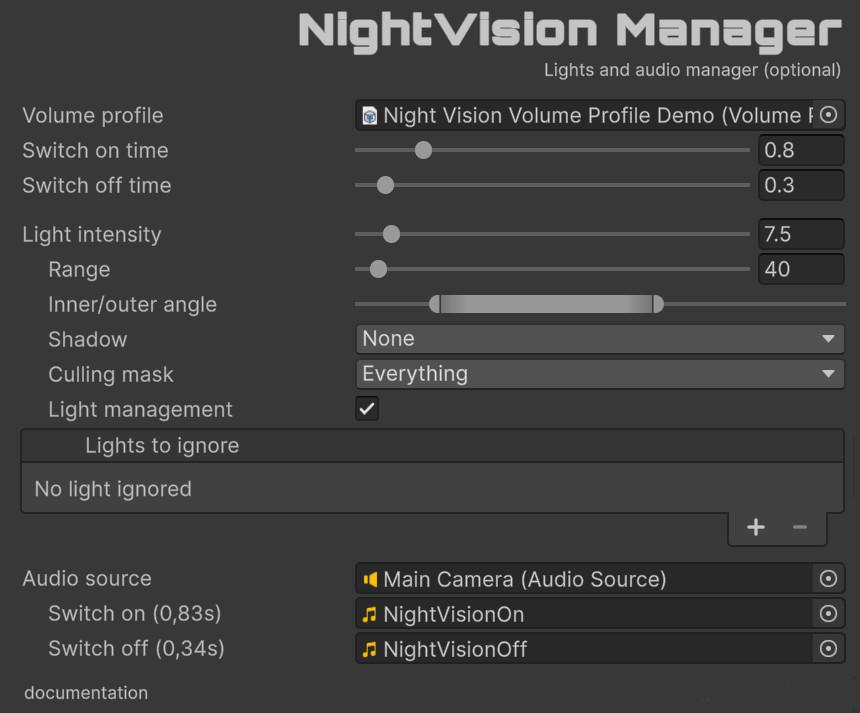
NightVisionManager is an optional helper component that turns the effect into a full gameplay system rather than just a volume override.
- On: the main runtime toggle.
- VolumeProfile: must contain the
NightVisionVolumeused by the manager. - SwitchOnTime / SwitchOffTime: ramp-in and ramp-out duration.
- AutomaticLightManagement: automatically disables other realtime lights and manages a spotlight on the same object.
- LightRange / LightInnerAngle / LightOuterAngle / LightIntensity / LightShadow / LightCullingMask: spotlight configuration.
- AudioSource / SwitchOnClip / SwitchOffClip: optional switch sounds.
- IgnoreLights: realtime lights that should remain active when night vision turns on.
The manager also exposes an OnSwitch event and will create a hidden spotlight automatically if light management is enabled and no light is already present.
Performance Characteristics
This is one of the heavier effects in the bundle because it chains multiple operations.
- Pass Count: 3 blit-style passes.
- Texture Samples: Moderate to high depending on blur, UI, and noise settings.
- Memory: Additional temporary render textures are used for the pipeline stages.
Usage Patterns and Presets
Tactical NVG
For realistic night-ops presentation:
- Resolution: Half or Normal
- Blur: 1 - 2
- Glow: 1.0 - 2.5
- UI > Intensity: 0.05 - 0.15
Horror Camcorder Vision
For dirtier cinematic night vision:
- Blur: 2 - 4
- Edge > Strength: medium
- Noise: medium/high
- Vignette: binocular or monocular
🎥 BodyCam
‘BodyCam’ simulates the look of compact wearable cameras using lens warping, radial blur, flare artifacts, band-limited color, and sensor noise.
Requisites
To ensure optimal performance and compatibility, your project must meet the following requirements:
- Unity: 6000.0.58f2 or higher.
- Universal RP: 17.0.3 or higher.
Installation Guide
Step 1: Add Renderer Feature
- Locate your Universal Renderer Data asset.
- Click Add Renderer Feature and select Fronkon Games > Spice Up > BodyCam.
Step 2: Configure the Volume
- Create a Volume component (Global or Local).
- In the Volume component, create or assign a Volume Profile.
- Click Add Override and select Fronkon Games > Spice Up > BodyCam.
- Enable ‘Intensity’ and the camera-style parameters you want to control.
Parameter Configuration
With ‘Intensity’ you can control the overall strength of the effect [0.0 - 1.0]. If it is 0, the effect will not be active.
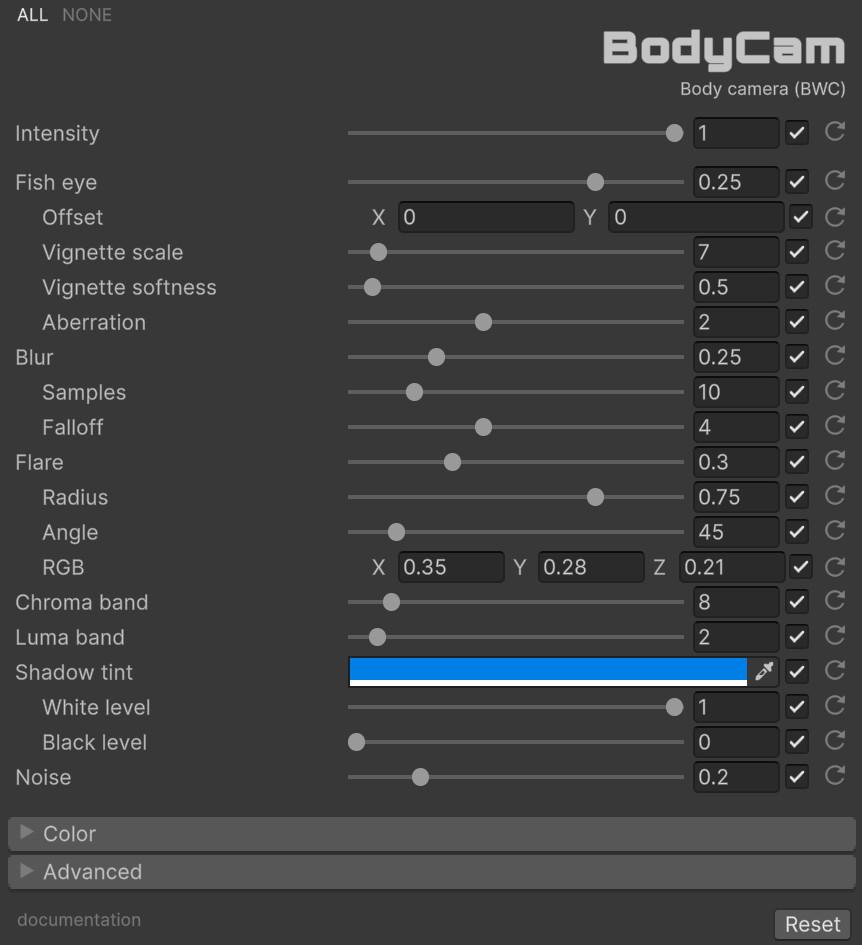
Fish eye
For ‘BodyCam’, this section follows the exact custom inspector order, beginning with the ‘Fish eye’ block and its nested lens-shaping controls.
| Fish eye | Lens zoom / warp |
| Offset | Shift of the lens center |
| Vignette scale | Edge shaping scale |
| Vignette softness | Edge shaping softness |
| Aberration | Chromatic aberration at the edges |
Blur
The ‘Blur’ block in the custom inspector contains the radial blur settings described here.
| Blur | Radial blur strength |
| Samples | Blur quality |
| Falloff | Blur falloff |
Flare
Lens reflex behavior is configured in the custom inspector through the ‘Flare’ block below.
| Flare | Lens reflex strength |
| Radius | Flare radius |
| Angle | Flare angle |
| RGB | RGB flare offsets |
Chroma band
These standalone controls appear after Flare in the custom inspector and define the band-limited look of the sensor.
| Chroma band / Luma band | Band-limited color and luma resolution |
Shadow tint
The custom inspector uses the ‘Shadow tint’ block to control tonal bias in the darker parts of the image.
| Shadow tint | Color bias in darker tones |
| White Level / Black Level | Contrast/level shaping |
Noise
This final standalone ‘Noise’ control appears at the bottom of the custom inspector and adds signal noise to the result.
| Noise | Signal noise |
Runtime Control
using UnityEngine;
using UnityEngine.Rendering;
using FronkonGames.SpiceUp.BodyCam;

[SerializeField] private VolumeProfile volumeProfile;

private void SetBodyCam(bool enabled)
{
  if (volumeProfile.TryGet(out BodyCamVolume volume))
  {
    volume.intensity.overrideState = true;
    volume.intensity.value = enabled ? 1.0f : 0.0f;
  }
}
You can simulate a reflection of a light with ‘Angle’. You can change it manually, or you can synchronize it with the Y axis of your character’s rotation:
volume.flareAngle.value = this.transform.eulerAngles.y;💡 Take a look at the code in the included demo to learn more about how the effect works.
BodyCam Roll
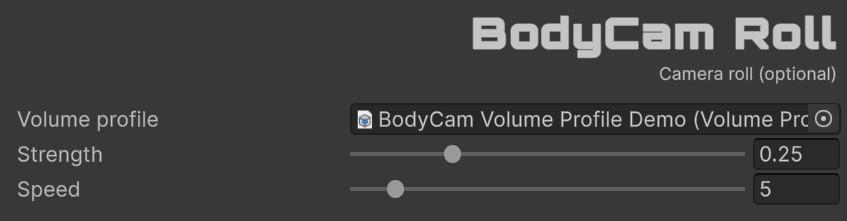
BodyCamRoll is an optional helper component that writes camera-rotation inertia into BodyCamVolume.offset so the center of the effect lags behind the camera.
- Strength: amount of offset generated from rotation changes.
- Speed: how quickly the offset catches up.
- UpdateRotation(): resets the internal baseline rotation.
UpdateRotation() is useful after teleports, snap turns, cutscenes, or any hard transform reset, so the next frame does not produce a sudden offset jump.
Note that this component is designed for objects that move in the XZ plane, and therefore rotate on the Y axis (as in the vast majority of FPS). If in your game the displacement planes are different, you will have to modify the code.
Performance Characteristics
The effect is a little heavier than the simpler single-pass effects because it uses a two-stage render path.
- Pass Count: 2 blit-style passes.
- Texture Samples: Moderate and affected by blur sample count.
- Memory: Temporary render texture used between stages.
Usage Patterns and Presets
Police Body Camera
For a believable documentary look:
- Fish eye: 0.15 - 0.3
- Blur: 0.1 - 0.25
- Noise: 0.1 - 0.25
- Shadow tint: slightly blue
Horror Found Footage
For stronger stylization:
- Fish eye: 0.25 - 0.4
- Aberration: 2.0 - 4.0
- Noise: 0.25 - 0.5
- BodyCamRoll: enabled
✨ Lens Flare
‘Lens Flare’ generates stylized flare streaks from bright regions of the image and is especially effective in high-contrast scenes.
Requisites
To ensure optimal performance and compatibility, your project must meet the following requirements:
- Unity: 6000.0.58f2 or higher.
- Universal RP: 17.0.3 or higher.
Installation Guide
Step 1: Add Renderer Feature
- Locate your Universal Renderer Data asset.
- Click Add Renderer Feature and select Fronkon Games > Spice Up > Lens Flare.
Step 2: Configure the Volume
- Create a Volume component (Global or Local).
- In the Volume component, create or assign a Volume Profile.
- Click Add Override and select Fronkon Games > Spice Up > Lens Flare.
- Enable ‘Intensity’ and the flare parameters you want to tune.
Parameter Configuration
With ‘Intensity’ you can control the overall strength of the effect [0.0 - 1.0]. If it is 0, the effect will not be active.
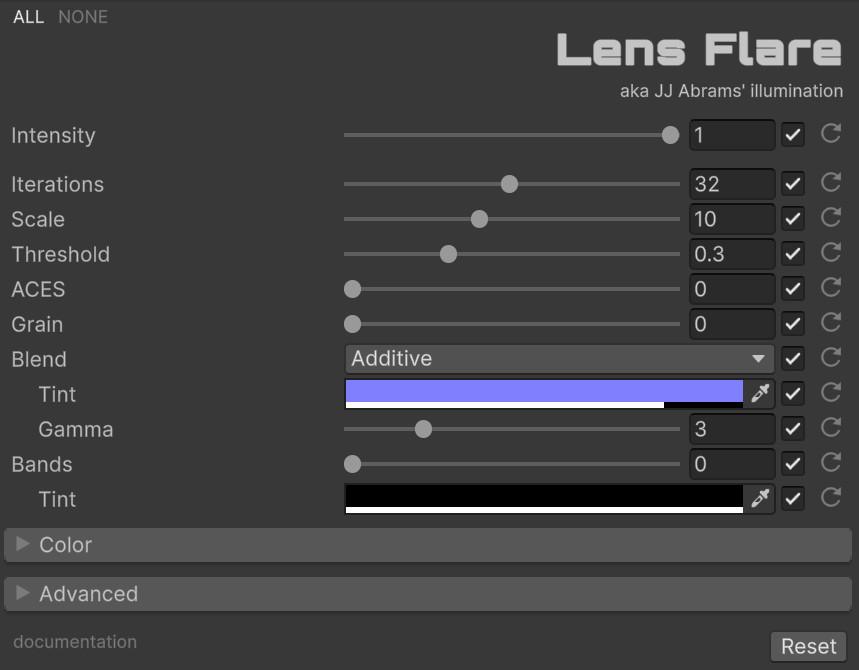
Iterations
For ‘Lens Flare’, the explanation below keeps the exact inspector order, starting with the flare-generation controls before the nested blend and bands blocks.
| Iterations | Quality level and number of flare samples |
| Scale | Horizontal spread of the flares |
| Threshold | Brightness cutoff used to generate flares |
| ACES | Tonemapping influence |
| Grain | Grain added to the final image |
Blend
The nested ‘Blend’ block in the custom inspector controls how the flare is composited over the source image.
| Blend | Blend mode used to composite the flares |
| Tint | Flare color |
| Gamma | Gamma shaping of the flare response |
Bands
The cinematic top-and-bottom band treatment is configured in the custom inspector inside the nested ‘Bands’ block.
| Bands | Cinematic band strength |
| Tint | Band tint |
Runtime Control
using UnityEngine;
using UnityEngine.Rendering;
using FronkonGames.SpiceUp.Lensflare;

[SerializeField] private VolumeProfile volumeProfile;

private void SetFlares(float value)
{
  if (volumeProfile.TryGet(out LensflareVolume volume))
  {
    volume.intensity.overrideState = true;
    volume.threshold.overrideState = true;
    volume.threshold.value = value;
    volume.intensity.value = 1.0f;
  }
}
💡 Take a look at the code in the included demo to learn more about how the effect works.
Performance Characteristics
The effect runs in a single pass, but cost increases with iteration count.
- Pass Count: 1 blit pass.
- Texture Samples: Dependent on Iterations.
- Complexity: O(n) with respect to flare iteration count.
Usage Patterns and Presets
Clean Cinematic Flare
For bright sci-fi or police lights:
- Iterations: 24 - 32
- Threshold: 0.25 - 0.4
- Blend: Additive
Stylized Film Look
For heavier cinematic shaping:
- Iterations: 32 - 48
- ACES: 0.2 - 0.5
- Grain: 0.1 - 0.3
- Bands: 0.05 - 0.15
🌫️ Blurry
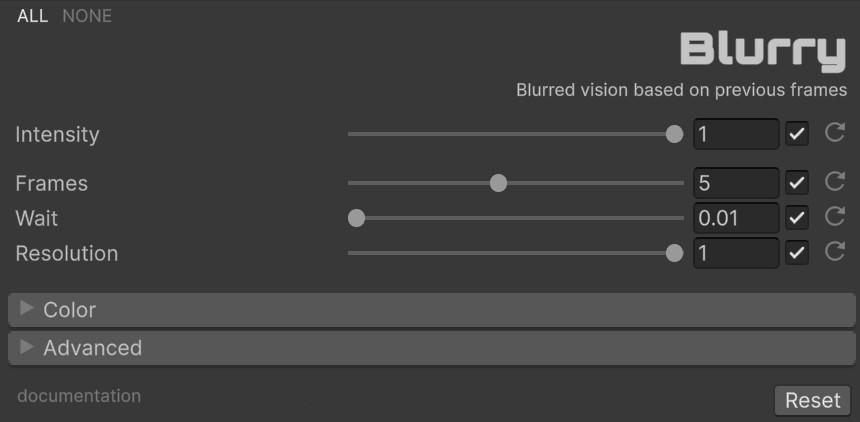
‘Blurry’ creates delayed blurred vision by blending the current frame with a configurable history of previous frames. It feels temporal rather than purely optical, which makes it well suited to dizziness, dream sequences, concussions, intoxication, and slow-motion shock states.
Requisites
To ensure optimal performance and compatibility, your project must meet the following requirements:
- Unity: 6000.0.58f2 or higher.
- Universal RP: 17.0.3 or higher.
Installation Guide
Step 1: Add Renderer Feature
- Locate your Universal Renderer Data asset.
- Click Add Renderer Feature and select Fronkon Games > Spice Up > Blurry.
Step 2: Configure the Volume
- Create a Volume component (Global or Local).
- In the Volume component, create or assign a Volume Profile.
- Click Add Override and select Fronkon Games > Spice Up > Blurry.
- Enable ‘Intensity’ and the frame-history parameters you want to control.
Parameter Configuration
With ‘Intensity’ you can control the overall strength of the effect [0.0 - 1.0]. If it is 0, the effect will not be active.
Frames
For ‘Blurry’, the notes below follow the exact custom inspector order, from the stored history size through the capture timing and history resolution.
| Frames | Number of history frames used, from 1 to 10 |
| Wait | Pause between captured frames |
| Resolution | Resolution scale of the stored history frames |
Lower frame counts produce a milder smear. Higher values create stronger temporal blur, but increase memory use and the amount of visible lag in the effect.
Runtime Control
using UnityEngine;
using UnityEngine.Rendering;
using FronkonGames.SpiceUp.Blurry;

[SerializeField] private VolumeProfile volumeProfile;

private void SetBlur(float value)
{
  if (volumeProfile.TryGet(out BlurryVolume volume))
  {
    volume.intensity.overrideState = true;
    volume.frames.overrideState = true;
    volume.intensity.value = value;
    volume.frames.value = 5;
  }
}
💡 Take a look at the code in the included demo to learn more about how the effect works.
Performance Characteristics
Blurry is one of the more memory-sensitive effects because it stores frame history.
- Pass Count: copy + effect pass, plus history management.
- Texture Samples: Multiple history-frame lookups depending on Frames.
- Memory: Up to 10 history render targets are maintained internally.
Usage Patterns and Presets
Concussion Blur
For gameplay-safe disorientation:
- Frames: 3 - 5
- Wait: 0.01 - 0.03
- Resolution: 0.75 - 1.0
Dream Sequence
For more pronounced temporal smear:
- Frames: 6 - 10
- Wait: 0.03 - 0.08
- Resolution: 0.25 - 0.75
F.A.Q.
Effect Not appearing
If the effect doesn’t appear in your scene:
- Verify Renderer Feature: Check that the renderer feature is added to your Universal Renderer Data asset.
- Check Volume Profile: Ensure a Volume component exists in your scene with the effect override enabled.
- Confirm Intensity: Verify that the Intensity parameter is set to a value greater than 0.0 and enabled.
- Camera Settings: Check that your camera has Post Processing enabled in the Camera component.
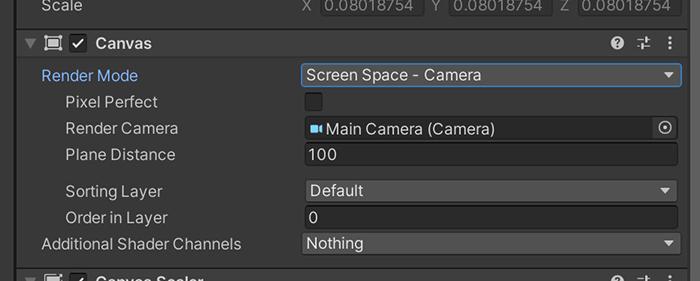
How do I make the effect also affect the UI?
If your UI is using ‘Screen Space - Overlay’, it bypasses the camera and therefore bypasses the effect. Change the canvas to ‘Screen Space - Camera’ and assign the camera used for rendering the effect.
Can I use it in a material?
Yes! Any effect can easily be used on a material. Just follow these steps:
- In the ‘Project’ window, open the ‘Create’ menu with the right mouse button and select ‘Create > Render Texture’.
- Create a new camera and in ‘Output Texture’ select the Render Texture previously created. Remember to activate ‘Post Processing’ and select in ‘Renderer’ where you have the effect added.
- In the material you want to use, select in ‘Base Map’ the Render Texture.
Why does changing a value from code sometimes do nothing?
In URP volumes, the parameter override must be enabled. When setting values from code, remember to set overrideState = true for every parameter you want the volume system to apply.
Support
Do you have any problem or any suggestions? Send me an email to fronkongames@gmail.com and I’ll be happy to help you.
If you want to report an error, it helps a lot if you include the Unity log file.
If you are happy with this asset, consider writing a review in the store.
Thanks!
If you are happy with this asset, consider writing a review in the store.
Thanks!