Store
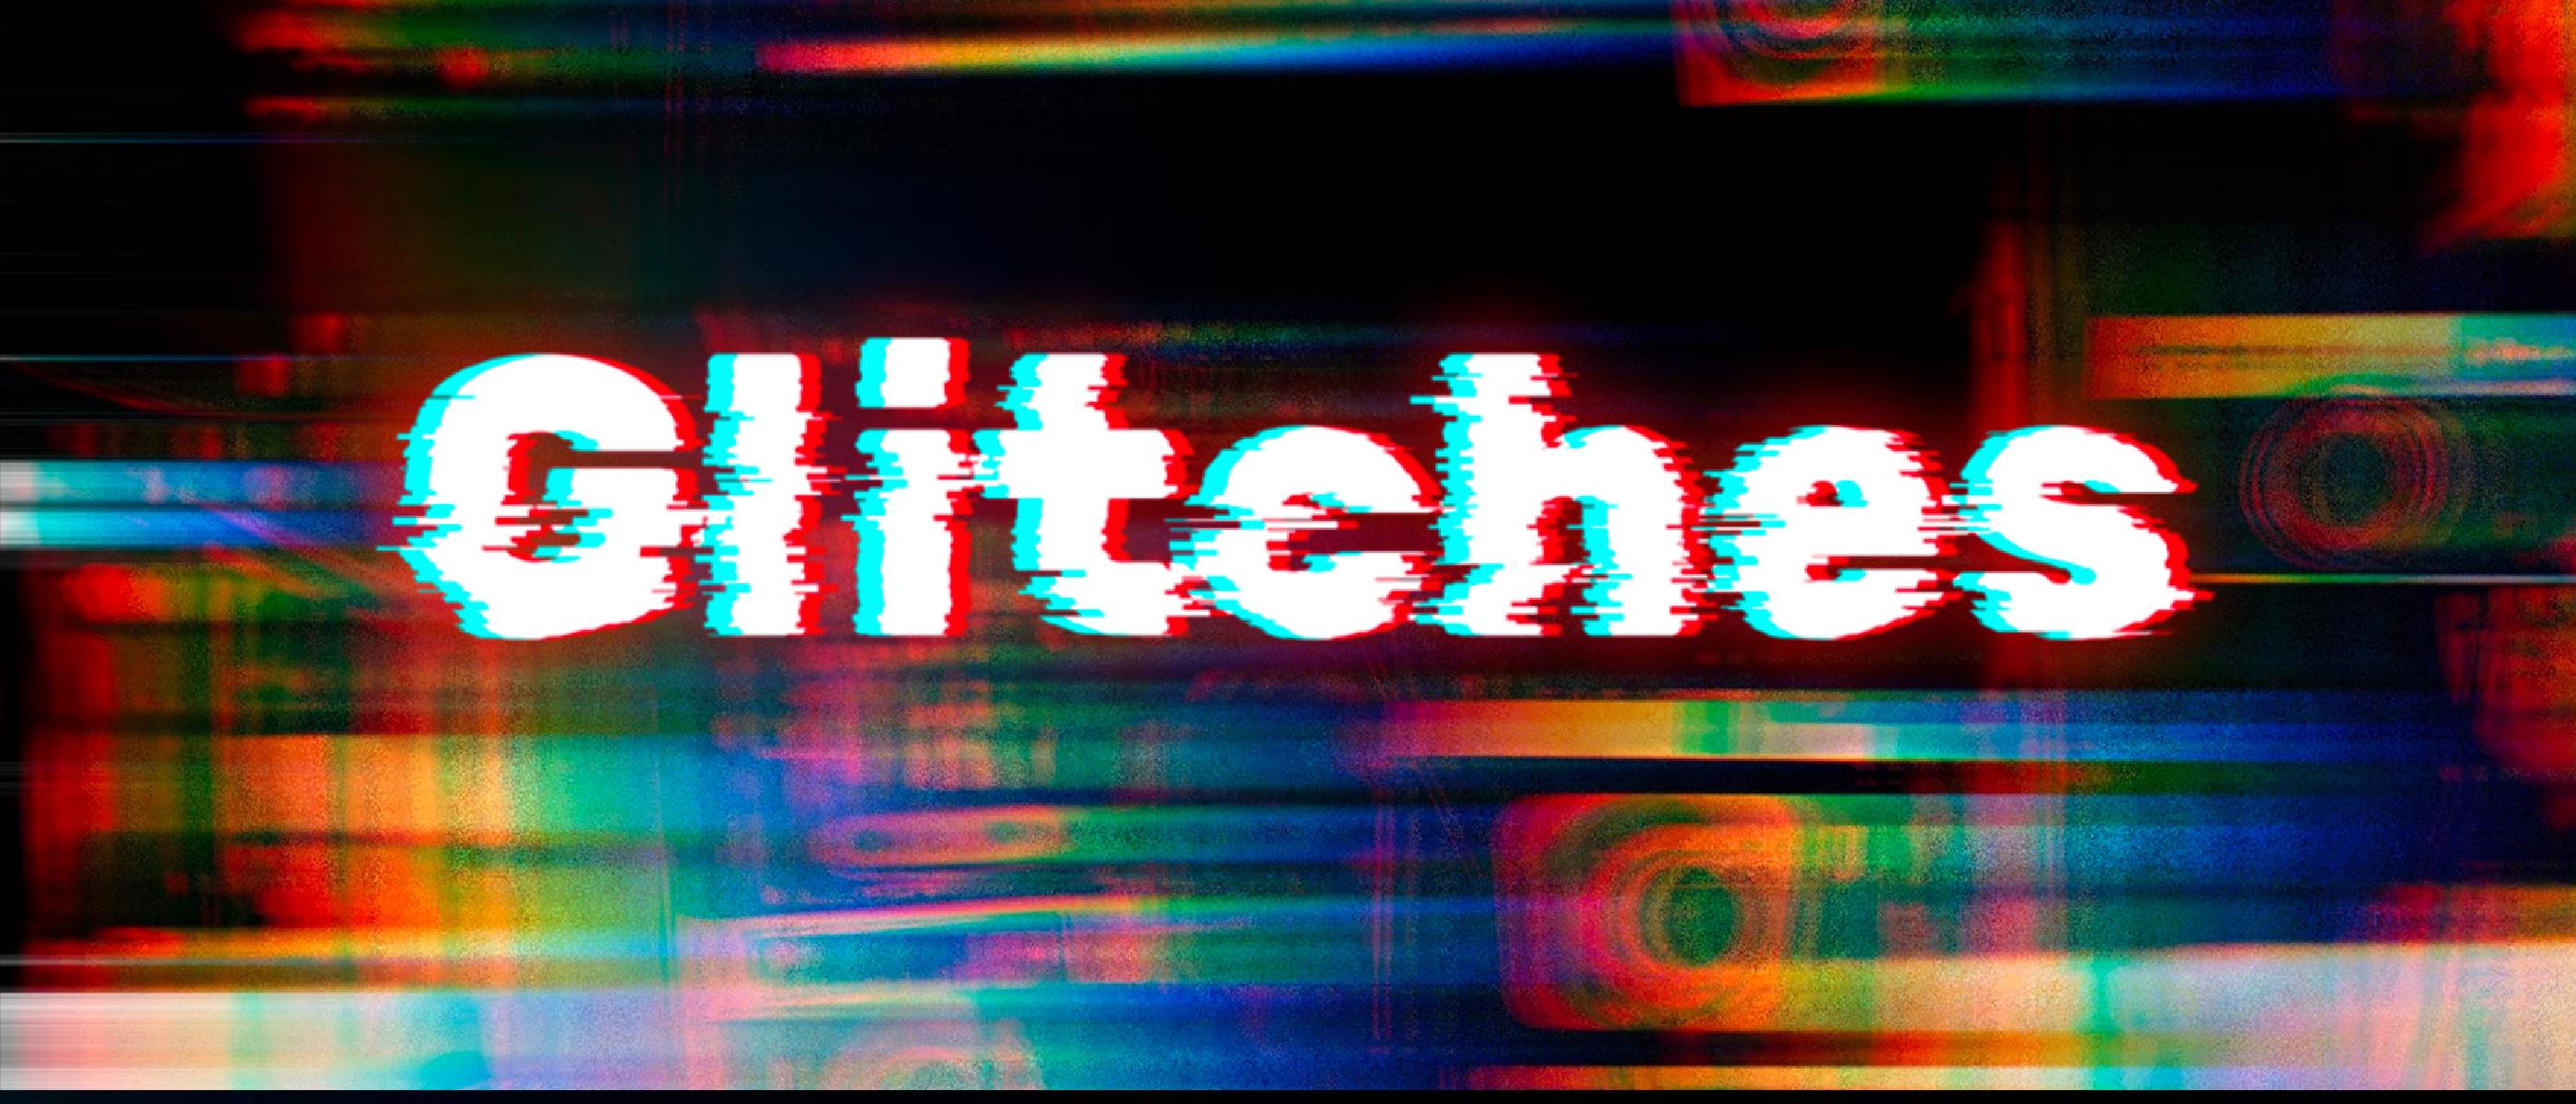
‘Glitches’ is a collection of cinematic distortion and glitch effects to enhance visual storytelling in games and interactive experiences. Contains the following assets:
- Corrupt Memory, a cyber attack? no, it’s just corrupted memory.
- Interferences, something is interfering with the signal…
- VHS, the beauty of analog.
- Distortions, distortions effects to increase the awesomeness of your games.
- Cheap Camera, emulates the defects of cheap cameras with poor quality digital sensors.
- Bad GPU, simulates the effects of a broken GPU.
- Artifacts, generated by a bad video reception or excessive compression.
- Hacked, smile… you r being hacked :)
- Broken LCD, simulated.
- Color Blindness, simulates the most common vision defects.
Requirements
All ‘Glitches’ effects are developed for ‘Universal Render Pipeline’ (or URP), which means they will not work with Built-In, or HDRP.
Unity 6 or Higher
All effects are compatible with Unity 6, and use the new Render Graph. You will need to have URP version 17.0.2 or higher installed. In the official documentation you can find the steps to install it correctly.
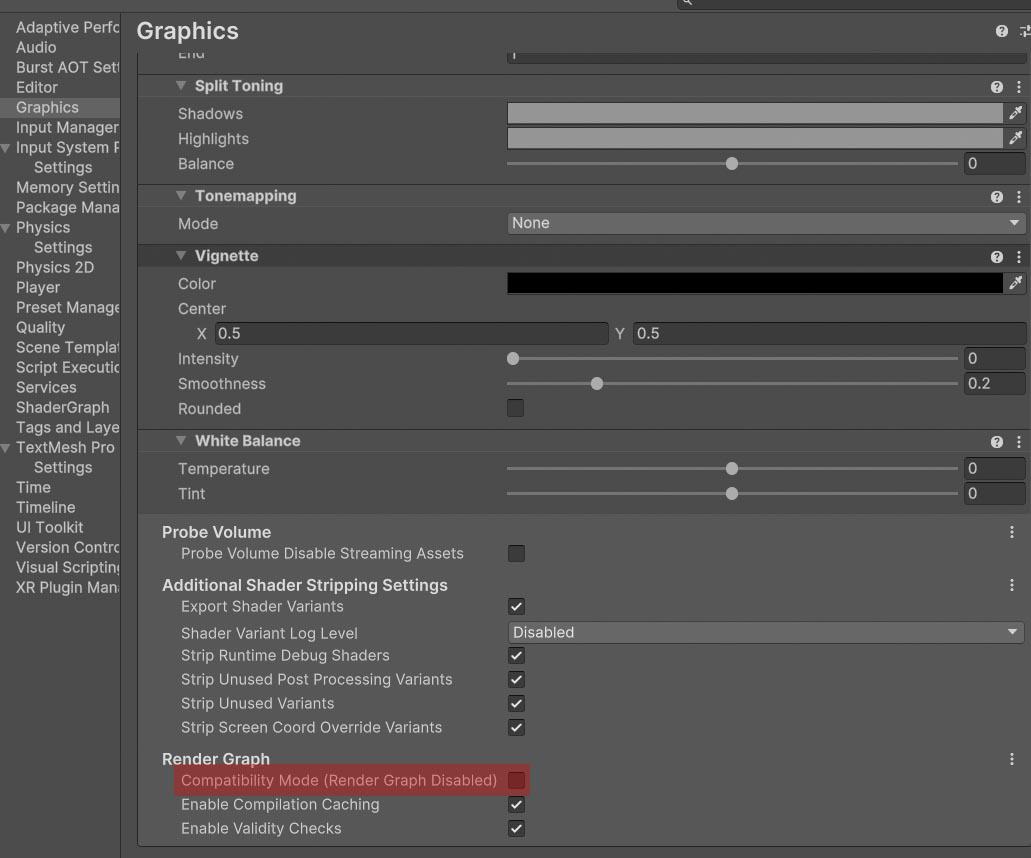
Make sure that the ‘Compatibility Mode’ is disabled (Project Settings > Graphics > Render Graph).
Installation
Step 1: Add Renderer Feature
The effects must be registered in your project’s URP configuration:
- Locate your Universal Renderer Data asset.
- Click Add Renderer Feature and select the desired distortion from Fronkon Games > Glitches.
Once installed, you have to add the effect you want to use from ‘Glitches’ as a ‘Render Feature’. This official tutorial tells how to do it.
Remember that the camera you are using must have the ‘Post Processing’ option enabled.

‘Quality’ levels (Project Settings > Quality) can have their own active ‘Render Pipeline Asset’.
If so, whatever you assign in ‘Scriptable Render Pipeline Settings’ in ‘Graphics’ will be ignored.
Remember to add the effect to the quality levels you want to use.
Step 2: Configure The Volume
To apply the effects to your scene:
- Create a Volume component (Global or Local) or select one that has already been created.
- In the Volume component, create or assign a Volume Profile.
- Click Add Override and select the desired distortion from Fronkon Games > Glitches.
- Enable the ‘Intensity’ parameter (and any others you wish to modify).
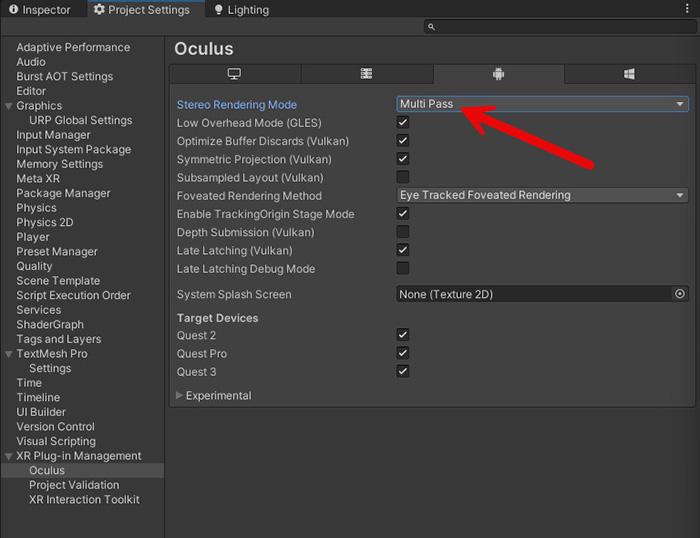
VR
To increase compatibility with VR devices, I recommend that you select ‘Stereo Rendering Mode’ in ‘Multi Pass’ mode:
💾 Corrupt Memory
Corrupt Memory simulates the visual degradation that occurs during video memory corruption or cyberattack scenarios. By generating patterns of overlapping rectangles with randomized properties, this effect creates zones where pixelation, chromatic aberration, and image displacement are selectively applied, producing realistic digital artifacts that range from subtle data loss to catastrophic hardware failure visualizations.
Requisites
To ensure optimal performance and compatibility, your project must meet the following requirements:
- Unity: 6000.0.58f1 or higher.
- Universal RP: 17.0.3 or higher.
Instalation Guide
Step 1: Add Renderer Feature
The effect must be registered in your project’s URP configuration:
- Locate your Universal Renderer Data asset.
- Click Add Renderer Feature and select Fronkon Games > Glitches > Corrupt Memory.
Step 2: Configure the Volume
To apply the effect to your scene:
- Create a Volume component (Global or Local).
- In the Volume component, create or assign a Volume Profile.
- Click Add Override and select Fronkon Games > Glitches > Corrupt Memory.
- Enable the ‘Intensity’ parameter (and any others you wish to modify).
Three-Tier Effect System
The generated corruption pattern serves as a mask for three distinct effect layers, each activated independently based on threshold comparisons against the hash values.
| Effect Layer | Activation Threshold | Visual Impact | Primary Parameters |
|---|---|---|---|
| Pixelation | Corruption Z > Pixelation Threshold | Reduces effective resolution in corruption zones | Pixelation intensity [0-1], Threshold [0-1] |
| Aberration | Corruption.rgb > Aberration Threshold | Separates RGB channels at different offsets | Aberration XYZ [0-25], Threshold [0-1] |
| Offset | Corruption Z > Offset Threshold | Shifts texture coordinates radially | Offset [0-1], Scale [0-1], Threshold [0-1] |
Pixelation
Pixelation reduces sampling resolution by quantizing UV coordinates. The shader calculates a target pixel count between 256 and 8 based on the pixelation parameter, then uses floor division to snap coordinates to grid positions. This creates blocky artifacts visible only in zones where the corruption pattern exceeds the threshold, simulating GPU texture memory degradation.
Chromatic Aberration Application
Color channel separation occurs independently per RGB component, each sampling from different UV offsets. The offset magnitude depends on the corresponding channel’s hash value exceeding the aberration threshold. This asymmetric channel separation creates rainbow-like fringes characteristic of display connector degradation or GPU memory errors.
Image Displacement Mechanism
Spatial displacement applies radial offset to UV coordinates, creating tearing effects. The offset direction derives from trigonometric functions of the hash values, while magnitude scales with the offset parameter and temporal fading. The sine-wave fade creates pulsating displacement intensity, while screen-parameter normalization ensures consistent artifact size across resolutions.
Parameter Configuration
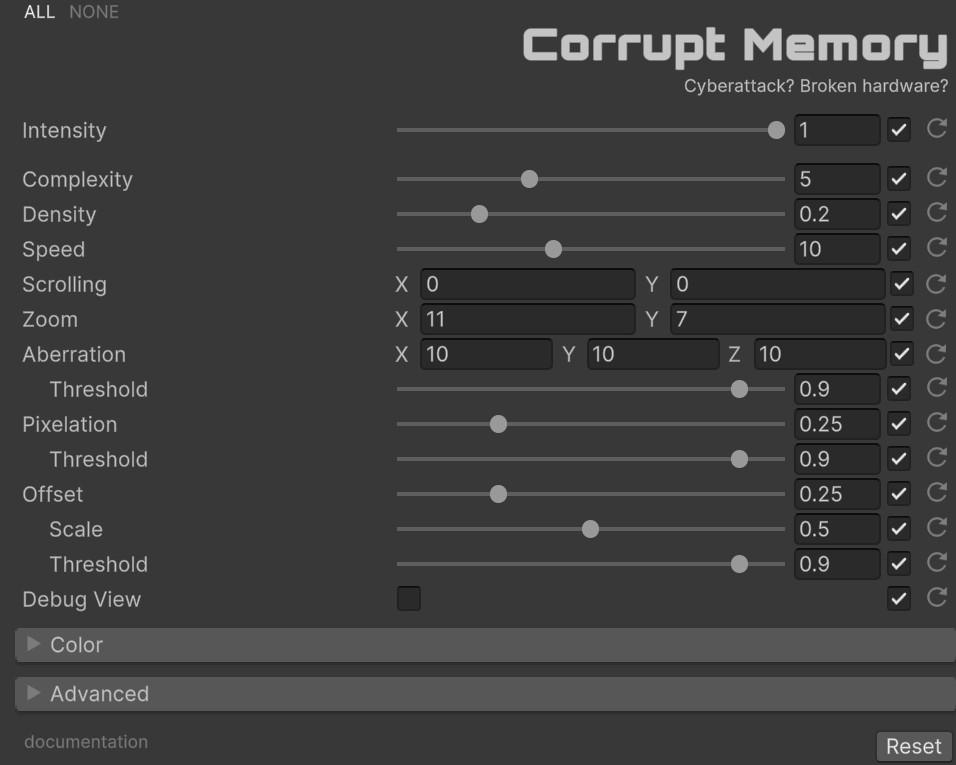
With ‘Intensity’ you can control the overall strength of the effect [0.0 - 1.0]. If it is 0, the effect will not be active.
| Parameter | Range | Default | Effect |
|---|---|---|---|
| Complexity | 0-15 | 5.0 | Number of recursive iterations. Higher values create more intricate patterns at increased GPU cost |
| Density | 0-1 | 0.2 | Probability of corruption zone activation. Lower values create sparse, dramatic artifacts |
| Speed | 0-25 | 10.0 | Temporal evolution rate. Controls how quickly patterns morph and migrate |
| Scrolling | Vector2 | (0, 0) | Manual pattern displacement. Enables directional movement of corruption zones |
| Zoom | Vector2 | (11, 7) | Spatial scaling of pattern generation. Larger values produce smaller, more numerous artifacts |
| Parameter | Sub-Parameter | Range | Default | Purpose |
|---|---|---|---|---|
| Pixelation | Intensity | 0-1 | 0.25 | Amount of resolution reduction (256→8 pixels) |
| Threshold | 0-1 | 0.9 | Minimum corruption intensity to trigger pixelation | |
| Aberration | RGB Intensity | 0-25 | (10,10,10) | Channel offset magnitude in texels |
| Threshold | 0-1 | 0.9 | Per-channel activation requirement | |
| Offset | Intensity | 0-1 | 0.25 | Maximum UV offset amount |
| Scale | 0-1 | 0.5 | Screen-space normalization factor | |
| Threshold | 0-1 | 0.9 | Minimum corruption for displacement |
Color Grading
Standard color correction parameters apply to the final output.
| Parameter | Range | Effect | Default |
|---|---|---|---|
| Brightness | -1.0 to 1.0 | Additive luminance offset | 0.0 |
| Contrast | 0.0 to 10.0 | Mid-tone contrast expansion | 1.0 |
| Gamma | 0.1 to 10.0 | Nonlinear tonal mapping (inverted) | 1.0 |
| Hue | 0.0 to 1.0 | Color wheel rotation | 0.0 |
| Saturation | 0.0 to 2.0 | Color intensity relative to luminance | 1.0 |
These operations follow standard image processing order: contrast expansion → hue rotation → gamma correction → saturation adjustment.
Runtime Control
Effect control follows the standard Unity Volume API pattern. Access parameters through the Volume component after retrieving it from the active profile:
using FronkonGames.Glitches.CorruptMemory;
using UnityEngine.Rendering;

[SerializeField]
private VolumeProfile volumeProfile;

private CorruptMemoryVolume corruptMemory;

private void Awake()
{
    // Retrieve the volume component
    volumeProfile.TryGet(out corruptMemory);
}

private void ApplyCorruptionEffect(float severity)
{
    // Scale pattern intensity with event severity
    corruptMemory.intensity.value = severity;

    // Increase density for more extensive damage
    corruptMemory.density.value = Mathf.Lerp(0.1f, 0.8f, severity);

    // Accelerate pattern evolution during critical events
    corruptMemory.speed.value = Mathf.Lerp(5.0f, 25.0f, severity);

    // Enable all three effect layers
    corruptMemory.pixelation.value = 0.5f * severity;
    corruptMemory.aberration.value = Vector3.one * (15.0f * severity);
    corruptMemory.offset.value = 0.6f * severity;

    // Lower thresholds for broader effect application
    corruptMemory.pixelationThreshold.value = 1.0f - (0.3f * severity);
    corruptMemory.aberrationThreshold.value = 1.0f - (0.4f * severity);
    corruptMemory.offsetThreshold.value = 1.0f - (0.2f * severity);
}
The effect includes built-in debugging capabilities through the DEBUG_VIEW shader keyword. When enabled via the Debug View parameter, the shader renders the raw corruption pattern luminance instead of applying the three effect layers. This visualization reveals:
- Hash distribution across screen space
- Pattern complexity and iteration boundaries
- Density threshold effectiveness
- Temporal evolution characteristics
Use this mode when tuning pattern parameters to ensure artifact distribution matches intended visual design before enabling the full effect composition.
corruptMemory.debugView.value = true;  // View hash-based pattern only
corruptMemory.debugView.value = false; // Apply full effect composition
Performance Considerations
The algorithmic complexity scales linearly with the complexity parameter. Each iteration incurs hash calculation, conditional branching, and coordinate transformation operations. On mobile hardware (Adreno 640+):
| Complexity Setting | Estimated GPU Cost | Recommended Use Case |
|---|---|---|
| 1-3 | < 0.5ms | Mobile, heavy scenes |
| 4-7 | 0.5-1.5ms | Desktop, balanced scenes |
| 8-15 | 1.5-4ms | Cinematic, dedicated post-processing |
Pixelation and chromatic aberration effects require additional texture samples. Minimize these costs by keeping thresholds high (0.85+) when effect intensity is low.
📡 Interferences
Replicates the visual artifacts of signal degradation, electronic interference, and horizontal scanline noise. The effect combines simplex noise-driven distortion with chromatic aberration and scanline overlay to simulate electromagnetic interference, poor antenna reception, or malfunctioning display hardware.
The core technique uses two layers of simplex noise (snoise) evaluated at different frequencies and speeds. The first layer generates broad distortion bands, while the second adds fine-grained amplitude modulation. The squared noise product creates sharp, organic tearing patterns. Chromatic aberration is applied by sampling the red and blue channels at horizontally offset UV coordinates, with the green channel left at the original position, producing the characteristic color fringing of analog signal interference.
Requisites
To ensure optimal performance and compatibility, your project must meet the following requirements:
- Unity: 6000.0.58f1 or higher.
- Universal RP: 17.0.3 or higher.
Instalation Guide
Step 1: Add Renderer Feature
The effect must be registered in your project’s URP configuration:
- Locate your Universal Renderer Data asset.
- Click Add Renderer Feature and select Fronkon Games > Glitches > Interferences.
Step 2: Configure the Volume
To apply the effect to your scene:
- Create a Volume component (Global or Local).
- In the Volume component, create or assign a Volume Profile.
- Click Add Override and select Fronkon Games > Glitches > Interferences.
- Enable the ‘Intensity’ parameter (and any others you wish to modify).
Dual-Layer Signal Degradation
The effect implements two independent processing stages — Distortion and Scanlines — that combine to produce the final interference pattern.
| Stage | Technique | Characteristic | Typical Use Case |
|---|---|---|---|
| Distortion | Simplex noise UV displacement + chromatic aberration | Horizontal tearing with color fringing | Signal loss, electromagnetic interference |
| Scanlines | Screen-space coordinate modulation | Horizontal darkening bands | CRT monitors, old displays |
The distortion stage uses noise-squared amplitude to create sharp, intermittent tearing rather than smooth continuous warping. The scanline stage applies noise-modulated opacity to alternating horizontal lines, creating organic flickering.
Parameter Configuration
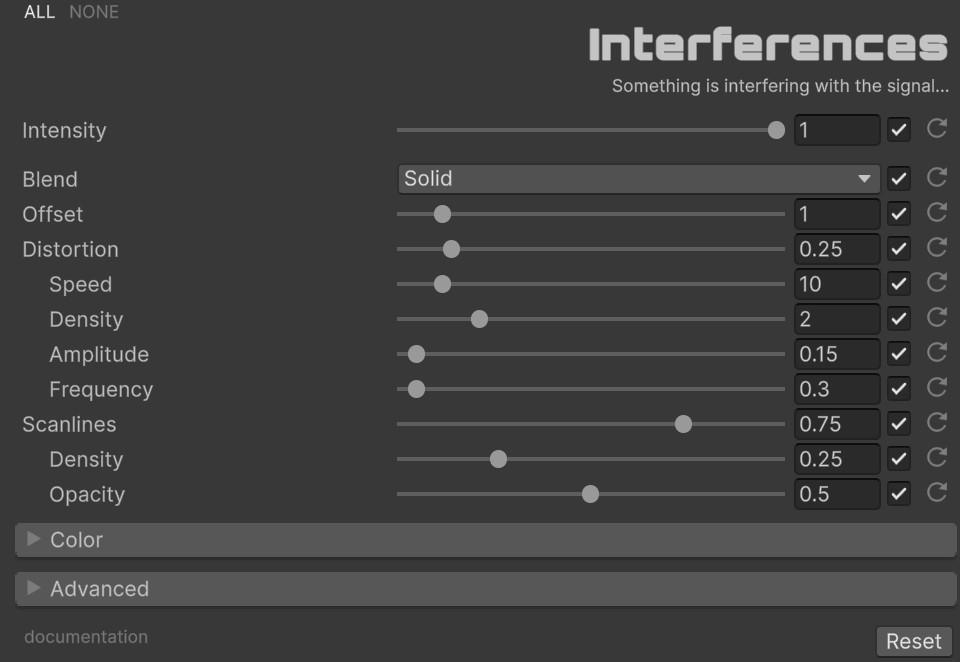
With ‘Intensity’ you can control the overall strength of the effect [0.0 - 1.0]. If it is 0, the effect will not be active.
Signal Parameters
| Parameter | Range | Default | Effect |
|---|---|---|---|
| Blend | Enum (23 modes) | Solid | Color blend operation used to mix interference with the original image |
| Offset | 0.0 to 10.0 | 1.0 | Chromatic aberration size — displaces R and B channels horizontally in affected zones |
Distortion Parameters
| Parameter | Range | Default | Effect |
|---|---|---|---|
| Distortion | 0.0 to 2.0 | 0.25 | Maximum horizontal UV displacement. Higher values create wider tearing |
| Distortion Speed | 0.0 to 100.0 | 10.0 | Temporal evolution rate of the noise pattern |
| Distortion Density | 0.0 to 10.0 | 2.0 | Vertical scale of the distortion bands. Higher values produce thinner, more numerous bands |
| Distortion Amplitude | 0.0 to 5.0 | 0.15 | Fine-grained noise modulation strength |
| Distortion Frequency | 0.0 to 10.0 | 0.3 | Vertical frequency of the primary noise layer |
Scanline Parameters
| Parameter | Range | Default | Effect |
|---|---|---|---|
| Scanlines | 0.0 to 1.0 | 0.75 | Overall visibility of the scanline overlay |
| Scanlines Density | 0.0 to 1.0 | 0.25 | Spacing between scanlines. Higher values produce tighter line patterns |
| Scanlines Opacity | 0.0 to 1.0 | 0.5 | Darkening strength of each scanline. Modulated by the distortion noise for organic variation |
Color Grading
Standard color correction parameters apply to the final output.
| Parameter | Range | Effect | Default |
|---|---|---|---|
| Brightness | -1.0 to 1.0 | Additive luminance offset | 0.0 |
| Contrast | 0.0 to 10.0 | Mid-tone contrast expansion | 1.0 |
| Gamma | 0.1 to 10.0 | Nonlinear tonal mapping (inverted) | 1.0 |
| Hue | 0.0 to 1.0 | Color wheel rotation | 0.0 |
| Saturation | 0.0 to 2.0 | Color intensity relative to luminance | 1.0 |
These operations follow standard image processing order: contrast expansion → hue rotation → gamma correction → saturation adjustment.
Runtime Control
The effect integrates with Unity’s Volume system for seamless runtime parameter modification. Access the InterferencesVolume component through the Volume Profile.
using UnityEngine;
using UnityEngine.Rendering;
using FronkonGames.Glitches.Interferences;

// ...

[SerializedField]
private VolumeProfile volumeProfile;

// ...

// Access the effect
if (volumeProfile.TryGet(out InterferencesVolume volume))
{
    // Enable/disable effect
    volume.intensity.value = 1.0f; // 0.0 = disabled

    // Configure signal parameters
    volume.blend.value = ColorBlends.Solid;
    volume.offset.value = 2.0f;

    // Control distortion
    volume.distortion.value = 0.5f;
    volume.distortionSpeed.value = 15.0f;
    volume.distortionDensity.value = 3.0f;
    volume.distortionAmplitude.value = 0.2f;
    volume.distortionFrequency.value = 0.5f;

    // Configure scanlines
    volume.scanlines.value = 0.8f;
    volume.scanlinesDensity.value = 0.3f;
    volume.scanlinesOpacity.value = 0.6f;

    // Apply color correction
    volume.contrast.value = 1.2f;
    volume.saturation.value = 0.8f;
}
For a more detailed example, check the code in the demo scene.
Performance Characteristics
The effect executes in a single render pass with O(1) per-pixel complexity. The simplex noise function uses analytical evaluation without texture lookups.
Performance considerations:
- Pass Count: 1 blit pass.
- Texture Samples: Up to 5 per pixel (original + 2 chromatic aberration offsets per branch).
- Branching: 2 conditional branches using screen-space modulation (scanline check + interference band selection).
- Memory: No additional textures or compute buffers.
Preset Configurations
Subtle Static
Suitable for background monitors, old TVs, or environmental storytelling.
Intensity: 0.3, Blend: Solid, Offset: 0.5
Distortion: 0.1, Distortion Speed: 5.0, Distortion Density: 1.5
Distortion Amplitude: 0.1, Distortion Frequency: 0.2
Scanlines: 0.4, Scanlines Density: 0.2, Scanlines Opacity: 0.3
Heavy Interference
Creates severe signal degradation for dramatic transitions or horror sequences.
Intensity: 0.8, Blend: Solid, Offset: 3.0
Distortion: 1.0, Distortion Speed: 30.0, Distortion Density: 4.0
Distortion Amplitude: 0.4, Distortion Frequency: 0.6
Scanlines: 0.9, Scanlines Density: 0.4, Scanlines Opacity: 0.8
📼 VHS
Recreates the distinct look and artifacts of analog video tapes, capturing the essence of 80s and 90s home video. The effect combines magnetic tape noise with tracking error simulation to produce the characteristic static, color bleeding, and horizontal banding of VHS playback.
The noise layer uses a 3D noise function (based on Inigo Quilez’s technique) combined with a Hash42 4-component hash to generate tape-like static patterns. Three noise octaves at different scales are multiplied together, creating the bursty, non-uniform static characteristic of magnetic tape degradation. The pause layer simulates tracking errors by applying UV jitter and horizontal banding with random color injection, replicating the visual artifacts seen when pausing or rewinding a VHS tape.
Requisites
To ensure optimal performance and compatibility, your project must meet the following requirements:
- Unity: 6000.0.58f1 or higher.
- Universal RP: 17.0.3 or higher.
Instalation Guide
Step 1: Add Renderer Feature
The effect must be registered in your project’s URP configuration:
- Locate your Universal Renderer Data asset.
- Click Add Renderer Feature and select Fronkon Games > Glitches > VHS.
Step 2: Configure the Volume
To apply the effect to your scene:
- Create a Volume component (Global or Local).
- In the Volume component, create or assign a Volume Profile.
- Click Add Override and select Fronkon Games > Glitches > VHS.
- Enable the ‘Intensity’ parameter (and any others you wish to modify).
Dual-Layer Tape Simulation
The effect implements two independent artifact layers — Noise and Pause — each with its own blend mode, color tint, and temporal behavior.
| Layer | Technique | Characteristic | Typical Use Case |
|---|---|---|---|
| Noise | 3D noise × Hash42, block-quantized | Bursty magnetic tape static | Background tape hiss, recording artifacts |
| Pause | UV jitter + horizontal banding with random color | Tracking errors and color bleeding | Paused playback, rewinding, damaged tape |
Both layers operate independently and can be combined for complex VHS degradation. The noise layer is gated by a threshold (values below 0.7 are discarded), creating intermittent bursts rather than constant static.
Parameter Configuration
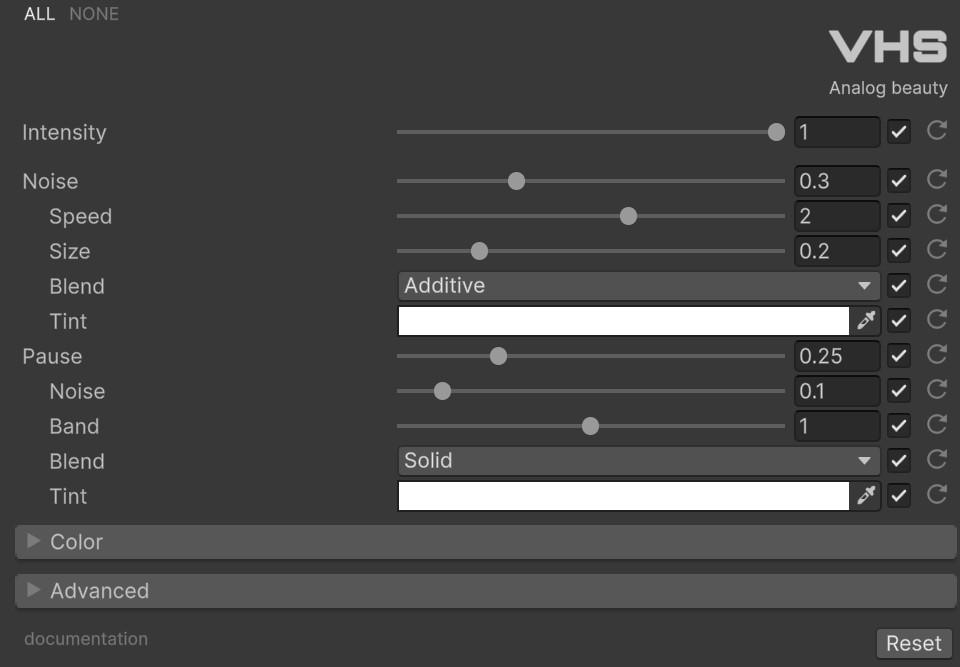
With ‘Intensity’ you can control the overall strength of the effect [0.0 - 1.0]. If it is 0, the effect will not be active.
Noise Parameters
| Parameter | Range | Default | Effect |
|---|---|---|---|
| Noise | 0.0 to 1.0 | 0.3 | Intensity of the magnetic tape static pattern |
| Noise Speed | -10.0 to 10.0 | 2.0 | Temporal scroll rate of the noise. Negative values reverse direction |
| Noise Size | 0.0 to 1.0 | 0.2 | Block quantization size. Lower values produce finer static; higher values create chunkier blocks |
| Noise Blend | Enum (23 modes) | Additive | Color blend operation for mixing noise with the image |
| Noise Color | Color | White | Tint applied to the noise pattern before blending |
Pause Parameters
| Parameter | Range | Default | Effect |
|---|---|---|---|
| Pause | 0.0 to 1.0 | 0.25 | Intensity of the tracking error simulation |
| Pause Noise | 0.0 to 1.0 | 0.1 | Amount of UV jitter applied to simulate tape instability |
| Pause Band | 0.0 to 2.0 | 1.0 | Width and intensity of the horizontal interference band |
| Pause Blend | Enum (23 modes) | Solid | Color blend operation for the pause band overlay |
| Pause Color | Color | White | Tint applied to the pause band artifacts |
Color Grading
Standard color correction parameters apply to the final output.
| Parameter | Range | Effect | Default |
|---|---|---|---|
| Brightness | -1.0 to 1.0 | Additive luminance offset | 0.0 |
| Contrast | 0.0 to 10.0 | Mid-tone contrast expansion | 1.0 |
| Gamma | 0.1 to 10.0 | Nonlinear tonal mapping (inverted) | 1.0 |
| Hue | 0.0 to 1.0 | Color wheel rotation | 0.0 |
| Saturation | 0.0 to 2.0 | Color intensity relative to luminance | 1.0 |
These operations follow standard image processing order: contrast expansion → hue rotation → gamma correction → saturation adjustment.
Runtime Control
The effect integrates with Unity’s Volume system for seamless runtime parameter modification. Access the VHSVolume component through the Volume Profile.
using UnityEngine;
using UnityEngine.Rendering;
using FronkonGames.Glitches.VHS;

// ...

[SerializedField]
private VolumeProfile volumeProfile;

// ...

// Access the effect
if (volumeProfile.TryGet(out VHSVolume volume))
{
    // Enable/disable effect
    volume.intensity.value = 1.0f; // 0.0 = disabled

    // Configure noise layer
    volume.noise.value = 0.4f;
    volume.noiseSpeed.value = 3.0f;
    volume.noiseSize.value = 0.15f;
    volume.noiseBlend.value = ColorBlends.Additive;
    volume.noiseColor.value = Color.white;

    // Configure pause layer
    volume.pause.value = 0.3f;
    volume.pauseNoise.value = 0.15f;
    volume.pauseBand.value = 1.2f;
    volume.pauseBlend.value = ColorBlends.Solid;
    volume.pauseColor.value = Color.white;

    // Apply color correction
    volume.contrast.value = 1.1f;
    volume.saturation.value = 0.9f;
}
For a more detailed example, check the code in the demo scene.
Performance Characteristics
The effect executes in a single render pass with O(1) per-pixel complexity. The 3D noise function uses analytical evaluation with linear interpolation, and the Hash42 function employs arithmetic operations without texture lookups.
Performance considerations:
- Pass Count: 1 blit pass.
- Texture Samples: 2 per pixel (original + pause-displaced sample).
- Branching: 2 conditional branches (noise size check + pause band selection).
- Memory: No additional textures or compute buffers.
Preset Configurations
Nostalgic Playback
Suitable for retro aesthetics, flashback sequences, or found-footage style.
Intensity: 0.4, Noise: 0.2, Noise Speed: 1.5, Noise Size: 0.25
Noise Blend: Additive, Noise Color: White
Pause: 0.15, Pause Noise: 0.05, Pause Band: 0.8
Pause Blend: Solid, Pause Color: White
Damaged Tape
Creates severe VHS degradation for horror or glitch-art sequences.
Intensity: 0.9, Noise: 0.6, Noise Speed: 4.0, Noise Size: 0.1
Noise Blend: Additive, Noise Color: White
Pause: 0.5, Pause Noise: 0.2, Pause Band: 1.5
Pause Blend: Solid, Pause Color: (0.8, 0.8, 1.0)
🌀 Distortions
A collection of ten independent distortion effects to warp, twist, and reshape your game’s visuals. Each effect is registered as its own Volume override, allowing you to combine multiple distortions simultaneously or use them individually. All effects share a common base with intensity control and color grading parameters.
| Effect | Description | Key Parameters |
|---|---|---|
| Gravity | Black hole / warp | Center, Radius, Strength, Corona, Core |
| Water 2D | 2D water reflection | Height, Strength, Frequency, Angle |
| Underwater | Submerged simulation | Strength, Speed, Amplitude, Depth tinting |
| Raining | Rain-streaked window | Strength, Speed, Density |
| Magnifying | Magnifying lens | Center, Magnification, Radius, Distortion |
| Swirl | Rotational twist | Angle, Radius, Center, Threshold |
| Tremors | Screen shake + blur | Samples, Strength, Speed, Amplitude, Frequency |
| Scope | Sniper scope / barrel | Center, Radius, Vignette, Radial Distortion |
| Inflate | Swell / deflate areas | Strength, Radius, Center |
| Fisheye | Lens distortion | Strength, Center, Blend, Tint |
Requisites
To ensure optimal performance and compatibility, your project must meet the following requirements:
- Unity: 6000.0.58f1 or higher.
- Universal RP: 17.0.3 or higher.
Instalation Guide
Step 1: Add Renderer Feature
Each distortion effect must be registered individually in your project’s URP configuration:
- Locate your Universal Renderer Data asset.
- Click Add Renderer Feature and select the desired distortion from Fronkon Games > Glitches > Distortions.
Step 2: Configure the Volume
To apply a distortion effect to your scene:
- Create a Volume component (Global or Local).
- In the Volume component, create or assign a Volume Profile.
- Click Add Override and select the desired distortion from Fronkon Games > Glitches > Distortions.
- Enable the ‘Intensity’ parameter (and any others you wish to modify).
🕳️ Gravity
Black hole or warp effect that pulls pixels toward a focal point, with independent color controls for the outer corona and inner core zones.
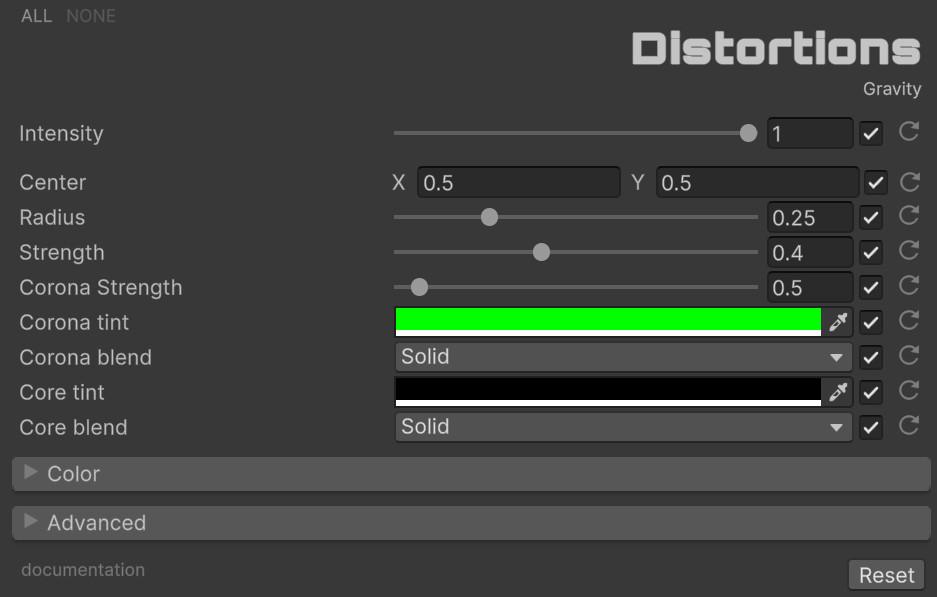
| Parameter | Range | Default | Effect |
|---|---|---|---|
| Center | Vector2 | (0.5, 0.5) | Position of the gravitational center on screen |
| Radius | 0.0 to 1.0 | 0.25 | Reach of the gravitational pull |
| Strength | 0.0 to 1.0 | 0.4 | Intensity of the pixel displacement toward center |
| Corona Strength | 0.0 to 10.0 | 0.5 | Intensity of the outer glow zone |
| Corona Tint | Color | Green | Color applied to the outer corona zone |
| Corona Blend | Enum (23 modes) | Solid | Blend operation for the corona |
| Core Tint | Color | Black | Color applied to the inner core zone |
| Core Blend | Enum (23 modes) | Solid | Blend operation for the core |
💧 Water 2D
Reflection and wave effect optimized for 2D planes. Simulates a water surface at a configurable height with animated wave distortion and vertical reflection.
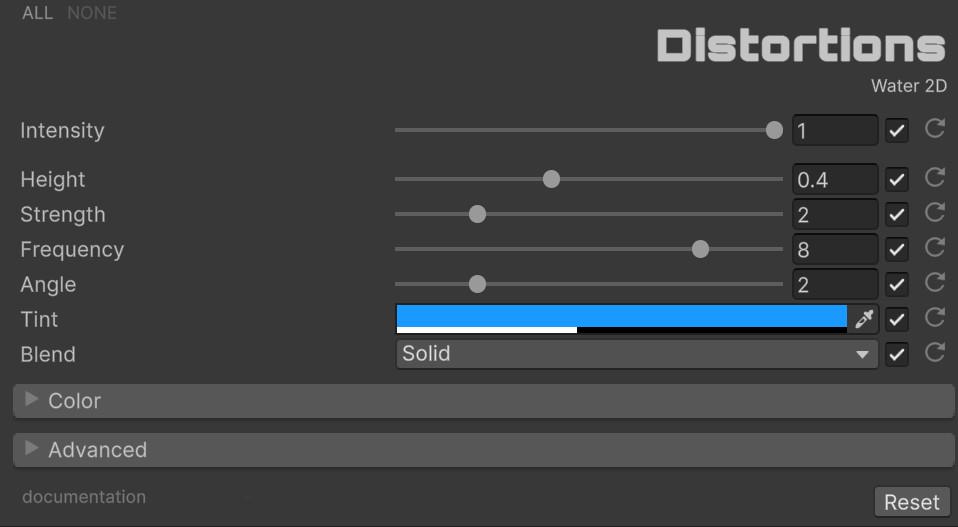
| Parameter | Range | Default | Effect |
|---|---|---|---|
| Height | 0.0 to 1.0 | 0.4 | Vertical position of the water surface (0 = bottom, 1 = top) |
| Strength | 0.0 to 10.0 | 2.0 | Amplitude of the wave distortion |
| Frequency | 0.0 to 10.0 | 8.0 | Number of wave oscillations across the surface |
| Angle | 0.0 to 10.0 | 2.0 | Angle of the reflection distortion |
| Tint | Color | (0.1, 0.6, 1.0, 0.4) | Color overlay applied to the water region |
| Blend | Enum (23 modes) | Solid | Color blend operation for the water tint |
🌊 Under Water
Simulates being submerged with animated wave distortion and depth-based color tinting.
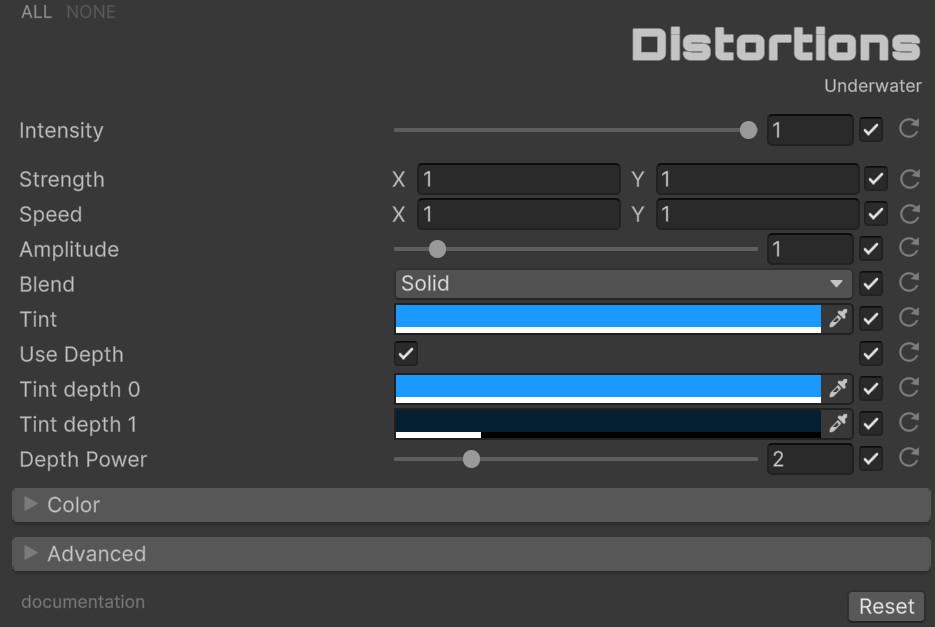
| Parameter | Range | Default | Effect |
|---|---|---|---|
| Strength | Vector2 | (1.0, 1.0) | Wave displacement intensity per axis |
| Speed | Vector2 | (1.0, 1.0) | Wave animation speed per axis |
| Amplitude | 0.0 to 10.0 | 1.0 | Overall wave amplitude multiplier |
| Blend | Enum (23 modes) | Solid | Color blend operation for the water tint |
| Tint | Color | (0.1, 0.6, 1.0) | Base water color overlay |
| Use Depth | Boolean | true | Enables depth-based color gradient |
| Tint Depth 0 | Color | (0.1, 0.6, 1.0) | Tint for nearest objects |
| Tint Depth 1 | Color | (0.02, 0.12, 0.2) | Tint for farthest objects |
| Depth Power | 0.0 to 10.0 | 2.0 | Depth falloff curve exponent |
🌧️ Raining
Simulates vision through a rain-streaked window with animated falling droplets.
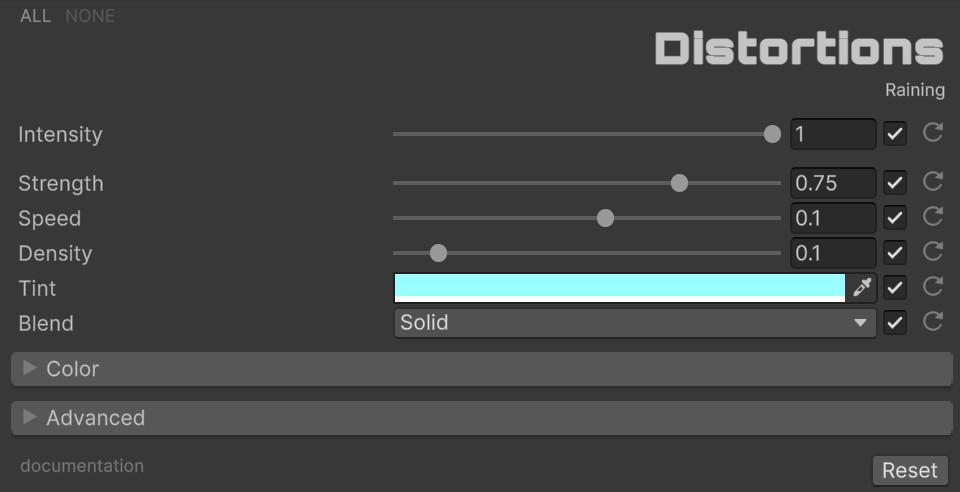
| Parameter | Range | Default | Effect |
|---|---|---|---|
| Strength | 0.0 to 1.0 | 0.75 | Overall intensity of the rain distortion |
| Speed | -1.0 to 1.0 | 0.1 | Falling speed of the drops. Negative values reverse direction |
| Density | 0.0 to 1.0 | 0.1 | Number and coverage of rain droplets |
| Tint | Color | (0.6, 1.0, 1.0) | Color tint applied to the rain effect |
| Blend | Enum (23 modes) | Solid | Color blend operation for the rain overlay |
🔍 Magnifying
Simulates a magnifying lens with configurable zoom, border, and chromatic aberration.
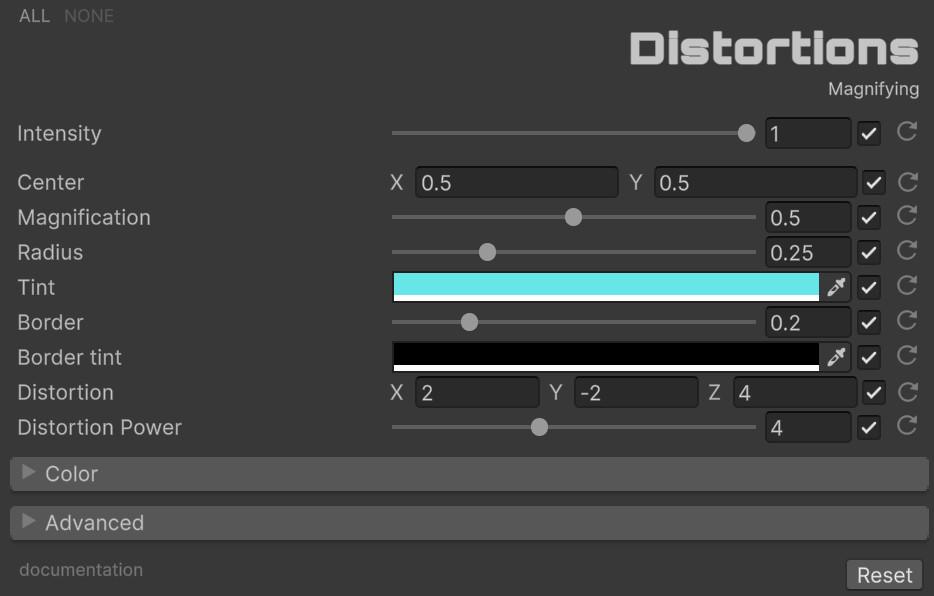
| Parameter | Range | Default | Effect |
|---|---|---|---|
| Center | Vector2 | (0.5, 0.5) | Position of the lens on screen |
| Magnification | 0.0 to 1.0 | 0.5 | Zoom level inside the lens |
| Radius | 0.0 to 1.0 | 0.25 | Size of the magnifying area |
| Tint | Color | (0.4, 0.9, 0.9) | Color tint applied to the lens area |
| Border | 0.0 to 1.0 | 0.2 | Width of the lens border ring |
| Border Tint | Color | Black | Color of the border ring |
| Distortion | Vector3 | (2.0, -2.0, 4.0) | Per-channel chromatic aberration offset (R, G, B) |
| Distortion Power | 0.0 to 10.0 | 4.0 | Exponent controlling aberration falloff from center |
🌪️ Swirl
Twists the screen around a point with configurable rotation angle and smooth edge falloff.
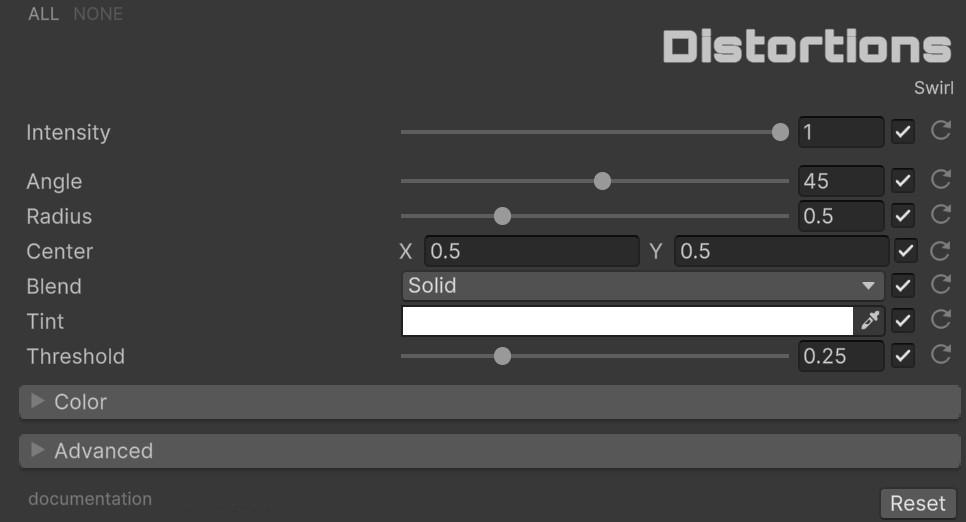
| Parameter | Range | Default | Effect |
|---|---|---|---|
| Angle | -1080.0 to 1080.0 | 45.0 | Rotation angle in degrees. Positive = clockwise, negative = counter-clockwise |
| Radius | 0.0 to 2.0 | 0.5 | Reach of the swirl effect from center |
| Center | Vector2 | (0.5, 0.5) | Anchor point of the rotation |
| Blend | Enum (23 modes) | Solid | Color blend operation for the swirled region |
| Tint | Color | White | Color tint applied to the swirled area |
| Threshold | 0.0 to 1.0 | 0.25 | Smoothness of the transition at the swirl boundary |
🫨 Tremors
Screen shake and motion blur effect with independent per-axis control and wave modulation.
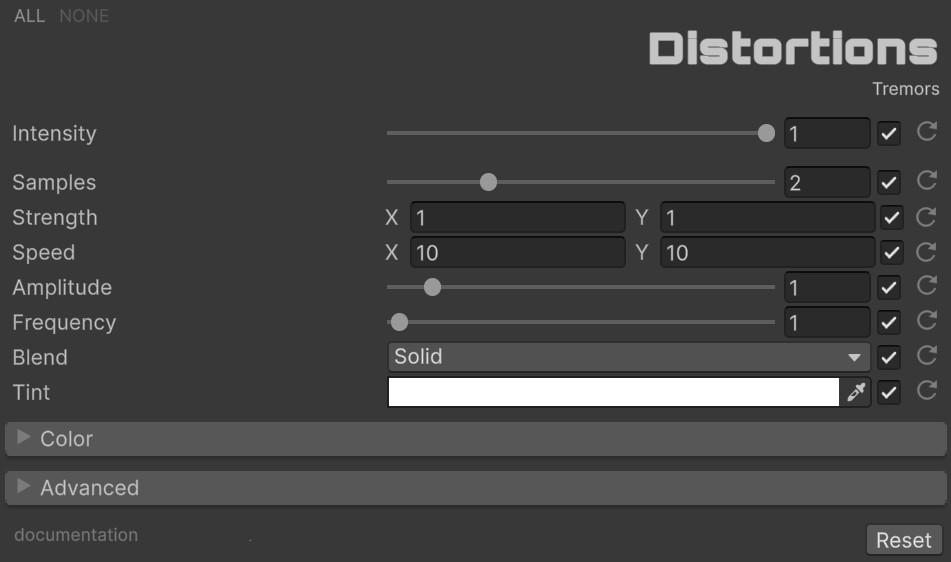
| Parameter | Range | Default | Effect |
|---|---|---|---|
| Samples | 1 to 5 | 2 | Number of blur samples. Higher values produce smoother blur at increased cost |
| Strength | Vector2 | (1.0, 1.0) | Shake intensity per axis (X, Y) |
| Speed | Vector2 | (10.0, 10.0) | Shake animation speed per axis |
| Amplitude | 0.0 to 10.0 | 1.0 | Wave amplitude multiplier for complex vibration patterns |
| Frequency | 0.0 to 100.0 | 1.0 | Wave frequency for vibration modulation |
| Blend | Enum (23 modes) | Solid | Color blend operation for the blurred result |
| Tint | Color | White | Color tint applied to the effect |
🎯 Scope
Sniper scope or barrel distortion using a radial lens formula with three coefficients (K1, K2, K3).
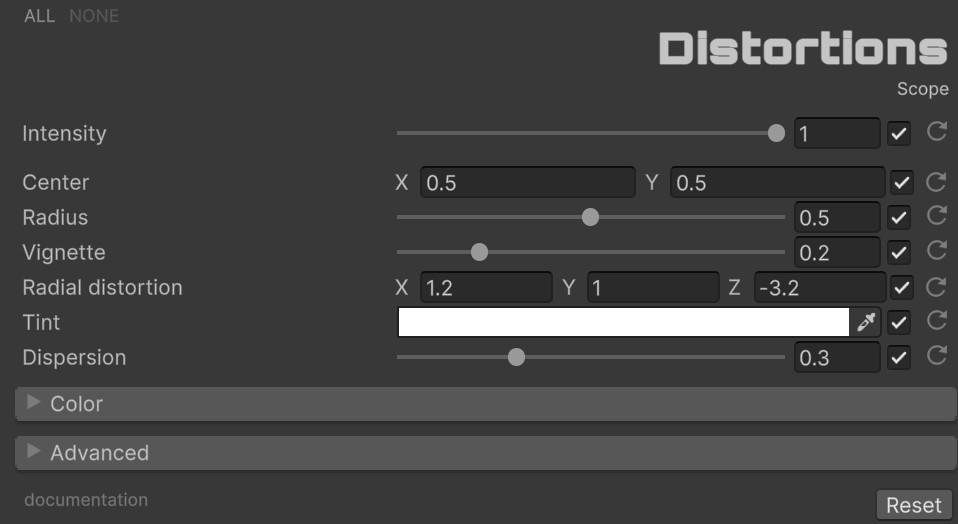
| Parameter | Range | Default | Effect |
|---|---|---|---|
| Center | Vector2 | (0.5, 0.5) | Aiming position on screen |
| Radius | 0.0 to 1.0 | 0.5 | Size of the scope view area |
| Vignette | 0.0 to 1.0 | 0.2 | Edge darkening intensity within the scope |
| Radial Distortion | Vector3 | (1.2, 1.0, -3.2) | Lens distortion coefficients (K1, K2, K3) |
| Tint | Color | White | Color tint applied to the scope view |
| Dispersion | 0.0 to 1.0 | 0.3 | Chromatic aberration intensity at the scope edges |
🎈 Inflate
Swell or deflate specific screen areas with a radial deformation field.
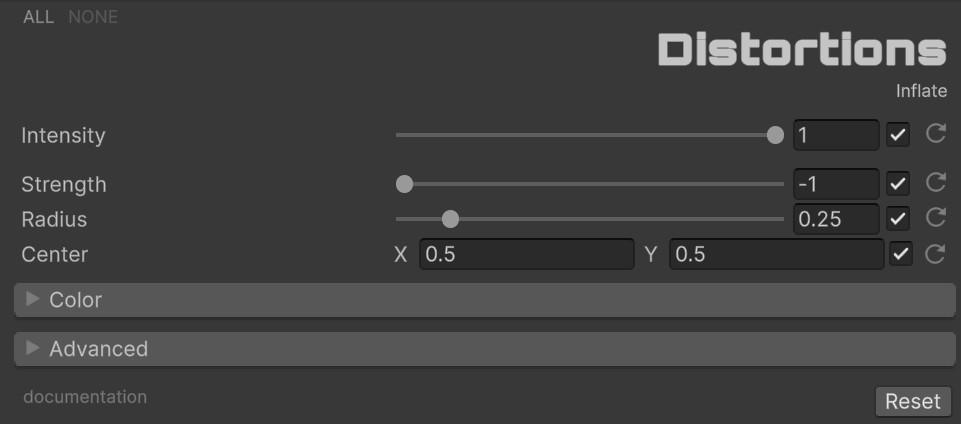
| Parameter | Range | Default | Effect |
|---|---|---|---|
| Strength | -1.0 to 1.0 | -1.0 | Positive values inflate, negative values deflate |
| Radius | 0.0 to 2.0 | 0.25 | Reach of the deformation from center |
| Center | Vector2 | (0.5, 0.5) | Focus point of the inflation/deflation |
🐟 Fisheye
Classic barrel/pincushion lens distortion with configurable center point and color blending.
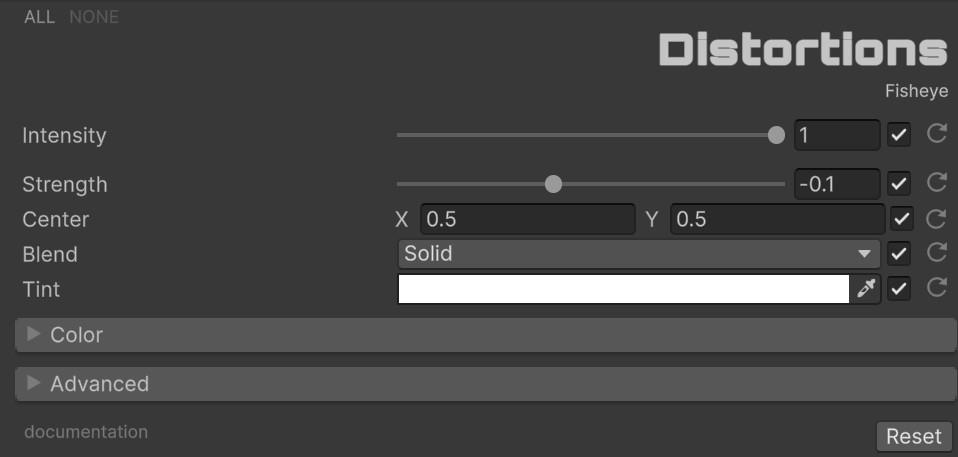
| Parameter | Range | Default | Effect |
|---|---|---|---|
| Strength | -0.5 to 0.5 | -0.1 | Positive = fisheye (barrel), negative = anti-fisheye (pincushion) |
| Center | Vector2 | (0.5, 0.5) | Center point of the distortion |
| Blend | Enum (23 modes) | Solid | Color blend operation for the distorted region |
| Tint | Color | White | Color tint applied to the effect |
Runtime Control
All distortion effects integrate with Unity’s Volume system. Each effect has its own Volume class within the FronkonGames.Glitches.Distortions namespace.
using UnityEngine;
using UnityEngine.Rendering;
using FronkonGames.Glitches.Distortions;

// ...

[SerializedField]
private VolumeProfile volumeProfile;

// ...

// Access any distortion effect — example with Gravity
if (volumeProfile.TryGet(out GravityVolume gravity))
{
    gravity.intensity.value = 1.0f;
    gravity.center.value = new Vector2(0.5f, 0.5f);
    gravity.radius.value = 0.3f;
    gravity.strength.value = 0.5f;
    gravity.coronaStrength.value = 1.0f;
    gravity.coronaTint.value = Color.green;
}

// Example with Underwater
if (volumeProfile.TryGet(out UnderwaterVolume underwater))
{
    underwater.intensity.value = 1.0f;
    underwater.strength.value = new Vector2(1.5f, 1.5f);
    underwater.speed.value = new Vector2(0.8f, 0.8f);
    underwater.amplitude.value = 2.0f;
    underwater.useDepth.value = true;
    underwater.depthPower.value = 3.0f;
}

// Example with Swirl
if (volumeProfile.TryGet(out SwirlVolume swirl))
{
    swirl.intensity.value = 1.0f;
    swirl.angle.value = 180.0f;
    swirl.radius.value = 0.6f;
    swirl.threshold.value = 0.3f;
}
For a more detailed example, check the code in the demo scene.
Performance Characteristics
Each distortion effect executes in a single render pass with O(1) per-pixel complexity. All distortions use analytical UV coordinate transformations without texture lookups or compute buffers.
Performance considerations:
- Pass Count: 1 blit pass per active distortion.
- Texture Samples: 1-3 per pixel depending on the effect (chromatic aberration effects sample per channel).
- Branching: Minimal — most effects use smooth mathematical functions without conditional logic.
- Memory: No additional textures or compute buffers (except Tremors which uses N blur samples).
📷 Cheap Camera
Replicates the visual characteristics of low-quality cameras with poor optics, noisy sensors, and limited image processing. The effect implements a three-stage imaging pipeline — Lens, Sensor, and Processor — that mirrors the physical signal path of a real cheap camera, from light entering the optics through to the final processed output.
The lens stage applies a radial + tangential distortion model (matching the OpenCV calibration convention) combined with per-zone vignetting and chromatic aberration. The sensor stage quantizes the image to a configurable resolution, injects static and dynamic pixel noise between exposure and gain stages, and truncates color depth via dynamic range reduction. The processor stage performs edge detection, adaptive sharpening/blurring, and white balance correction using multi-sample blur kernels.
Requisites
To ensure optimal performance and compatibility, your project must meet the following requirements:
- Unity: 6000.0.58f1 or higher.
- Universal RP: 17.0.3 or higher.
Instalation Guide
Step 1: Add Renderer Feature
The effect must be registered in your project’s URP configuration:
- Locate your Universal Renderer Data asset.
- Click Add Renderer Feature and select Fronkon Games > Glitches > Cheap Camera.
Step 2: Configure the Volume
To apply the effect to your scene:
- Create a Volume component (Global or Local).
- In the Volume component, create or assign a Volume Profile.
- Click Add Override and select Fronkon Games > Glitches > Cheap Camera.
- Enable the ‘Intensity’ parameter (and any others you wish to modify).
Three-Stage Imaging Pipeline
The effect processes each pixel through three sequential stages that simulate the complete signal path of a low-quality camera.
| Stage | Operation | Simulates |
|---|---|---|
| Lens | Radial/tangential distortion, vignetting, chromatic aberration, zoom | Cheap plastic optics with poor alignment |
| Sensor | Resolution quantization, pixel noise (static + dynamic), exposure/gain, dynamic range | Low-resolution CMOS sensor with limited bit depth |
| Processor | Edge detection, sharpening/blur, white balance | Basic on-chip image signal processor |
Parameter Configuration
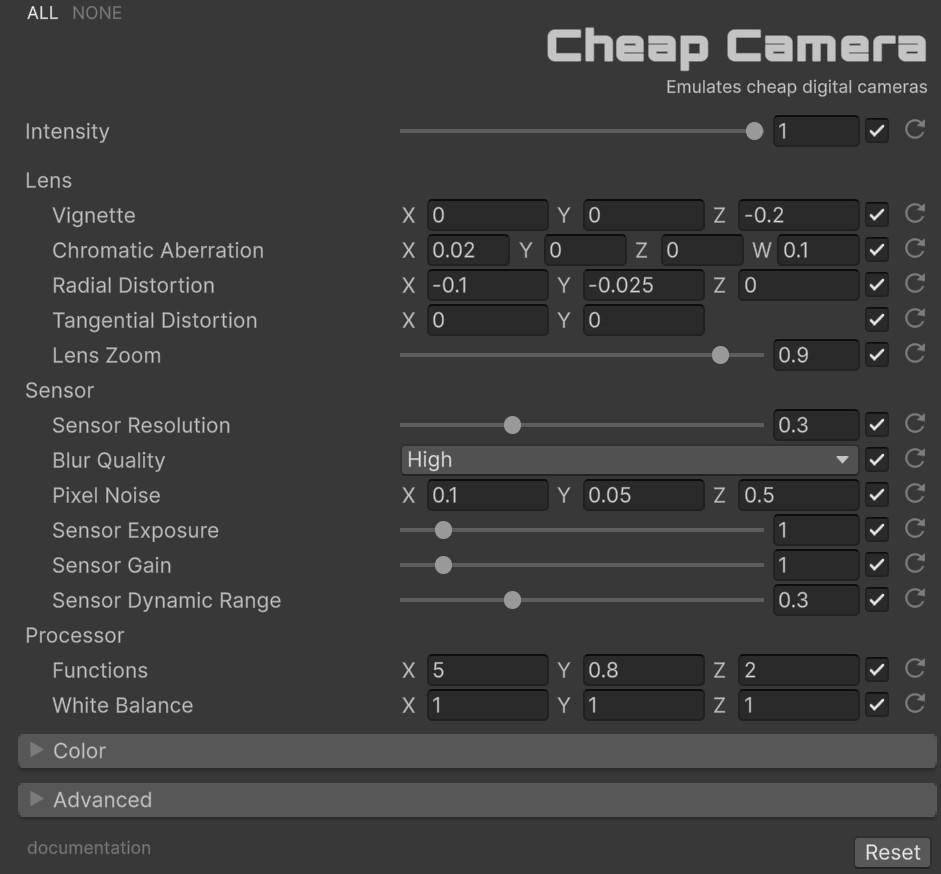
With ‘Intensity’ you can control the overall strength of the effect [0.0 - 1.0]. If it is 0, the effect will not be active.
Lens Parameters
| Parameter | Sub-Parameter | Default | Effect |
|---|---|---|---|
| Vignette | X (center) | 0.0 | Brightness adjustment at screen center |
| Y (middle) | 0.0 | Brightness adjustment at mid-screen | |
| Z (outer) | -0.2 | Brightness adjustment at screen edges. Negative = darkening | |
| Chromatic Aberration | X (center) | 0.02 | Color fringing at screen center |
| Y (middle) | 0.0 | Color fringing at mid-screen | |
| Z (outer) | 0.0 | Color fringing at screen edges | |
| W (noise) | 0.1 | Random variation applied to aberration | |
| Radial Distortion | X (center) | -0.1 | Barrel/pincushion at screen center |
| Y (middle) | -0.025 | Barrel/pincushion at mid-screen | |
| Z (outer) | 0.0 | Barrel/pincushion at screen edges | |
| Tangential Distortion | X, Y | (0.0, 0.0) | Diagonal misalignment of the lens |
| Zoom | 0.0 to 1.0 | 0.9 | Field of view adjustment |
Sensor Parameters
| Parameter | Range / Sub-Parameter | Default | Effect |
|---|---|---|---|
| Resolution | 0.0 to 1.0 | 0.3 | Simulated pixel count. Lower values produce more pixelation |
| Blur Quality | Low / Medium / High | High | Number of blur samples (2, 3, or 4) |
| Pixel Noise | X (static) | 0.1 | Intensity of fixed-pattern noise |
| Y (dynamic) | 0.05 | Intensity of temporal noise | |
| Z (velocity) | 0.5 | Speed of dynamic noise variation | |
| Exposure | 0.0 to 10.0 | 1.0 | Signal amplification before noise injection |
| Gain | 0.0 to 10.0 | 1.0 | Signal amplification after noise injection |
| Dynamic Range | 0.0 to 1.0 | 0.3 | Sensor bit depth. Lower values reduce color precision |
Processor Parameters
| Parameter | Sub-Parameter | Default | Effect |
|---|---|---|---|
| Functions | X (edges) | 5.0 | Edge detection strength. Higher values enhance edges |
| Y (sharpen) | 0.8 | Sharpening intensity. Blends between sharp and blurred | |
| Z (pixel size) | 2.0 | Pixel size multiplier for blur kernel | |
| White Balance | R, G, B | (1.0, 1.0, 1.0) | Per-channel color temperature correction |
Color Grading
Standard color correction parameters apply to the final output.
| Parameter | Range | Effect | Default |
|---|---|---|---|
| Brightness | -1.0 to 1.0 | Additive luminance offset | 0.0 |
| Contrast | 0.0 to 10.0 | Mid-tone contrast expansion | 1.0 |
| Gamma | 0.1 to 10.0 | Nonlinear tonal mapping (inverted) | 1.0 |
| Hue | 0.0 to 1.0 | Color wheel rotation | 0.0 |
| Saturation | 0.0 to 2.0 | Color intensity relative to luminance | 1.0 |
These operations follow standard image processing order: contrast expansion → hue rotation → gamma correction → saturation adjustment.
Runtime Control
The effect integrates with Unity’s Volume system for seamless runtime parameter modification. Access the CheapCameraVolume component through the Volume Profile.
using UnityEngine;
using UnityEngine.Rendering;
using FronkonGames.Glitches.CheapCamera;

// ...

[SerializedField]
private VolumeProfile volumeProfile;

// ...

// Access the effect
if (volumeProfile.TryGet(out CheapCameraVolume volume))
{
    // Enable/disable effect
    volume.intensity.value = 1.0f; // 0.0 = disabled

    // Configure lens
    volume.lensVignette.value = new Vector3(0.0f, 0.0f, -0.3f);
    volume.lensChromaticAberration.value = new Vector4(0.03f, 0.0f, 0.0f, 0.15f);
    volume.lensRadialDistortion.value = new Vector3(-0.15f, -0.03f, 0.0f);
    volume.lensZoom.value = 0.85f;

    // Configure sensor
    volume.sensorResolution.value = 0.2f;
    volume.sensorPixelNoise.value = new Vector3(0.15f, 0.1f, 0.8f);
    volume.sensorExposure.value = 1.2f;
    volume.sensorGain.value = 1.1f;
    volume.sensorDynamicRange.value = 0.2f;

    // Configure processor
    volume.processorFunctions.value = new Vector3(6.0f, 0.9f, 2.5f);
    volume.processorWhiteBalance.value = new Vector3(1.0f, 1.0f, 0.9f);

    // Apply color correction
    volume.contrast.value = 1.2f;
    volume.saturation.value = 0.8f;
}
For a more detailed example, check the code in the demo scene.
Performance Characteristics
The effect executes in a single render pass. Per-pixel cost depends on the Blur Quality setting, which controls the number of sensor samples per pixel.
Performance considerations:
- Pass Count: 1 blit pass.
- Texture Samples: 3-5 per pixel (1 center + 2-4 blur samples, each running the full lens+sensor pipeline).
- Branching: Chromatic aberration uses a compile-time keyword branch for 3-channel vs single-channel sampling.
- Memory: No additional textures or compute buffers.
| Blur Quality | Samples | Estimated Cost |
|---|---|---|
| Low | 2 | Lightest — suitable for mobile |
| Medium | 3 | Balanced |
| High | 4 | Best quality — recommended for desktop |
Preset Configurations
Webcam Quality
Suitable for security cameras, video calls, or low-budget recording devices.
Intensity: 0.5, Vignette: (0, 0, -0.15), Chromatic Aberration: (0.01, 0, 0, 0.05)
Radial Distortion: (-0.05, -0.01, 0), Zoom: 0.95
Resolution: 0.4, Blur Quality: Medium, Pixel Noise: (0.08, 0.03, 0.3)
Exposure: 1.0, Gain: 1.0, Dynamic Range: 0.4
Functions: (3.0, 0.5, 1.5), White Balance: (1.0, 1.0, 1.0)
Toy Camera
Creates the extreme distortion and noise of a very cheap toy camera.
Intensity: 0.9, Vignette: (0, 0, -0.4), Chromatic Aberration: (0.05, 0.02, 0, 0.2)
Radial Distortion: (-0.2, -0.05, 0), Zoom: 0.8
Resolution: 0.15, Blur Quality: Low, Pixel Noise: (0.2, 0.15, 1.0)
Exposure: 1.3, Gain: 1.2, Dynamic Range: 0.15
Functions: (8.0, 1.0, 3.0), White Balance: (1.1, 1.0, 0.85)
🔥 Bap GPU
Simulates the visual artifacts characteristic of failing graphics hardware, including pixel scrambling, memory corruption patterns, and signal degradation. Unlike other glitch effects that simulate external interference, this effect emulates internal GPU malfunction through sophisticated coordinate manipulation and noise generation algorithms.
The core innovation lies in the use of Morton/Z-order curves for pixel coordinate transformation. This space-filling curve algorithm interleaves bits from X and Y coordinates to create a linear index that preserves spatial locality. When noise is applied to this Morton-encoded index and then converted back to UV coordinates, the result creates the characteristic blocky, hardware-corruption appearance rather than smooth gradient distortions.
Requisites
To ensure optimal performance and compatibility, your project must meet the following requirements:
- Unity: 6000.0.58f1 or higher.
- Universal RP: 17.0.3 or higher.
Instalation Guide
Step 1: Add Renderer Feature
The effect must be registered in your project’s URP configuration:
- Locate your Universal Renderer Data asset.
- Click Add Renderer Feature and select Fronkon Games > Glitches > Bad GPU.
Step 2: Configure the Volume
To apply the effect to your scene:
- Create a Volume component (Global or Local).
- In the Volume component, create or assign a Volume Profile.
- Click Add Override and select Fronkon Games > Glitches > Bad GPU.
- Enable the ‘Intensity’ parameter (and any others you wish to modify).
Parameter Configuration
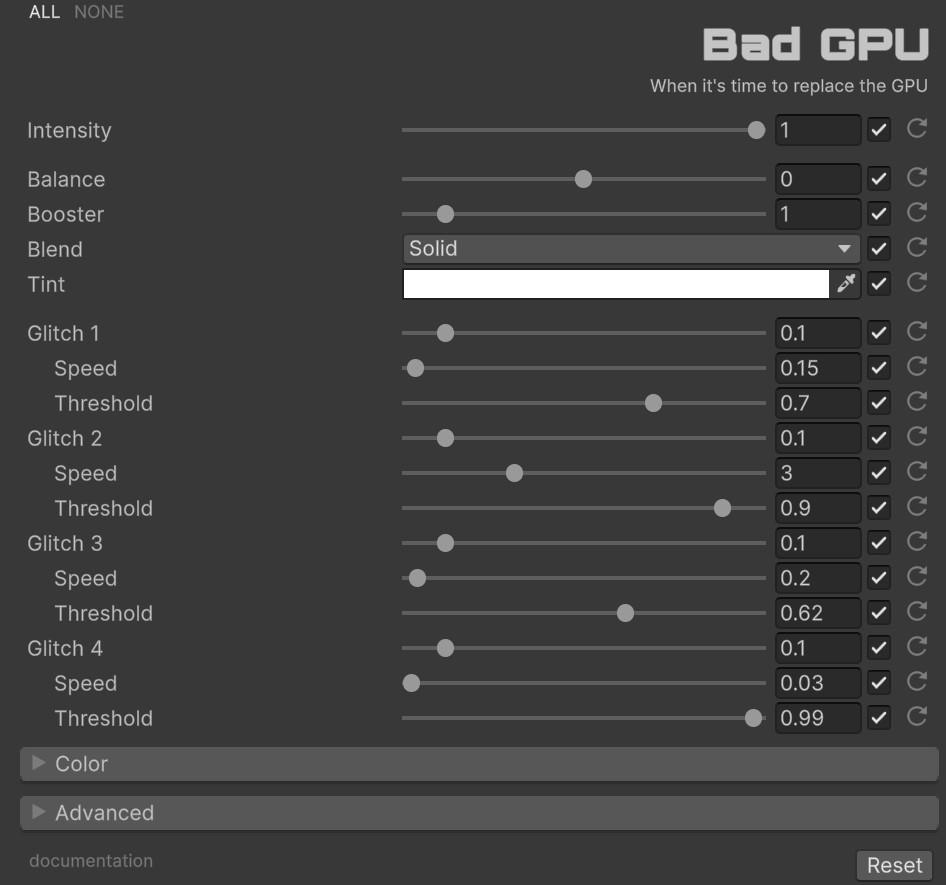
With ‘Intensity’ you can control the overall strength of the effect [0.0 - 1.0]. If it is 0, the effect will not be active.
Signal Parameters
The core parameters control the balance between the original image and the corrupted output.
- Balance [-1.0 to 1.0]: Negative values favor the original image, positive values enhance the glitch effect. At 0.0, mixing depends on pixel difference magnitude.
- Booster [0.0 to 10.0]: Multiplies the glitch color intensity before blending. Higher values create more severe corruption.
- Blend: Selects from 23 color blend modes (Solid, Screen, Difference, etc.).
- Tint: Applies a color filter to the glitch artifacts before blending.
Four-Layer Glitch System
The effect implements four independent noise layers (Glitch 1-4), each contributing distinct artifact patterns. This multi-layered approach simulates the complex cascading failures that occur in actual GPU hardware problems.
| Layer | Noise Scale | Characteristic | Typical Use Case |
|---|---|---|---|
| Glitch 1 | 1×10⁻³ | Blocky posterized artifacts with 4 levels | Main chunk corruption |
| Glitch 2 | 1×10⁻⁵ | Fine-grained noise with 20 posterization levels | Bit-level errors |
| Glitch 3 | 1×10³ | Large-scale displacement with threshold control | Memory addressing failures |
| Glitch 4 | 0.01 | Subtle random color injection | Signal degradation |
Each layer combines three operations: noise generation scaled by coordinate position, posterization for quantization, and threshold application for selective activation. The noise function uses 1D value noise with linear interpolation, scaled by time-dependent speed parameters.
Color Grading
Standard color correction parameters apply to the final output.
| Parameter | Range | Effect | Default |
|---|---|---|---|
| Brightness | -1.0 to 1.0 | Additive luminance offset | 0.0 |
| Contrast | 0.0 to 10.0 | Mid-tone contrast expansion | 1.0 |
| Gamma | 0.1 to 10.0 | Nonlinear tonal mapping (inverted) | 1.0 |
| Hue | 0.0 to 1.0 | Color wheel rotation | 0.0 |
| Saturation | 0.0 to 2.0 | Color intensity relative to luminance | 1.0 |
These operations follow standard image processing order: contrast expansion → hue rotation → gamma correction → saturation adjustment.
Runtime Control
The effect integrates with Unity’s Volume system for seamless runtime parameter modification. Access the BadGPUVolume component through the Volume Profile.
using UnityEngine;
using UnityEngine.Rendering;
using FronkonGames.Glitches.BadGPU;

// ...

[SerializedField]
private VolumeProfile volumeProfile;

// ...

// Access the effect
if (volumeProfile.TryGet(out BadGPUVolume volume))
{
    // Enable/disable effect
    volume.intensity.value = 1.0f; // 0.0 = disabled

    // Configure signal parameters
    volume.balance.value = 0.3f;
    volume.booster.value = 2.5f;
    volume.blend.value = ColorBlends.Difference;
    volume.tint.value = new Color(1.0f, 0.5f, 0.0f);

    // Control individual glitch layers
    volume.glitch1.value = 0.2f;
    volume.glitch1Speed.value = 0.5f;
    volume.glitch1Threshold.value = 0.6f;

    // Apply color correction
    volume.contrast.value = 1.2f;
    volume.saturation.value = 0.8f;
}
For a more detailed example, check the code in the demo scene.
Performance Characteristics
The effect executes in a single render pass with O(1) per-pixel complexity. The Morton curve operations use bitwise manipulation without branching, and noise generation employs analytical functions rather than texture lookups.
Performance considerations:
- Pass Count: 1 blit pass.
- Texture Samples: 2 per pixel (original and displaced coordinate).
- Branching: Minimal (threshold comparisons use step() intrinsic).
- Memory: No additional textures or compute buffers.
Preset Configurations
Subtle Artifacts
Suitable for environmental storytelling or failing electronics.
Intensity: 0.15, Balance: -0.3, Booster: 0.8, Blend: Solid
Glitch 1: Intensity 0.05, Speed 0.2, Threshold 0.8
Glitch 2: Intensity 0.03, Speed 2.0, Threshold 0.95
Critical Failure
Creates severe corruption for intense scenes or catastrophic events.
Intensity: 0.8, Balance: 0.4, Booster: 5.0, Blend: Difference, Tint: Orange
Glitch 1: Intensity 0.3, Speed 1.0, Threshold 0.6
Glitch 2: Intensity 0.2, Speed 4.0, Threshold 0.8
Glitch 3: Intensity 0.2, Speed 0.5, Threshold 0.5
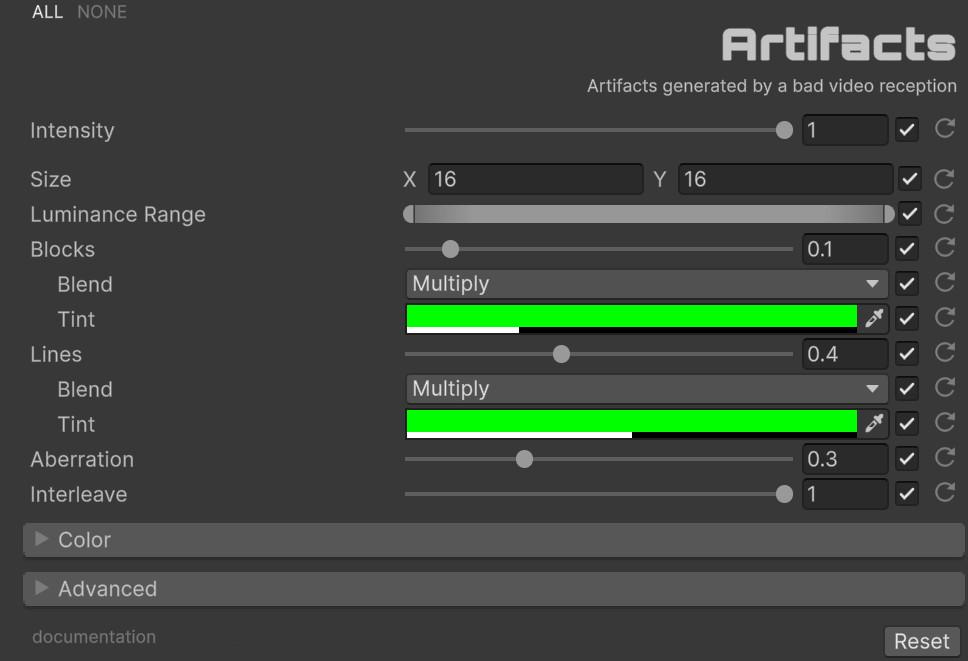
Glitch 4: Intensity 0.15, Speed 0.1, Threshold 0.9📦 Artifacts
Replicates the visual noise and blocking patterns characteristic of low-bitrate digital video, poor signal reception, or heavily compressed media. The effect simulates macro-block corruption, horizontal line tearing, chromatic aberration, and RGB sub-pixel interleaving, the hallmarks of degraded digital video signals.
The core technique uses a noise texture lookup driven by time-varying block coordinates. Screen pixels are quantized into configurable grid cells, and the resulting cell index is used to sample a noise texture at animated UV offsets. When the noise value crosses a probability threshold, the pixel undergoes color channel displacement, blend-mode tinting, and sub-pixel masking, all in a single shader pass.
Requisites
To ensure optimal performance and compatibility, your project must meet the following requirements:
- Unity: 6000.0.58f1 or higher.
- Universal RP: 17.0.3 or higher.
Instalation Guide
Step 1: Add Renderer Feature
The effect must be registered in your project’s URP configuration:
- Locate your Universal Renderer Data asset.
- Click Add Renderer Feature and select Fronkon Games > Glitches > Artifacts.
Step 2: Configure the Volume
To apply the effect to your scene:
- Create a Volume component (Global or Local).
- In the Volume component, create or assign a Volume Profile.
- Click Add Override and select Fronkon Games > Glitches > Artifacts.
- Enable the ‘Intensity’ parameter (and any others you wish to modify).
Dual-Layer Artifact
The effect implements two independent artifact layers — Blocks and Lines — each with its own probability, blend mode, and tint color. This dual-layer approach simulates the distinct corruption patterns found in real degraded video signals.
| Layer | Pattern | Characteristic | Typical Use Case |
|---|---|---|---|
| Blocks | Grid-aligned macro-blocks | Random rectangular corruption patches | Compression artifacts, data loss |
| Lines | Horizontal scan-lines | Full-width horizontal tearing | Signal interference, bad reception |
Both layers share the same noise texture and block-size grid, but sample different noise channels (red for blocks, green/blue for lines). Time-dependent power curves control the probability of each layer activating per frame, creating organic temporal variation.
Parameter Configuration
With ‘Intensity’ you can control the overall strength of the effect [0.0 - 1.0]. If it is 0, the effect will not be active.
- Size [Vector2Int]: Defines the dimensions of the artifact grid cells in pixels. Default (16, 16). Smaller values produce finer corruption; larger values create chunkier macro-blocks.
- Luminance Range [Vector2]: Restricts the effect to pixels within a specific brightness range. Pixels with luminance outside [min, max] are left untouched. Default (0.0, 1.0).
- Blocks [0.0 to 1.0]: Controls the probability and intensity of macro-block artifacts. Default 0.1.
- Block Blend: Selects from 23 color blend modes (Multiply, Screen, Difference, etc.). Default Multiply.
- Block Tint: Color and alpha applied to block artifacts. Alpha controls the blend strength. Default (0, 1, 0, 0.25).
- Lines [0.0 to 1.0]: Controls the probability and intensity of horizontal line artifacts. Default 0.4.
- Line Blend: Selects from 23 color blend modes. Default Multiply.
- Line Tint: Color and alpha applied to line artifacts. Alpha controls the blend strength. Default (0, 1, 0, 0.5).
- Aberration [0.0 to 1.0]: Chromatic aberration intensity. Displaces R, G, and B channels independently when artifacts are active. Default 0.3.
- Interleave [0.0 to 1.0]: RGB sub-pixel pattern intensity. Simulates CRT-style sub-pixel rendering within corrupted regions. Default 1.0.
Color Grading
Standard color correction parameters apply to the final output.
| Parameter | Range | Effect | Default |
|---|---|---|---|
| Brightness | -1.0 to 1.0 | Additive luminance offset | 0.0 |
| Contrast | 0.0 to 10.0 | Mid-tone contrast expansion | 1.0 |
| Gamma | 0.1 to 10.0 | Nonlinear tonal mapping (inverted) | 1.0 |
| Hue | 0.0 to 1.0 | Color wheel rotation | 0.0 |
| Saturation | 0.0 to 2.0 | Color intensity relative to luminance | 1.0 |
These operations follow standard image processing order: contrast expansion → hue rotation → gamma correction → saturation adjustment.
Runtime Control
The effect integrates with Unity’s Volume system for seamless runtime parameter modification. Access the ArtifactsVolume component through the Volume Profile.
using UnityEngine;
using UnityEngine.Rendering;
using FronkonGames.Glitches.Artifacts;

// ...

[SerializedField]
private VolumeProfile volumeProfile;

// ...

// Access the effect
if (volumeProfile.TryGet(out ArtifactsVolume volume))
{
    // Enable/disable effect
    volume.intensity.value = 1.0f; // 0.0 = disabled

    // Configure artifact parameters
    volume.size.value = new Vector2Int(8, 8);
    volume.luminanceRange.value = new Vector2(0.0f, 1.0f);
    volume.blocks.value = 0.8f;
    volume.blockBlend.value = ColorBlends.Difference;
    volume.blockTint.value = new Color(0.0f, 1.0f, 0.0f, 0.25f);
    volume.lines.value = 0.4f;
    volume.lineBlend.value = ColorBlends.Multiply;
    volume.lineTint.value = new Color(0.0f, 1.0f, 0.0f, 0.5f);
    volume.aberration.value = 0.3f;
    volume.interleave.value = 1.0f;

    // Apply color correction
    volume.contrast.value = 1.2f;
    volume.saturation.value = 0.8f;
}
For a more detailed example, check the code in the demo scene.
Performance Characteristics
The effect executes in a single render pass with O(1) per-pixel complexity. Block coordinates are computed via integer division, and noise sampling uses a pre-baked 64×64 texture with linear filtering.
Performance considerations:
- Pass Count: 1 blit pass.
- Texture Samples: 4 per pixel (original + up to 3 displaced channels) + noise lookups.
- Branching: Conditional blocks use UNITY_BRANCH for coherent warp execution.
- Memory: 1 additional noise texture (64×64).
Preset Configurations
Subtle Compression
Suitable for surveillance cameras, old monitors, or low-quality video feeds.
Intensity: 0.3, Size: (16, 16), Luminance Range: (0.0, 1.0)
Blocks: 0.05, Block Blend: Multiply, Block Tint: (0, 1, 0, 0.15)
Lines: 0.2, Line Blend: Multiply, Line Tint: (0, 1, 0, 0.3)
Aberration: 0.1, Interleave: 0.5
Heavy Signal Loss
Creates severe corruption for dramatic transitions or horror sequences.
Intensity: 0.8, Size: (8, 8), Luminance Range: (0.0, 1.0)
Blocks: 0.6, Block Blend: Difference, Block Tint: (0, 1, 0, 0.5)
Lines: 0.8, Line Blend: Screen, Line Tint: (1, 0, 0, 0.6)
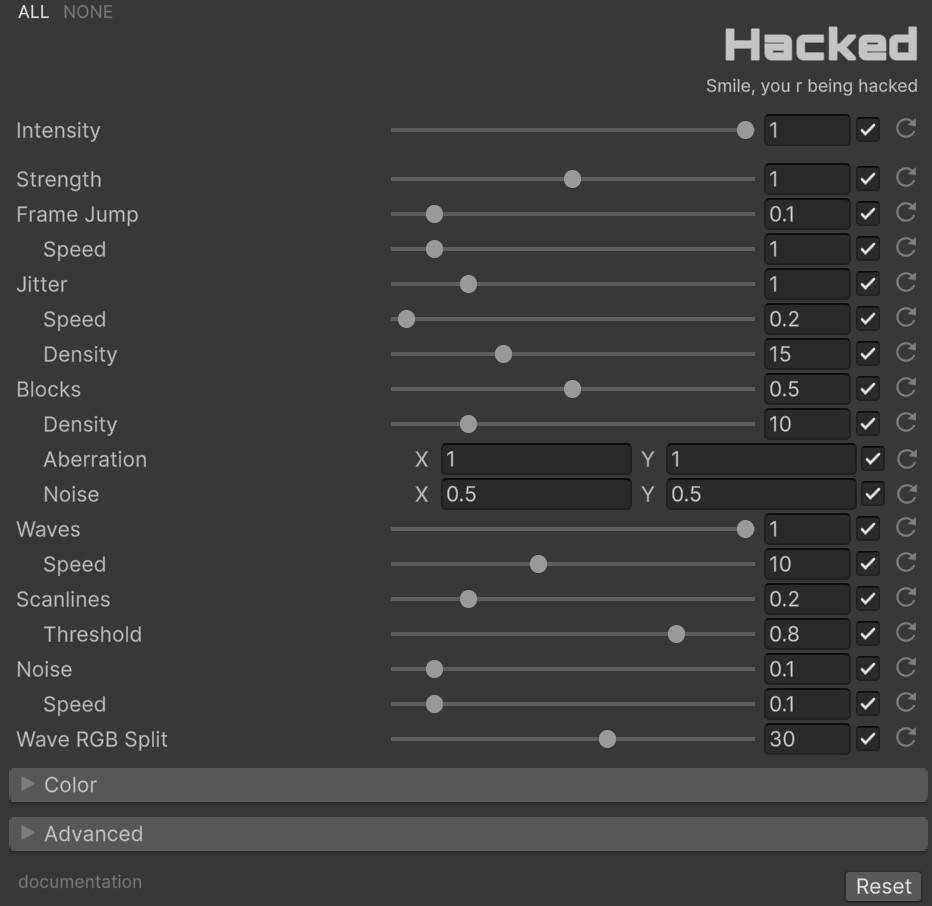
Aberration: 0.8, Interleave: 1.0💀 Hacked
Simulates a variety of digital glitches, frame jumps, and compression artifacts, giving the impression of a hacked or malfunctioning system. The effect composites six independent distortion layers — Frame Jump, Jitter, Blocks, Waves, Scanlines, and Noise — each operating on separate UV coordinate channels (R, G, B) to produce the characteristic RGB splitting of digital interference.
The shader processes each pixel through all six layers sequentially, accumulating UV offsets independently for the red, green, and blue channels. This per-channel UV separation creates the distinctive chromatic tearing seen in hacked displays. The final pixel is assembled by sampling the texture at three different UV coordinates (one per channel), producing organic color fringing that varies with each layer’s contribution.
Requisites
To ensure optimal performance and compatibility, your project must meet the following requirements:
- Unity: 6000.0.58f1 or higher.
- Universal RP: 17.0.3 or higher.
Instalation Guide
Step 1: Add Renderer Feature
The effect must be registered in your project’s URP configuration:
- Locate your Universal Renderer Data asset.
- Click Add Renderer Feature and select Fronkon Games > Glitches > Hacked.
Step 2: Configure the Volume
To apply the effect to your scene:
- Create a Volume component (Global or Local).
- In the Volume component, create or assign a Volume Profile.
- Click Add Override and select Fronkon Games > Glitches > Hacked.
- Enable the ‘Intensity’ parameter (and any others you wish to modify).
Six-Layer Compositing System
The effect implements six independent distortion layers that are composited sequentially. Each layer contributes UV offsets that accumulate across the R, G, and B channels independently.
| Layer | Technique | Characteristic | Typical Use Case |
|---|---|---|---|
| Frame Jump | Vertical UV scroll with speed control | Vertical rolling / sync loss | Monitor desynchronization |
| Jitter | Horizontal tile displacement with density bands | Horizontal slicing with per-band offset | Signal interference, data corruption |
| Blocks | Random block displacement with per-channel aberration | Blocky RGB splitting with noise | Compression artifacts, data loss |
| Waves | Simplex noise-driven horizontal displacement | Smooth wave-like RGB separation | Electromagnetic interference |
| Scanlines | Threshold-gated random horizontal jitter | Sharp horizontal noise lines | Display scanning errors |
| Noise | Per-channel random color injection with luminance gating | Analog static with color variation | Signal degradation, white noise |
Parameter Configuration
With ‘Intensity’ you can control the overall strength of the effect [0.0 - 1.0]. If it is 0, the effect will not be active.
- Strength [0.0 to 2.0]: Master multiplier applied to all six layers simultaneously. Default 1.0.
Frame Jump
Frame jump
Simulates vertical synchronization failure between the signal and the monitor.
| Parameter | Range | Default | Effect |
|---|---|---|---|
| Frame Jump | 0.0 to 1.0 | 0.1 | Intensity of the vertical rolling displacement |
| Frame Jump Speed | 0.0 to 10.0 | 1.0 | Speed of the vertical scroll animation |
Jitter
Jitter
Creates horizontal bands that slice the image with oscillating displacement.
| Parameter | Range | Default | Effect |
|---|---|---|---|
| Jitter | 0.0 to 5.0 | 1.0 | Horizontal displacement intensity of each band |
| Jitter Speed | 0.0 to 10.0 | 0.2 | Oscillation speed of the jitter displacement |
| Jitter Density | 0.0 to 50.0 | 15.0 | Number of horizontal bands across the screen |
Blocks
Blocks
Creates a multitude of blocks that deform the color channels with independent RGB displacement.
| Parameter | Range | Default | Effect |
|---|---|---|---|
| Blocks | 0.0 to 1.0 | 0.5 | Intensity of block-based channel displacement |
| Block Density | 0.0 to 50.0 | 10.0 | Number of blocks in the grid pattern |
| Block Aberration | Vector2 | (1.0, 1.0) | Per-axis chromatic aberration intensity within blocks |
| Block Noise | Vector2 | (0.5, 0.5) | Random position offset applied to block displacement |
Waves
Waves
Adds simplex noise-driven sine wave deformation that separates the color channels horizontally.
| Parameter | Range | Default | Effect |
|---|---|---|---|
| Waves | 0.0 to 1.0 | 1.0 | Intensity of the wave displacement |
| Wave Speed | 0.0 to 25.0 | 10.0 | Animation speed of the wave pattern |
| Wave RGB Split | 0.0 to 50.0 | 30.0 | Color channel separation distance within the wave |
Scanlines
Scanlines
Adds threshold-gated horizontal noise lines that create sharp, intermittent displacement.
| Parameter | Range | Default | Effect |
|---|---|---|---|
| Scanlines | 0.0 to 1.0 | 0.2 | Intensity of the scanline displacement |
| Scanlines Threshold | 0.0 to 1.0 | 0.8 | Activation threshold. Higher values produce fewer, sharper lines |
Noise
Noise
Creates classic analog noise with per-channel random color injection and occasional luminance desaturation.
| Parameter | Range | Default | Effect |
|---|---|---|---|
| Noise | 0.0 to 1.0 | 0.1 | Intensity of the analog noise overlay |
| Noise Speed | 0.0 to 1.0 | 0.1 | Temporal variation speed of the noise pattern |
Color Grading
Standard color correction parameters apply to the final output.
| Parameter | Range | Effect | Default |
|---|---|---|---|
| Brightness | -1.0 to 1.0 | Additive luminance offset | 0.0 |
| Contrast | 0.0 to 10.0 | Mid-tone contrast expansion | 1.0 |
| Gamma | 0.1 to 10.0 | Nonlinear tonal mapping (inverted) | 1.0 |
| Hue | 0.0 to 1.0 | Color wheel rotation | 0.0 |
| Saturation | 0.0 to 2.0 | Color intensity relative to luminance | 1.0 |
These operations follow standard image processing order: contrast expansion → hue rotation → gamma correction → saturation adjustment.
Runtime Control
The effect integrates with Unity’s Volume system for seamless runtime parameter modification. Access the HackedVolume component through the Volume Profile.
using UnityEngine;
using UnityEngine.Rendering;
using FronkonGames.Glitches.Hacked;

// ...

[SerializedField]
private VolumeProfile volumeProfile;

// ...

// Access the effect
if (volumeProfile.TryGet(out HackedVolume volume))
{
    // Enable/disable effect
    volume.intensity.value = 1.0f; // 0.0 = disabled

    // Master strength
    volume.strength.value = 1.5f;

    // Configure individual layers
    volume.frameJump.value = 0.2f;
    volume.frameJumpSpeed.value = 2.0f;

    volume.jitter.value = 1.5f;
    volume.jitterSpeed.value = 0.5f;
    volume.jitterDensity.value = 20.0f;

    volume.blocks.value = 0.6f;
    volume.blockDensity.value = 15.0f;
    volume.blockAberration.value = new Vector2(1.5f, 1.5f);
    volume.blockNoise.value = new Vector2(0.7f, 0.7f);

    volume.waves.value = 0.8f;
    volume.waveSpeed.value = 15.0f;
    volume.waveRGBSplit.value = 40.0f;

    volume.scanlines.value = 0.3f;
    volume.scanlinesThreshold.value = 0.7f;

    volume.noise.value = 0.15f;
    volume.noiseSpeed.value = 0.2f;

    // Apply color correction
    volume.contrast.value = 1.2f;
    volume.saturation.value = 0.8f;
}
For a more detailed example, check the code in the demo scene.
Performance Characteristics
The effect executes in a single render pass with O(1) per-pixel complexity. All six layers are evaluated sequentially within the same fragment shader, accumulating UV offsets before the final three-channel texture sampling.
Performance considerations:
- Pass Count: 1 blit pass.
- Texture Samples: 3 per pixel (one per RGB channel at independently displaced UV coordinates).
- Branching: 2 conditional branches (jitter band selection + noise luminance gating).
- Memory: No additional textures or compute buffers.
Preset Configurations
Subtle Intrusion
Suitable for background hacking events, surveillance feeds, or environmental storytelling.
Intensity: 0.3, Strength: 0.5
Frame Jump: 0.05, Frame Jump Speed: 0.5
Jitter: 0.3, Jitter Speed: 0.1, Jitter Density: 10.0
Blocks: 0.2, Block Density: 8.0, Block Aberration: (0.5, 0.5), Block Noise: (0.3, 0.3)
Waves: 0.3, Wave Speed: 5.0, Wave RGB Split: 15.0
Scanlines: 0.1, Scanlines Threshold: 0.9
Noise: 0.05, Noise Speed: 0.05
Full System Compromise
Creates severe hacking effects for dramatic sequences or critical story moments.
Intensity: 0.9, Strength: 1.8
Frame Jump: 0.3, Frame Jump Speed: 3.0
Jitter: 2.5, Jitter Speed: 0.5, Jitter Density: 25.0
Blocks: 0.8, Block Density: 20.0, Block Aberration: (2.0, 2.0), Block Noise: (0.8, 0.8)
Waves: 1.0, Wave Speed: 20.0, Wave RGB Split: 45.0
Scanlines: 0.4, Scanlines Threshold: 0.6
Noise: 0.2, Noise Speed: 0.2
🔨 Broken LCD
Simulates the visual artifacts of a physically damaged liquid crystal display, including dead pixel clusters, color bleeding, and screen fractures. The effect produces the distinctive blocky, high-contrast patterns seen when an LCD panel’s internal structure is compromised, cracked substrates, severed column drivers, or pressure-damaged cells.
The core algorithm uses an iterative hash-based cell fracture system. Screen coordinates are divided into a configurable grid, and each cell is processed through multiple complexity iterations using a 4-component hash function (Hash42). At each iteration, UV coordinates are warped by the hash output, accumulating multiplicative color corruption. A final threshold test separates “broken” regions from intact areas, with blend-mode compositing applied only to damaged zones.
Requisites
To ensure optimal performance and compatibility, your project must meet the following requirements:
- Unity: 6000.0.58f1 or higher.
- Universal RP: 17.0.3 or higher.
Instalation Guide
Step 1: Add Renderer Feature
The effect must be registered in your project’s URP configuration:
- Locate your Universal Renderer Data asset.
- Click Add Renderer Feature and select Fronkon Games > Glitches > Broken LCD.
Step 2: Configure the Volume
To apply the effect to your scene:
- Create a Volume component (Global or Local).
- In the Volume component, create or assign a Volume Profile.
- Click Add Override and select Fronkon Games > Glitches > Broken LCD.
- Enable the ‘Intensity’ parameter (and any others you wish to modify).
Facture Generation Pipeline
The effect processes each pixel through a multi-stage pipeline that separates the screen into damaged and intact regions, then composites them independently.
| Stage | Operation | Controlled By |
|---|---|---|
| Grid Division | Screen split into cells with aspect-ratio correction | Cells |
| UV Animation | Cell coordinates offset by time-driven hash | Speed |
| Iterative Fracture | N iterations of hash-based UV warping and color accumulation | Complexity, Density |
| Tilt Distortion | Horizontal shear applied to vertical coordinates | Tilt |
| Threshold Split | Broken vs. intact region classification via luminance length | Threshold |
| Compositing | Blend-mode mixing with offset sampling for broken areas | Blend, Offset, Broken Tint, Background Tint |
The iterative loop at the core alternates warp direction each iteration (s = -s * (1.1 + h.y)), producing organic zigzag fracture patterns rather than uniform grid distortion.
Parameter Configuration
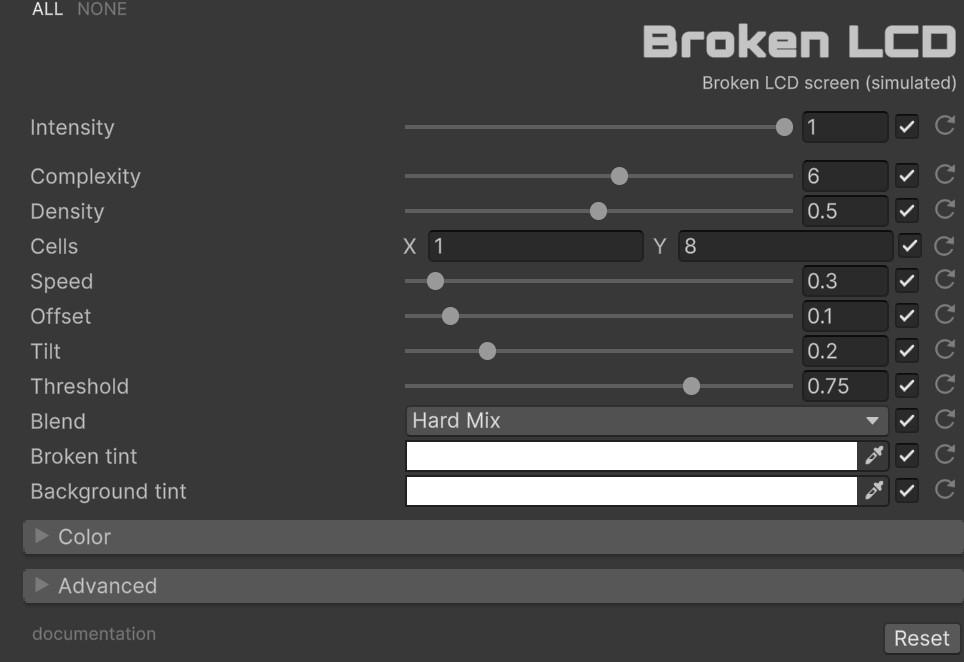
With ‘Intensity’ you can control the overall strength of the effect [0.0 - 1.0]. If it is 0, the effect will not be active.
The core parameters control the generation and appearance of LCD damage artifacts.
- Complexity [1 to 10]: Number of fracture iterations per pixel. Higher values produce finer, more detailed crack patterns at the cost of additional hash computations. Default 6.
- Density [0.0 to 1.0]: Controls the probability of color corruption at each iteration. Lower values leave more cells intact; higher values produce denser damage. Default 0.5.
- Cells [Vector2Int]: Number of grid divisions on each axis. The X component controls horizontal segmentation, Y controls vertical. Default (1, 8).
- Speed [0.0 to 5.0]: Frame rate of pattern change. Controls how quickly the fracture pattern animates over time. Default 0.3.
- Offset [0.0 to 1.0]: UV displacement applied when sampling the original image in broken regions. Creates the characteristic “shifted content” look of damaged displays. Default 0.1.
- Tilt [0.0 to 1.0]: Horizontal shear applied to the fracture pattern. Simulates angled crack lines across the display. Default 0.2.
- Threshold [0.0 to 1.0]: Activation limit that separates broken from intact regions. Lower values expand the damaged area; higher values restrict it. Default 0.75.
- Blend: Selects from 23 color blend modes (HardMix, Screen, Difference, etc.) for compositing broken regions. Default HardMix.
- Broken Tint: Color multiplier applied to damaged areas. Default White.
- Background Tint: Color multiplier applied to intact areas. Default White.
Color Grading
Standard color correction parameters apply to the final output.
| Parameter | Range | Effect | Default |
|---|---|---|---|
| Brightness | -1.0 to 1.0 | Additive luminance offset | 0.0 |
| Contrast | 0.0 to 10.0 | Mid-tone contrast expansion | 1.0 |
| Gamma | 0.1 to 10.0 | Nonlinear tonal mapping (inverted) | 1.0 |
| Hue | 0.0 to 1.0 | Color wheel rotation | 0.0 |
| Saturation | 0.0 to 2.0 | Color intensity relative to luminance | 1.0 |
These operations follow standard image processing order: contrast expansion → hue rotation → gamma correction → saturation adjustment.
Runtime Control
The effect integrates with Unity’s Volume system for seamless runtime parameter modification. Access the BrokenLCDVolume component through the Volume Profile.
using UnityEngine;
using UnityEngine.Rendering;
using FronkonGames.Glitches.BrokenLCD;

// ...

[SerializedField]
private VolumeProfile volumeProfile;

// ...

// Access the effect
if (volumeProfile.TryGet(out BrokenLCDVolume volume))
{
    // Enable/disable effect
    volume.intensity.value = 1.0f; // 0.0 = disabled

    // Configure fracture parameters
    volume.complexity.value = 8;
    volume.density.value = 0.6f;
    volume.cells.value = new Vector2Int(2, 10);
    volume.speed.value = 0.5f;
    volume.offset.value = 0.15f;
    volume.tilt.value = 0.3f;
    volume.threshold.value = 0.7f;
    volume.blend.value = ColorBlends.HardMix;
    volume.brokenTint.value = Color.white;
    volume.backgroundTint.value = new Color(0.9f, 0.9f, 1.0f);

    // Apply color correction
    volume.contrast.value = 1.2f;
    volume.saturation.value = 0.8f;
}
For a more detailed example, check the code in the demo scene.
Performance Characteristics
The effect executes in a single render pass. Per-pixel cost scales linearly with the Complexity parameter, as each iteration performs one Hash42 evaluation and UV warp.
Performance considerations:
- Pass Count: 1 blit pass.
- Texture Samples: 2 per pixel (original + offset-displaced sample in broken regions).
- Branching: Threshold split and density check use UNITY_BRANCH for coherent warp execution.
- Memory: No additional textures or compute buffers.
- Loop Cost: O(Complexity) hash evaluations per pixel (default 6).
Preset Configurations
Subtle Compression
Suitable for aged electronics, slightly cracked screens, or environmental storytelling.
Intensity: 0.3, Complexity: 4, Density: 0.3, Cells: (1, 6)
Speed: 0.1, Offset: 0.05, Tilt: 0.1, Threshold: 0.85
Blend: HardMix, Broken Tint: White, Background Tint: White
Shattered Display
Creates severe LCD destruction for dramatic impact or horror sequences.
Intensity: 0.9, Complexity: 10, Density: 0.8, Cells: (3, 12)
Speed: 0.5, Offset: 0.25, Tilt: 0.4, Threshold: 0.5
Blend: Difference, Broken Tint: (1, 0.8, 0.8), Background Tint: (0.7, 0.7, 0.9)👁️🗨️ Color Blindness
Accurately replicates how people with different types of color vision deficiency perceive the world, making it an essential tool for accessibility testing and artistic expression. The effect applies a 3×3 color transformation matrix to each pixel, mathematically remapping the RGB color space to simulate the reduced or absent cone response characteristic of each deficiency type.
The shader computes three dot products (one per output channel) between the input RGB values and the deficiency-specific coefficient vectors. This linear transformation preserves luminance relationships while collapsing the color dimensions that the affected cone type cannot distinguish. The built-in comparator splits the screen with a configurable dividing bar, enabling direct side-by-side comparison between normal and simulated vision.
Requisites
To ensure optimal performance and compatibility, your project must meet the following requirements:
- Unity: 6000.0.58f1 or higher.
- Universal RP: 17.0.3 or higher.
Instalation Guide
Step 1: Add Renderer Feature
The effect must be registered in your project’s URP configuration:
- Locate your Universal Renderer Data asset.
- Click Add Renderer Feature and select Fronkon Games > Glitches > Color Blindness.
Step 2: Configure the Volume
To apply the effect to your scene:
- Create a Volume component (Global or Local).
- In the Volume component, create or assign a Volume Profile.
- Click Add Override and select Fronkon Games > Glitches > Color Blindness.
- Enable the ‘Intensity’ parameter (and any others you wish to modify).
Supported Deficiency Types
The core of the simulation is the Deficiency parameter, which selects from eight scientifically-modeled color vision conditions.
| Deficiency | Type | Affected Colors | Prevalence |
|---|---|---|---|
| Protanomaly | Anomalous trichromacy | Red-green (reduced red sensitivity) | 1% males, 0.03% females |
| Deuteranomaly | Anomalous trichromacy | Red-green (reduced green sensitivity) | 6% males, 0.4% females |
| Tritanomaly | Anomalous trichromacy | Blue-yellow (reduced blue sensitivity) | 0.01% population |
| Protanopia | Dichromacy | Reds greatly reduced | 1% males, 0.02% females |
| Deuteranopia | Dichromacy | Greens greatly reduced | 1% males |
| Tritanopia | Dichromacy | Blues greatly reduced | 0.003% population |
| Achromatopsia | Monochromacy | Total color blindness | 0.001% population |
| Achromatomaly | Partial monochromacy | Partial color blindness | 0.00001% population |
Parameter Configuration
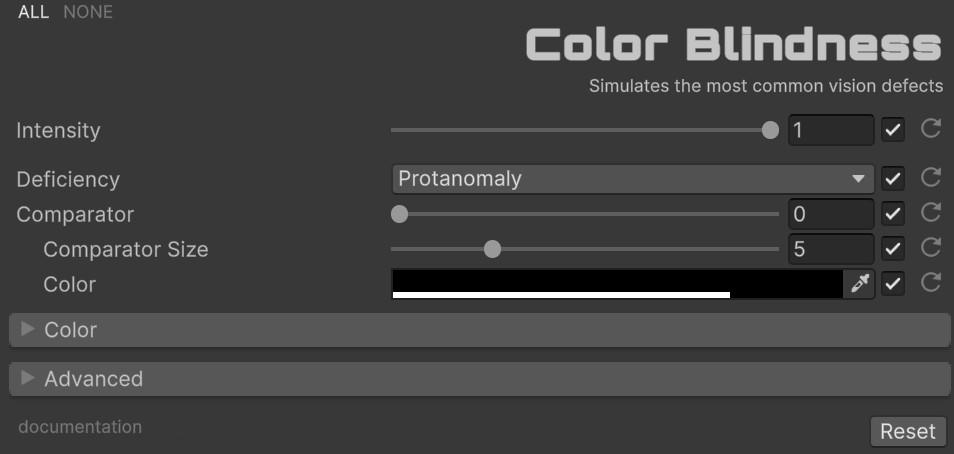
With ‘Intensity’ you can control the overall strength of the effect [0.0 - 1.0]. If it is 0, the effect will not be active.
Simulation Parameters
| Parameter | Range | Default | Effect |
|---|---|---|---|
| Deficiency | Enum (8 types) | Protanomaly | Selects the color vision condition to simulate |
Comparator Parameters
The built-in comparator splits the screen to allow direct side-by-side comparison between normal vision (left) and simulated deficiency (right).
| Parameter | Range | Default | Effect |
|---|---|---|---|
| Comparator | 0.0 to 1.0 | 0.0 | Screen split position. 0 = full deficiency view, 1 = full normal view |
| Comparator Size | 0 to 20 | 5 | Width of the dividing bar in pixels |
| Comparator Color | Color | (0, 0, 0, 0.75) | Color and opacity of the dividing bar |
Color Grading
Standard color correction parameters apply to the final output.
| Parameter | Range | Effect | Default |
|---|---|---|---|
| Brightness | -1.0 to 1.0 | Additive luminance offset | 0.0 |
| Contrast | 0.0 to 10.0 | Mid-tone contrast expansion | 1.0 |
| Gamma | 0.1 to 10.0 | Nonlinear tonal mapping (inverted) | 1.0 |
| Hue | 0.0 to 1.0 | Color wheel rotation | 0.0 |
| Saturation | 0.0 to 2.0 | Color intensity relative to luminance | 1.0 |
These operations follow standard image processing order: contrast expansion → hue rotation → gamma correction → saturation adjustment.
Runtime Control
The effect integrates with Unity’s Volume system for seamless runtime parameter modification. Access the ColorBlindnessVolume component through the Volume Profile.
using UnityEngine;
using UnityEngine.Rendering;
using FronkonGames.Glitches.ColorBlindness;

// ...

[SerializedField]
private VolumeProfile volumeProfile;

// ...

// Access the effect
if (volumeProfile.TryGet(out ColorBlindnessVolume volume))
{
    // Enable/disable effect
    volume.intensity.value = 1.0f; // 0.0 = disabled

    // Select deficiency type
    volume.deficiency.value = ColorBlindness.Deficiency.Deuteranopia;

    // Configure comparator for testing
    volume.comparator.value = 0.5f; // Split screen in half
    volume.comparatorSize.value = 3;
    volume.comparatorColor.value = new Color(0.0f, 0.0f, 0.0f, 0.9f);

    // Apply color correction
    volume.contrast.value = 1.0f;
    volume.saturation.value = 1.0f;
}
For a more detailed example, check the code in the demo scene.
Performance Characteristics
The effect executes in a single render pass with O(1) per-pixel complexity. The color transformation uses three dot products (one per channel) with no branching in the main path.
Performance considerations:
- Pass Count: 1 blit pass.
- Texture Samples: 1 per pixel.
- Branching: 1 conditional branch (comparator split position check).
- Memory: No additional textures or compute buffers.
- ALU: 3 dot products + standard color grading operations.
Preset Configurations
Accessibility Testing
Use the comparator to quickly verify your game’s readability under the most common deficiency.
Intensity: 1.0, Deficiency: Deuteranomaly
Comparator: 0.5, Comparator Size: 3, Comparator Color: (0, 0, 0, 0.9)
Artistic Desaturation
Use Achromatopsia with partial intensity for a stylized desaturated look.
Intensity: 0.6, Deficiency: Achromatopsia
Comparator: 0.0
Contrast: 1.3, Gamma: 0.9
F.A.Q.
Effect Not appearing
If the effect doesn’t appear in your scene:
- Verify Renderer Feature: Check that the renderer feature is added to your Universal Renderer Data asset.
- Check Volume Profile: Ensure a Volume component exists in your scene with the effect override enabled.
- Confirm Intensity: Verify that the Intensity parameter is set to a value greater than 0.0 and enabled.
- Camera Settings: Check that your camera has Post Processing enabled in the Camera component.
How to make the effect also affect the UI?
In order for the UI not to be affected by the effect, you should set the ‘Render Mode’ of your canvas from ‘Screen Space - Overlay’ to ‘Screen Space - Camera’ and dragging your camera with to ‘Render Camera’.
Note that when you make this change, the coordinates of your UI will be in camera space, so you will have to change them.
When Bloom is added, its intensity is too low or the effect stops working.
Bloom’s URP Unity effect is not compatible with postprocessing effects based on ScriptableRendererFeature (like this one).
You will have to add your own one based on ScriptableRendererFeature or you can use this one at no cost ;)
Can I use it in a material?
Yes! Any effect can easily be used on a material. Just follow these steps:
- In the ‘Project’ window, open the ‘Create’ menu with the right mouse button and select ‘Create > Render Texture’.
- Create a new camera and in ‘Output Texture’ select the Render Texture previously created. Remember to activate ‘Post Processing’ and select in ‘Renderer’ where you have the effect added.
- In the material you want to use, select in ‘Base Map’ the Render Texture.
Support
Do you have any problem or any suggestions? Send me an email to fronkongames@gmail.com and I’ll be happy to help you.
Remember that if you want to inform me of an error, it would help me if you sent to me the log file.
If you are happy with this asset, consider write a review in the store
❤️ thanks! ❤️
If you are happy with this asset, consider write a review in the store
❤️ thanks! ❤️